The Servo Book
Servo is a web browser engine written in the Rust programming language, and currently developed for following platforms:
- 64-bit Linux
- 64-bit macOS
- 64-bit Windows
- Android
- OpenHarmony
Work is still ongoing to make Servo consumable as a webview library. Currently, the recommended way to run Servo as a browser is via servoshell, our winit and egui-based demo browser. If you’d like to embed Servo in your own application, consider using tauri-runtime-verso, a custom Tauri runtime, or servo-gtk, a GTK4-based web browser widget.
This book will be your guide to building and running servoshell, hacking on and contributing to Servo, the architecture of Servo, and how to consume Servo and its libraries.
This book is a work in progress! In the table of contents, * denotes chapters that were recently added or imported from older docs, and still need to be copyedited or reworked.
Contributions are always welcome. Click the pencil button in the top right of each page to propose changes, or go to servo/book for more details.
Need help?
Join the Servo Zulip if you have any questions. Everyone is welcome!
Getting servoshell
The Servo project ships a small test browser called servoshell, which allows testing Servo. servoshell is not a fully fledged browser, but is meant as a way to see how Servo works on your system and to run tests. You can download the latest prebuilt version of servoshell from the Downloads section on our website. You can also download servoshell using the links below:
- Windows Installer (sha256)
- Windows ZIP (sha256)
- macOS (x86) (sha256)
- macOS (AArch64) (sha256)
- Linux (x86) (sha256)
- Android (AArch64) (sha256)
- OpenHarmony (AAarch64) (sha256)
Older nightly releases are available in the servo/servo-nightly-builds repo.
Running servoshell
Assuming you’re in the directory containing servo, you can run servoshell with:
$ ./servo [url] [options]
Use --help to list the available command line options:
$ ./servo --help
Enabling experimental web platform features
Servo has in-progress support for many web platform features.
Some are not complete enough to be enabled by default, but you can try them out using a preference setting.
For a list of these features and the preference used to enable them, see Experimental features.
In addition, you can enable a useful subset of these features with the --enable-experimental-web-platform-features command-line argument or via the servoshell user interface.
Keyboard shortcuts
- Ctrl+
Q(⌘Q on macOS) exits servoshell - Ctrl+
L(⌘L on macOS) focuses the location bar - Ctrl+
R(⌘R on macOS) reloads the page - Alt+
←(⌘← on macOS) goes back in history - Alt+
→(⌘→ on macOS) goes forward in history - Ctrl+
=(⌘= on macOS) increases the page zoom - Ctrl+
-(⌘- on macOS) decreases the page zoom - Ctrl+
0(⌘0 on macOS) resets the page zoom - Esc exits fullscreen mode
Troubleshooting
servoshell should run on most systems without any need to install dependencies. If you are on Linux and servoshell reports that a shared library is missing, ensure that you have the following packages installed:
GStreamer≥ 1.18gst-plugins-base≥ 1.18gst-plugins-good≥ 1.18gst-plugins-bad≥ 1.18gst-plugins-ugly≥ 1.18libXcursorlibXrandrlibXilibxkbcommonvulkan-loader
Getting the code
To make changes to Servo or build servoshell yourself, clone the main repo with Git:
$ git clone https://github.com/servo/servo.git
$ cd servo
Servo’s repository is pretty big! If you have an unreliable network connection or limited disk space, consider making a shallow clone.
Once you’ve cloned the Servo source code, the next step is to install dependencies and build Servo.
Building Servo
This page contains more detailed information about building Servo. You might want to skip straight to instructions for building Servo on your system:
mach
You need to use mach to build Servo.
mach is a Python program that does plenty of things to make working on Servo easier, like building and running Servo, running tests, and updating dependencies.
Windows users: you will need to replace ./mach with .\mach in the commands in this book if you are using cmd.
Use --help to list the subcommands, or get help with a specific subcommand:
$ ./mach --help
$ ./mach build --help
When you use mach to run another program, such as servoshell, that program may have its own options with the same names as mach options.
You can use --, surrounded by spaces, to tell mach not to touch any subsequent options and leave them for the other program.
$ ./mach run --help         # Gets help for `mach run`.
$ ./mach run -d --help      # Still gets help for `mach run`.
$ ./mach run -d -- --help   # Gets help for the debug build of servoshell.
This also applies to the Servo unit tests, where there are three layers of options: mach options, cargo test options, and libtest options.
$ ./mach test-unit --help           # Gets help for `mach test-unit`.
$ ./mach test-unit -- --help        # Gets help for `cargo test`.
$ ./mach test-unit -- -- --help     # Gets help for the test harness (libtest).
Work is ongoing to make it possible to build Servo without mach. Where possible, consider whether you can use native Cargo functionality before adding new functionality to mach.
Build profiles
There are three main build profiles, which you can build and use independently of one another:
- debug builds, which allow you to use a debugger (lldb) (selected by default if no profile is passed)
- release builds, which are slower to build but more performant
- production builds, which are used for official releases only
| debug | release | production | |
|---|---|---|---|
| mach option | -d |
-r |
--prod |
| optimised? | no | yes | yes, more than in release |
| maximum RUST_LOG level | trace |
info |
info |
| debug assertions? | yes | yes(!) | no |
| debug info? | yes | no | no |
| symbols? | yes | no | yes |
| finds resources in current working dir? |
yes | yes | no(!) |
There are also two special variants of production builds for performance-related use cases:
production-strippedbuilds are ideal for benchmarking Servo over time, with debug symbols stripped for faster initial startupprofilingbuilds are ideal for profiling and troubleshooting performance issues; they behave like a debug or release build, but have the same performance as a production build
| production | production-stripped | profiling | |
|---|---|---|---|
mach --profile |
production |
production-stripped |
profiling |
| debug info? | no | no | yes |
| symbols? | yes | no | yes |
| finds resources in current working dir? |
no | no | yes(!) |
You can change these settings in a servobuild file (see servobuild.example) or in the root Cargo.toml.
Optional build settings
Some build settings can only be enabled manually:
- AddressSanitizer builds are enabled with
./mach build --with-asan - ThreadSanitizer builds are enabled with
./mach build --with-tsan - crown linting is recommended when hacking on DOM code, and is enabled with
./mach build --use-crown - SpiderMonkey debug builds are enabled with
./mach build --debug-mozjs, or[build] debug-mozjs = truein your servobuild file
A full list of arguments can be seen by running ./mach build --help.
Running servoshell
When you build it yourself, servoshell will be in target/debug/servo or target/release/servo.
You can run it directly as shown above, but we recommend using mach instead.
To run servoshell with mach, replace ./servo with ./mach run -d -- or ./mach run -r --, depending on the build profile you want to run.
For example, both of the commands below run the debug build of servoshell with the same options:
$ target/debug/servo https://demo.servo.org
$ ./mach run -d -- https://demo.servo.org
Building for Linux
- Install
curl:- Arch:
sudo pacman -S --needed curl - Debian, Ubuntu:
sudo apt install curl - Fedora:
sudo dnf install curl - Gentoo:
sudo emerge net-misc/curl
- Arch:
- Install
uv:curl -LsSf https://astral.sh/uv/install.sh | sh - Install
rustup:curl --proto '=https' --tlsv1.2 -sSf https://sh.rustup.rs | sh - Restart your shell to make sure
cargois available - Install the other dependencies:
./mach bootstrap - Build servoshell:
./mach build
Unsupported Distributions
If ./mach boostrap reports that your distribution is unsupported, then you will need to install dependencies manually.
Below you will find instructions for installing build dependencies on a variety of types of distributions.
If your distribution is not listed, it’s recommended that you try to adapt the list for the package names on your system.
Updates to this list are very welcome!
Arch and Manjaro
-
sudo pacman -S --needed curl -
sudo pacman -S --needed base-devel git mesa cmake libxmu pkg-config ttf-fira-sans harfbuzz ccache llvm clang autoconf2.13 gstreamer gstreamer-vaapi gst-plugins-base gst-plugins-good gst-plugins-bad gst-plugins-ugly vulkan-icd-loader wireshark-cli
Debian-like
(including elementary OS, KDE neon, Linux Mint, Pop!_OS, Raspbian, TUXEDO OS, Ubuntu)
sudo apt install curl
sudo apt install build-essential ca-certificates ccache clang cmake curl g++ git gperf gstreamer1.0-libav gstreamer1.0-plugins-bad gstreamer1.0-plugins-base gstreamer1.0-plugins-good gstreamer1.0-plugins-ugly gstreamer1.0-tools libdbus-1-dev libegl1-mesa-dev libfreetype6-dev libges-1.0-dev libgl1-mesa-dri libgles2-mesa-dev libglib2.0-dev libgstreamer-plugins-bad1.0-dev libgstreamer-plugins-base1.0-dev libgstrtspserver-1.0-dev libharfbuzz-dev liblzma-dev libudev-dev libunwind-dev libvulkan1 libx11-dev libxcb-render0-dev libxcb-shape0-dev libxcb-xfixes0-dev libxkbcommon-x11-0 libxkbcommon0 libxmu-dev libxmu6 llvm-dev m4 xorg-dev
Note: For Ubuntu-based distributions, ensure that you also include the libgstreamer-plugins-good1.0-dev package alongside the packages listed above.
Fedora-like
sudo dnf install cabextract ccache clang clang-libs cmake dbus-devel expat-devel fontconfig-devel freetype-devel gcc-c++ glib2-devel gperf gstreamer1-devel gstreamer1-plugins-bad-free-devel gstreamer1-plugins-base-devel gstreamer1-plugins-good gstreamer1-plugins-ugly-free harfbuzz-devel libjpeg-turbo libjpeg-turbo-devel libtool libunwind-devel libX11-devel libXcursor-devel libXi-devel libxkbcommon libxkbcommon-x11 libXmu-devel libXrandr-devel llvm mesa-libEGL-devel mesa-libGL-devel ncurses-devel python3-devel rpm-build ttmkfdir vulkan-loader zlib-ng
Gentoo-like
sudo emerge net-misc/curl media-libs/freetype media-libs/mesa dev-util/gperf dev-libs/openssl media-libs/harfbuzz dev-util/ccache sys-libs/libunwind x11-libs/libXmu x11-base/xorg-server sys-devel/clang media-libs/gstreamer media-libs/gst-plugins-base media-libs/gst-plugins-good media-libs/gst-plugins-bad media-libs/gst-plugins-ugly media-libs/vulkan-loader
openSUSE
sudo zypper install libX11-devel libexpat-devel Mesa-libEGL-devel Mesa-libGL-devel cabextract cmake dbus-1-devel fontconfig-devel freetype-devel gcc-c++ git glib2-devel gperf harfbuzz-devel libXcursor-devel libXi-devel libXmu-devel libXrandr-devel libopenssl-devel rpm-build ccache llvm-clang libclang autoconf213 gstreamer-devel gstreamer-plugins-base-devel gstreamer-plugins-good gstreamer-plugins-bad-devel gstreamer-plugins-ugly vulkan-loader libvulkan1
Void Linux
sudo xbps-install bzip2-devel cabextract ccache clang cmake cmake dbus-devel expat-devel fontconfig-devel freetype-devel gcc glib-devel glu-devel gperf gst-plugins-bad1-devel gst-plugins-base1-devel gst-plugins-good1 gst-plugins-ugly1 gstreamer1-devel harfbuzz-devel libtool libunwind-devel libX11-devel libXcursor-devel libXi-devel libxkbcommon libxkbcommon-x11 libXmu-devel libXrandr-devel MesaLib-devel ncurses-devel pkg-config vulkan-loader
Troubleshooting
Be sure to look at the General Troubleshooting section if you have trouble with your build and your problem is not listed below.
build: /lib/x86_64-linux-gnu/libc.so.6: version `GLIBC_2.39' not found
This workaround is applicable when building Servo using nix in Linux distributions other than NixOS.
The error indicates that the version of glibc included in the distribution is older than the one in nixpkgs.
At the end of the shell.nix, change the line if ! [ -e /etc/NIXOS ]; then to if false; then to disable the support in shell.nix for producing binary artifacts that don’t depend on the nix store.
Building for macOS
- Download and install Xcode and
brew. - Install
uv:curl -LsSf https://astral.sh/uv/install.sh | sh - Install
rustup:curl --proto '=https' --tlsv1.2 -sSf https://sh.rustup.rs | sh - Restart your shell to make sure
cargois available - Install the other dependencies:
./mach bootstrap - Build servoshell:
./mach build
Troubleshooting
Be sure to look at the General Troubleshooting section if you have trouble with your build.
Building for Windows
- Download
uv, andrustup- Be sure to select Quick install via the Visual Studio Community installer
- Ensure that
wingetis available. It should be preinstalled on Windows 10 1809+ and Windows 11, otherwise can bemanually installed. - In the Visual Studio Installer, ensure the following components are installed:
- Windows 10/11 SDK (anything >= 10.0.19041.0) (
Microsoft.VisualStudio.Component.Windows{10, 11}SDK.{>=19041}) - MSVC v143 - VS 2022 C++ x64/x86 build tools (Latest) (
Microsoft.VisualStudio.Component.VC.Tools.x86.x64) - C++ ATL for latest v143 build tools (x86 & x64) (
Microsoft.VisualStudio.Component.VC.ATL)
- Windows 10/11 SDK (anything >= 10.0.19041.0) (
- Restart your shell to make sure
cargois available - Install the other dependencies:
.\mach bootstrap - Build servoshell:
.\mach build
We don’t recommend having more than one version of Visual Studio installed. Servo will try to search for the appropriate version of Visual Studio, but having only a single version installed means fewer things can go wrong.
Troubleshooting
Be sure to look at the General Troubleshooting section if you have trouble with your build and your problem is not listed below.
Cannot run mach in a path on a case-sensitive file system on Windows.
- Open a command prompt or PowerShell as administrator (Win+X, A)
- Disable case sensitivity for your Servo repo:
fsutil file SetCaseSensitiveInfo X:\path\to\servo disable
Could not find DLL dependency: api-ms-win-crt-runtime-l1-1-0.dllDLL file `api-ms-win-crt-runtime-l1-1-0.dll` not found!
Find the path to Redist\ucrt\DLLs\x64\api-ms-win-crt-runtime-l1-1-0.dll, e.g. C:\Program Files (x86)\Windows Kits\10\Redist\ucrt\DLLs\x64\api-ms-win-crt-runtime-l1-1-0.dll.
Then set the WindowsSdkDir environment variable to the path that contains Redist, e.g. C:\Program Files (x86)\Windows Kits\10.
thread 'main' panicked at 'Unable to find libclang: "couldn\'t find any valid shared libraries matching: [\'clang.dll\', \'libclang.dll\'], set the `LIBCLANG_PATH` environment variable to a path where one of these files can be found (invalid: [(C:\\Program Files\\LLVM\\bin\\libclang.dll: invalid DLL (64-bit))])"', C:\Users\me\.cargo\registry\src\...
rustup may have been installed with the 32-bit default host, rather than the 64-bit default host needed by Servo.
Check your default host with rustup show, then set the default host:
> rustup set default-host x86_64-pc-windows-msvc
ERROR: GetShortPathName returned a long path name: `C:/PROGRA~2/Windows Kits/10/`. Use `fsutil file setshortname' to create a short name for any components of this path that have spaces.
SpiderMonkey (mozjs) requires 8.3 filenames to be enabled on Windows (#26010).
- Open a command prompt or PowerShell as administrator (Win+X, A)
- Enable 8.3 filename generation:
fsutil behavior set disable8dot3 0 - Uninstall and reinstall whatever contains the failing paths, such as Visual Studio or the Windows SDK — this is easier than adding 8.3 filenames by hand
= note: lld-link: error: undefined symbol: __std_search_1
>>> referenced by D:\a\mozjs\mozjs\mozjs-sys\mozjs\intl\components\src\NumberFormatterSkeleton.cpp:157
Issues like this can occur when mozjs is upgraded, as the update may depend on newer MSVC (remember we require “Latest” in set up your environment!). To resolve it, launch the Visual Studio Installer and apply all available updates.
Building for NixOS
- Install Nix, the package manager. The easiest way is to use the installer, with either the multi-user or single-user installation (your choice).
- Tell
machto use Nix:export MACH_USE_NIX= - Type
nix-shellto enter a shell with all of the necessary tools and dependencies. - Install the other dependencies:
./mach bootstrap - Build servoshell:
./mach build
Troubleshooting
Be sure to look at the General Troubleshooting section if you have trouble with your build and your problem is not listed below.
error: getting status of /nix/var/nix/daemon-socket/socket: Permission denied
If you get this error and you’ve installed Nix with your system package manager:
- Add yourself to the
nix-usersgroup - Log out and log back in
error: file 'nixpkgs' was not found in the Nix search path (add it using $NIX_PATH or -I)
This error is harmless, but you can fix it as follows:
- Run
sudo nix-channel --add https://nixos.org/channels/nixpkgs-unstable nixpkgs - Run
sudo nix-channel --update
Building on WSL
Servo can be built on WSL as if you are building on any other Linux distribution. To run non-headless servo shell on WSL, you will most likely need to be on Windows 10 Build 19044+ or Windows 11 as access to WSL v2 is needed for GUI.
- Setup WSL v2. See Microsoft’s guidelines for setting up GUI apps in WSL.
- Follow the instructions for building and running Servo on the WSL distribution that you are using (e.g. Ubuntu, OpenSuse, etc.)
WSL v2 has the corresponding adaptors to display Wayland and X11 applications, though it may not always work out of the box with Servo.
Troubleshooting
Be sure to look at the General Troubleshooting section if you have trouble with your build and your problem is not listed below.
Failed to create event loop
If you encounter an immediate crash after running that points to winit and its platform implementation, setting WAYLAND_DISPLAY='' stops the crash.
Failed to create events loop: Os(OsError { line: 81, file: "/home/astra/.cargo/registry/src/index.crates.io-1949cf8c6b5b557f/winit-0.30.9/src/platform_impl/linux/wayland/event_loop/mod.rs", error: WaylandError(Connection(NoCompositor)) }) (thread main, at ports/servoshell/desktop/cli.rs:34)
   0: servoshell::backtrace::print
             at /home/astra/workspace/servo/ports/servoshell/backtrace.rs:18:5
  ...
  18: main
  19: <unknown>
  20: __libc_start_main
  21: _start
Servo was terminated by signal 11
Either export the variable, or set it before running:
export WAYLAND_DISPLAY=''
./mach run

# or

WAYLAND_DISPLAY='' ./mach run

# optionally save the variable long term to your .bashrc profile

echo 'export WAYLAND_DISPLAY=""' >> ~/.bashrc
Library libxkbcommon-x11.so could not be loaded
This may happen because your distro have not installed the required library. Run the following command (assuming you are using WSL Debian/Ubuntu, adjust accordingly if you use other distro):
sudo apt install libxkbcommon-x11-0
error: failed to run build command...
if you encounter an error like below while running ./mach build on WSL, it is possibly caused by out of memory (OOM) error because your WSL does not have enough RAM to build servo.
You will need to increase memory usage limit and swapfile on WSL, or upgrade your RAM to fix it.
yourusername@PC:~/servo$ ./mach build
No build type specified so assuming `--dev`.
Building `debug` build with crown disabled (no JS garbage collection linting).
   ...
   Compiling script v0.0.1 (/home/yourusername/servo/components/script)

error: failed to run build command...

Caused by:
  process didn't exit successfully: `/home/yourusername/.rustup/toolchains/1.91.0-x86_64-unknown-linux-gnu/bin/rustc --crate-name script --edition=2024 components/script/lib.rs...
  ...
warning: build failed, waiting for other jobs to finish...
Create C:/user/yourusername/.wslconfig then insert the following:
[wsl2]
memory=6GB
swap=16GB
swapfile=C:\\Users\\yourusername\\swapfile.vhdx
Save the file and restart WSL on powershell:
wsl --shutdown
Building for Android
- Ensure that the following environment variables are set:
ANDROID_SDK_ROOTANDROID_NDK_ROOT:$ANDROID_SDK_ROOT/ndk/28.2.13676358/ANDROID_SDK_ROOTcan be any directory (such as~/android-sdk). All of the Android build dependencies will be installed there.
- Install the latest version of the Android command-line tools to
$ANDROID_SDK_ROOT/cmdline-tools/latest. - Run the following command to install the necessary components:
sudo $ANDROID_SDK_ROOT/cmdline-tools/latest/bin/sdkmanager --install \ "build-tools;36.0.0" \ "emulator" \ "ndk;28.2.13676358" \ "platform-tools" \ "platforms;android-37" \ "system-images;android-37;google_apis;arm64-v8a" - Run
./mach build --android
Note: This will install dependencies and build Servo for the aarch64-linux-android platform.
In order to build Servo for other Android targets, ensure that you install the appropriate system images via sdkmanager and pass --target with a Rust compatible target to mach when building instead of --android.
Note: If you are not using Android Studio on macOS, you will need to install a JDK.
Use brew install opendjdk@21 to install a usable version; newer versions cause java.lang.IllegalArgumentException: 25 when running the gradle build step during the Servo build.
Note: If you are using Nix, you don’t need to install the tools or set up the ANDROID_SDK_ROOT and ANDROID_NDK_ROOT environment variables manually.
Simply enable the Android build support running:
export SERVO_ANDROID_BUILD=1
in the shell session before invoking ./mach commands
Building with Android Studio
It’s recommended to build Servo via the command-line for Android, but you can also build it using Android Studio, if you prefer to use the Android IDE.
- Install Android Studio by downloading the appropriate version from the official website and following the installation instructions.
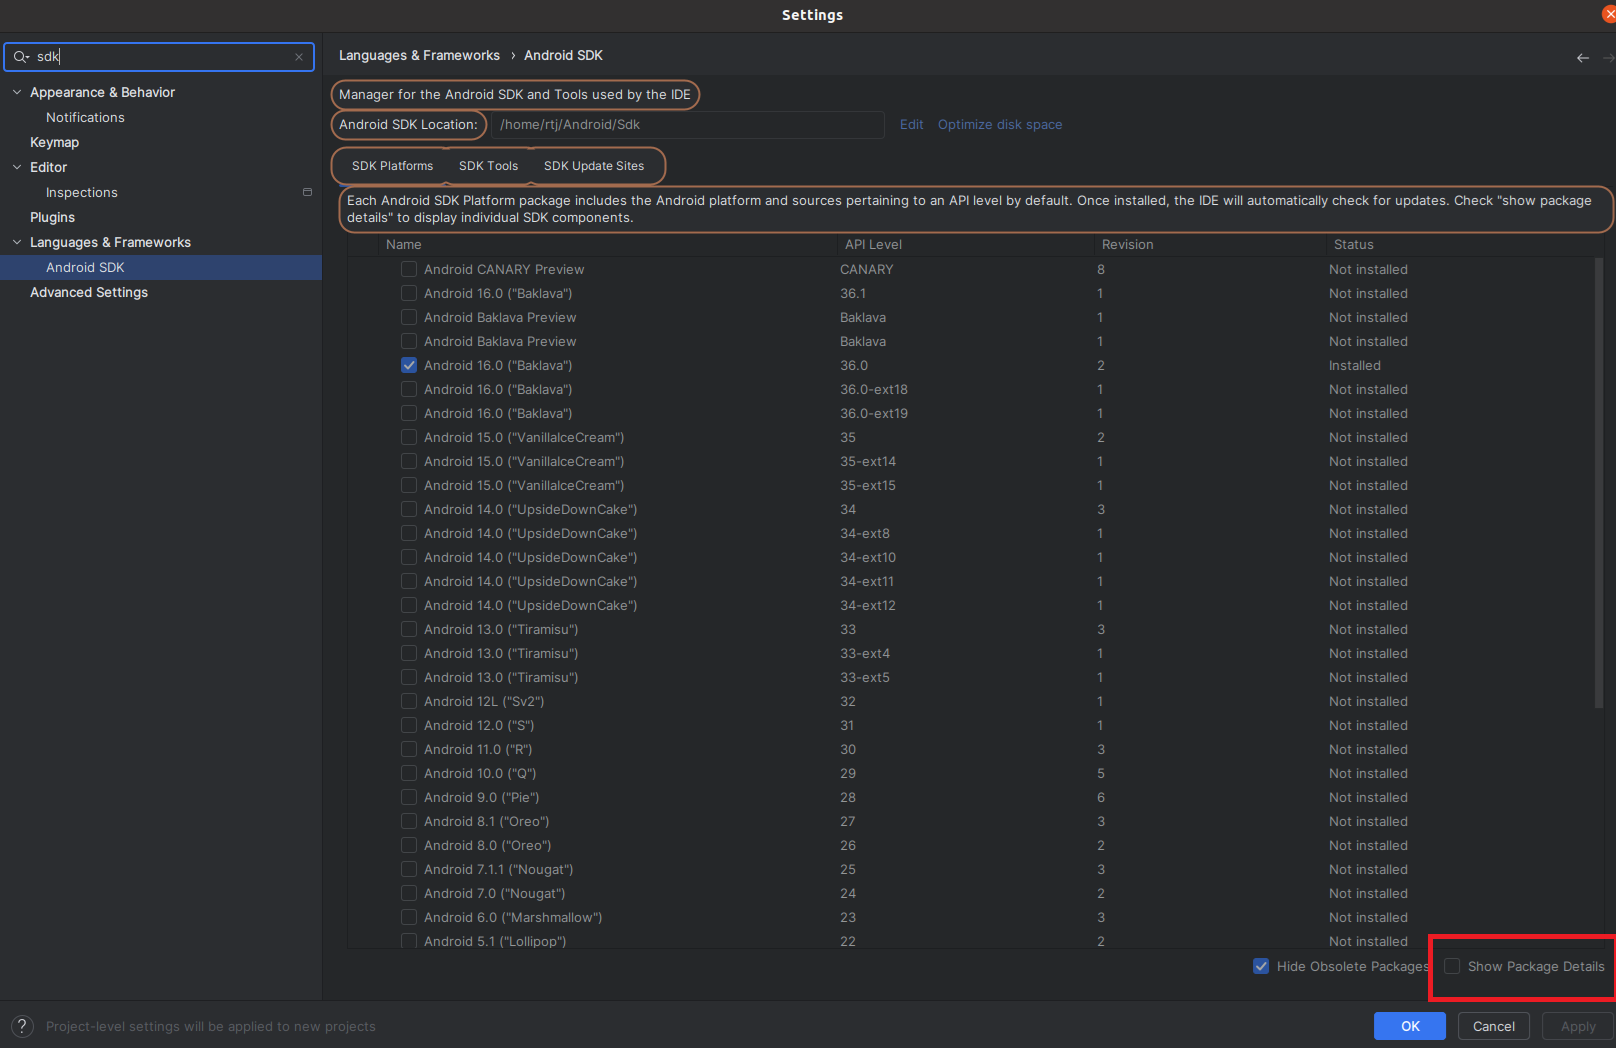
- In order to install additional tools run Android Studio, go to Settings and type
sdkon the search bar. - Select the SDK:
- Click Android SDK`
- Navigate to SDK Tools
- Check Android SDK Command-line tools (latest):
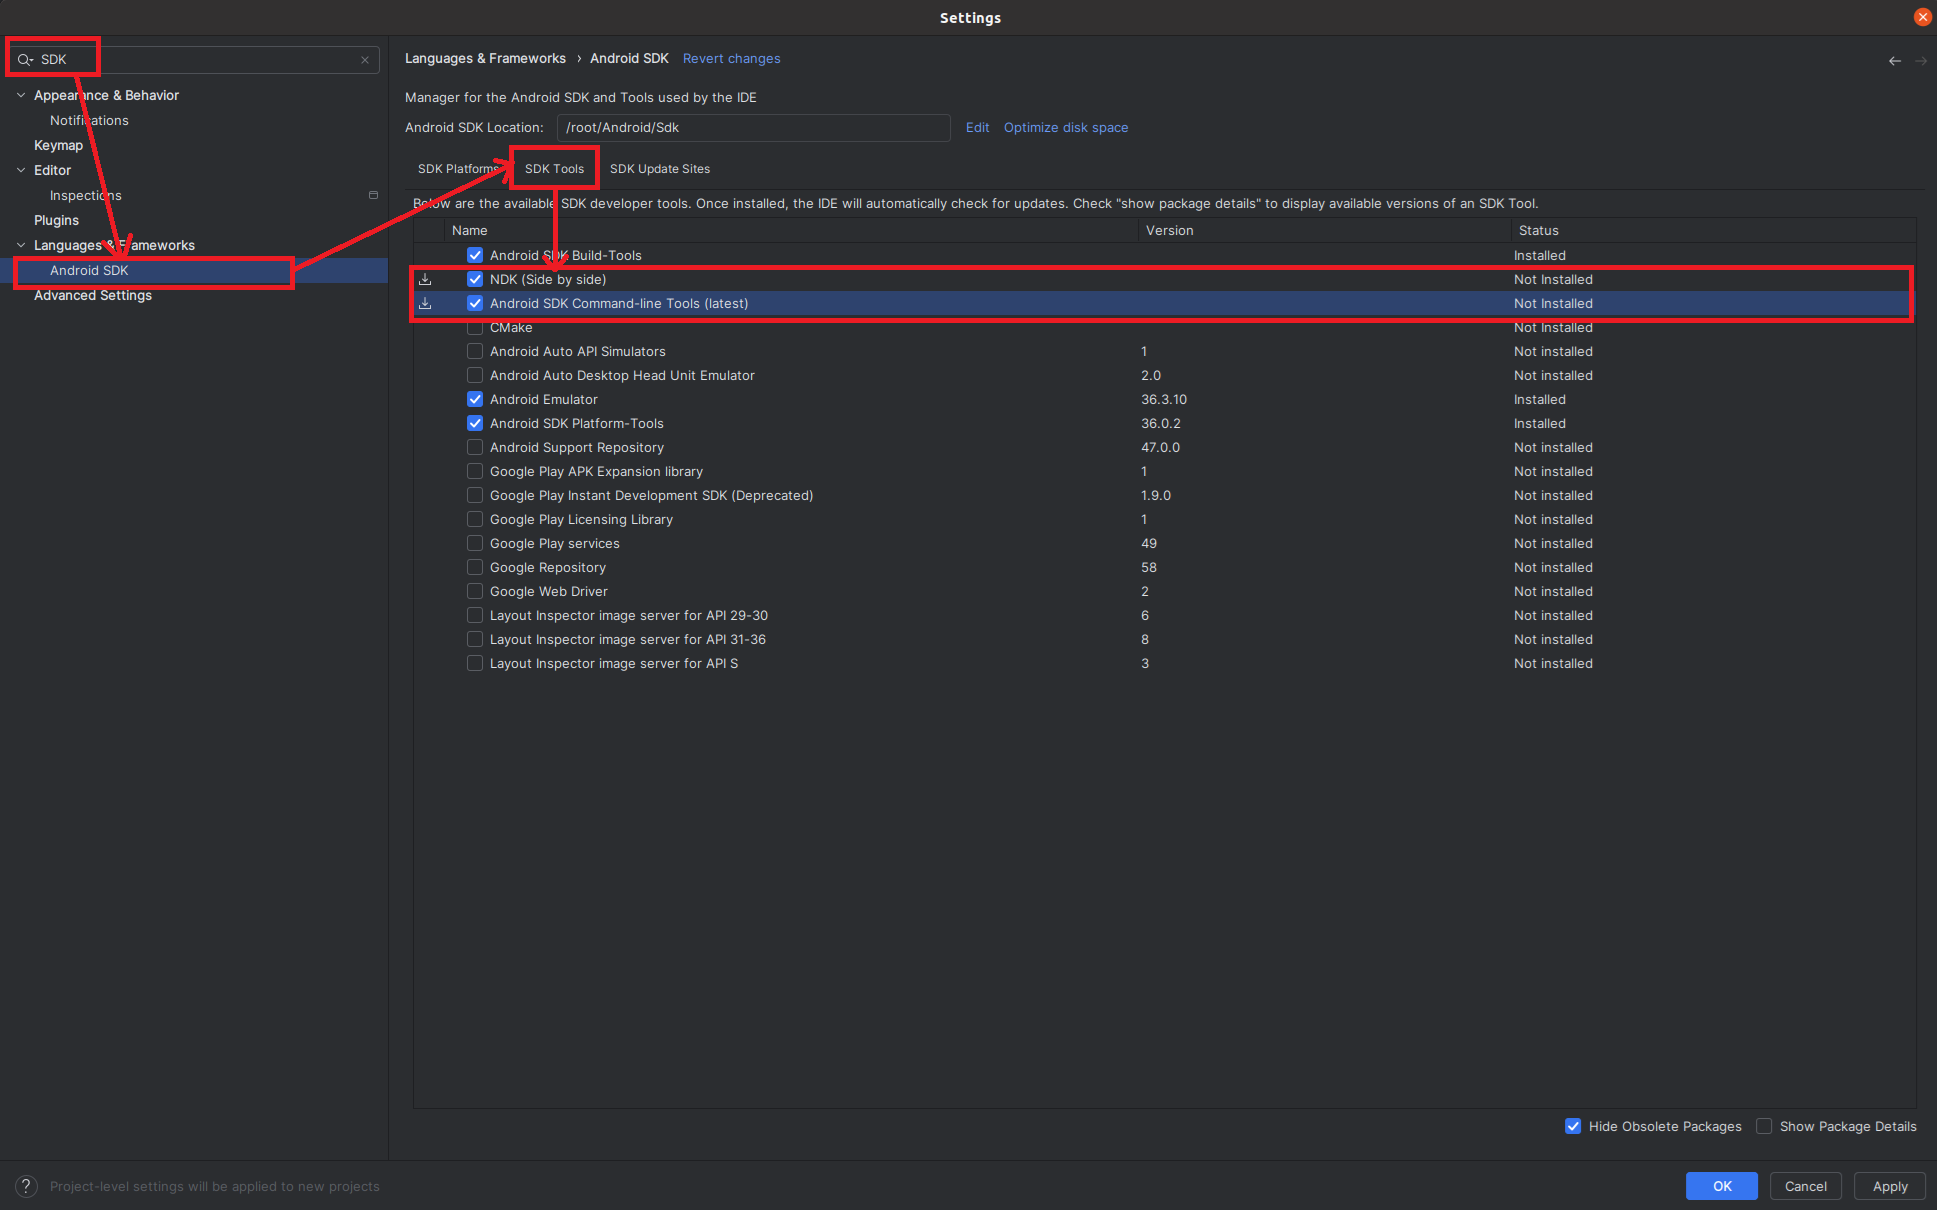
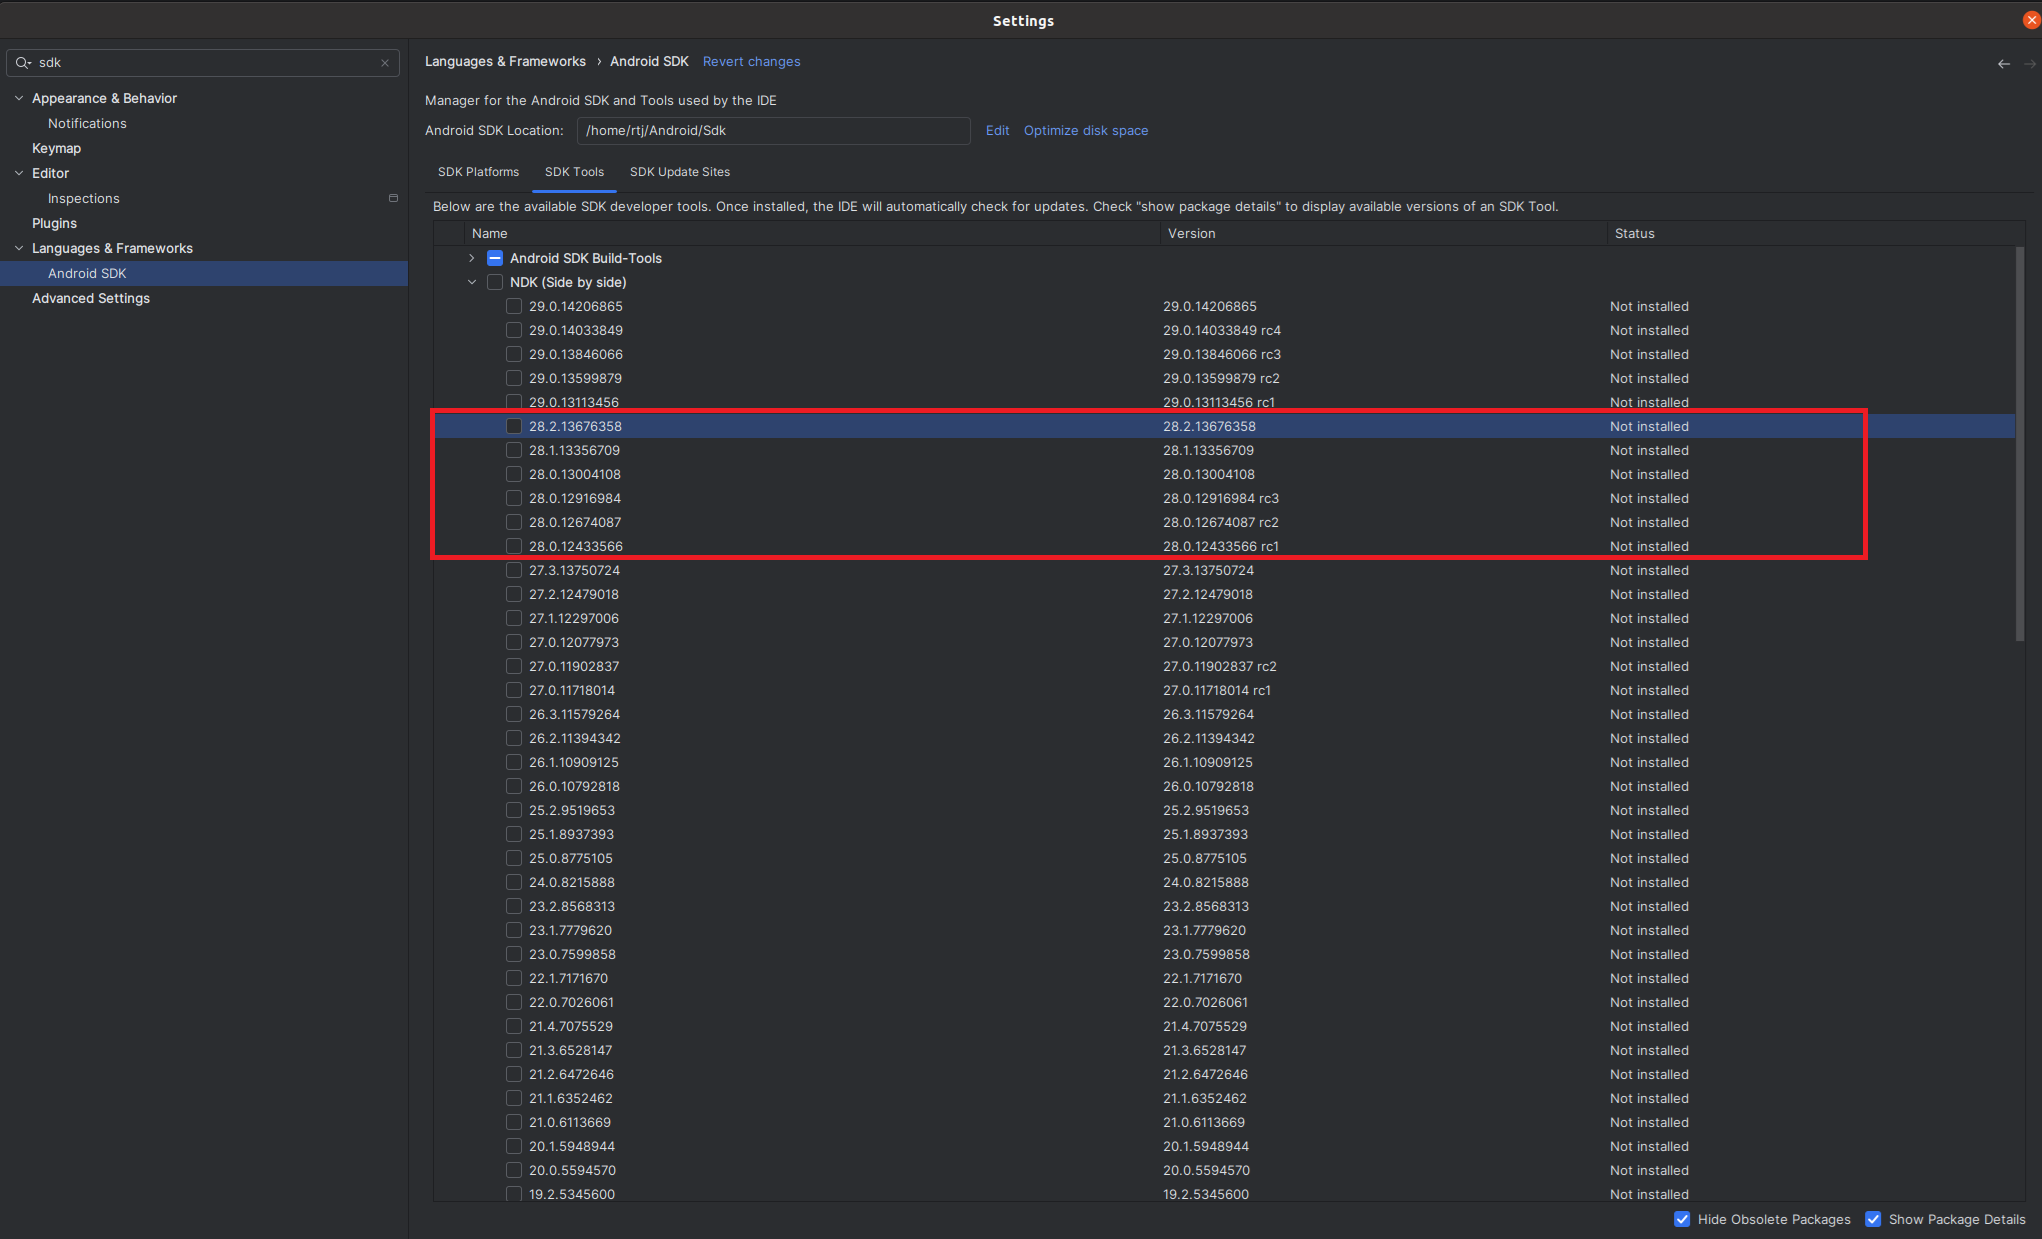
- Select the NDK. Note that Servo requires version 28 of the NDK.
- In the SDK Tools section, select NDK (side by side)
- Click show package details:
- Select the latest version of NDK 28:
- Click Ok to install both the NDK and SDK.
- Find the path to the SDK under Languages & Frameworks then Android SDK Location:
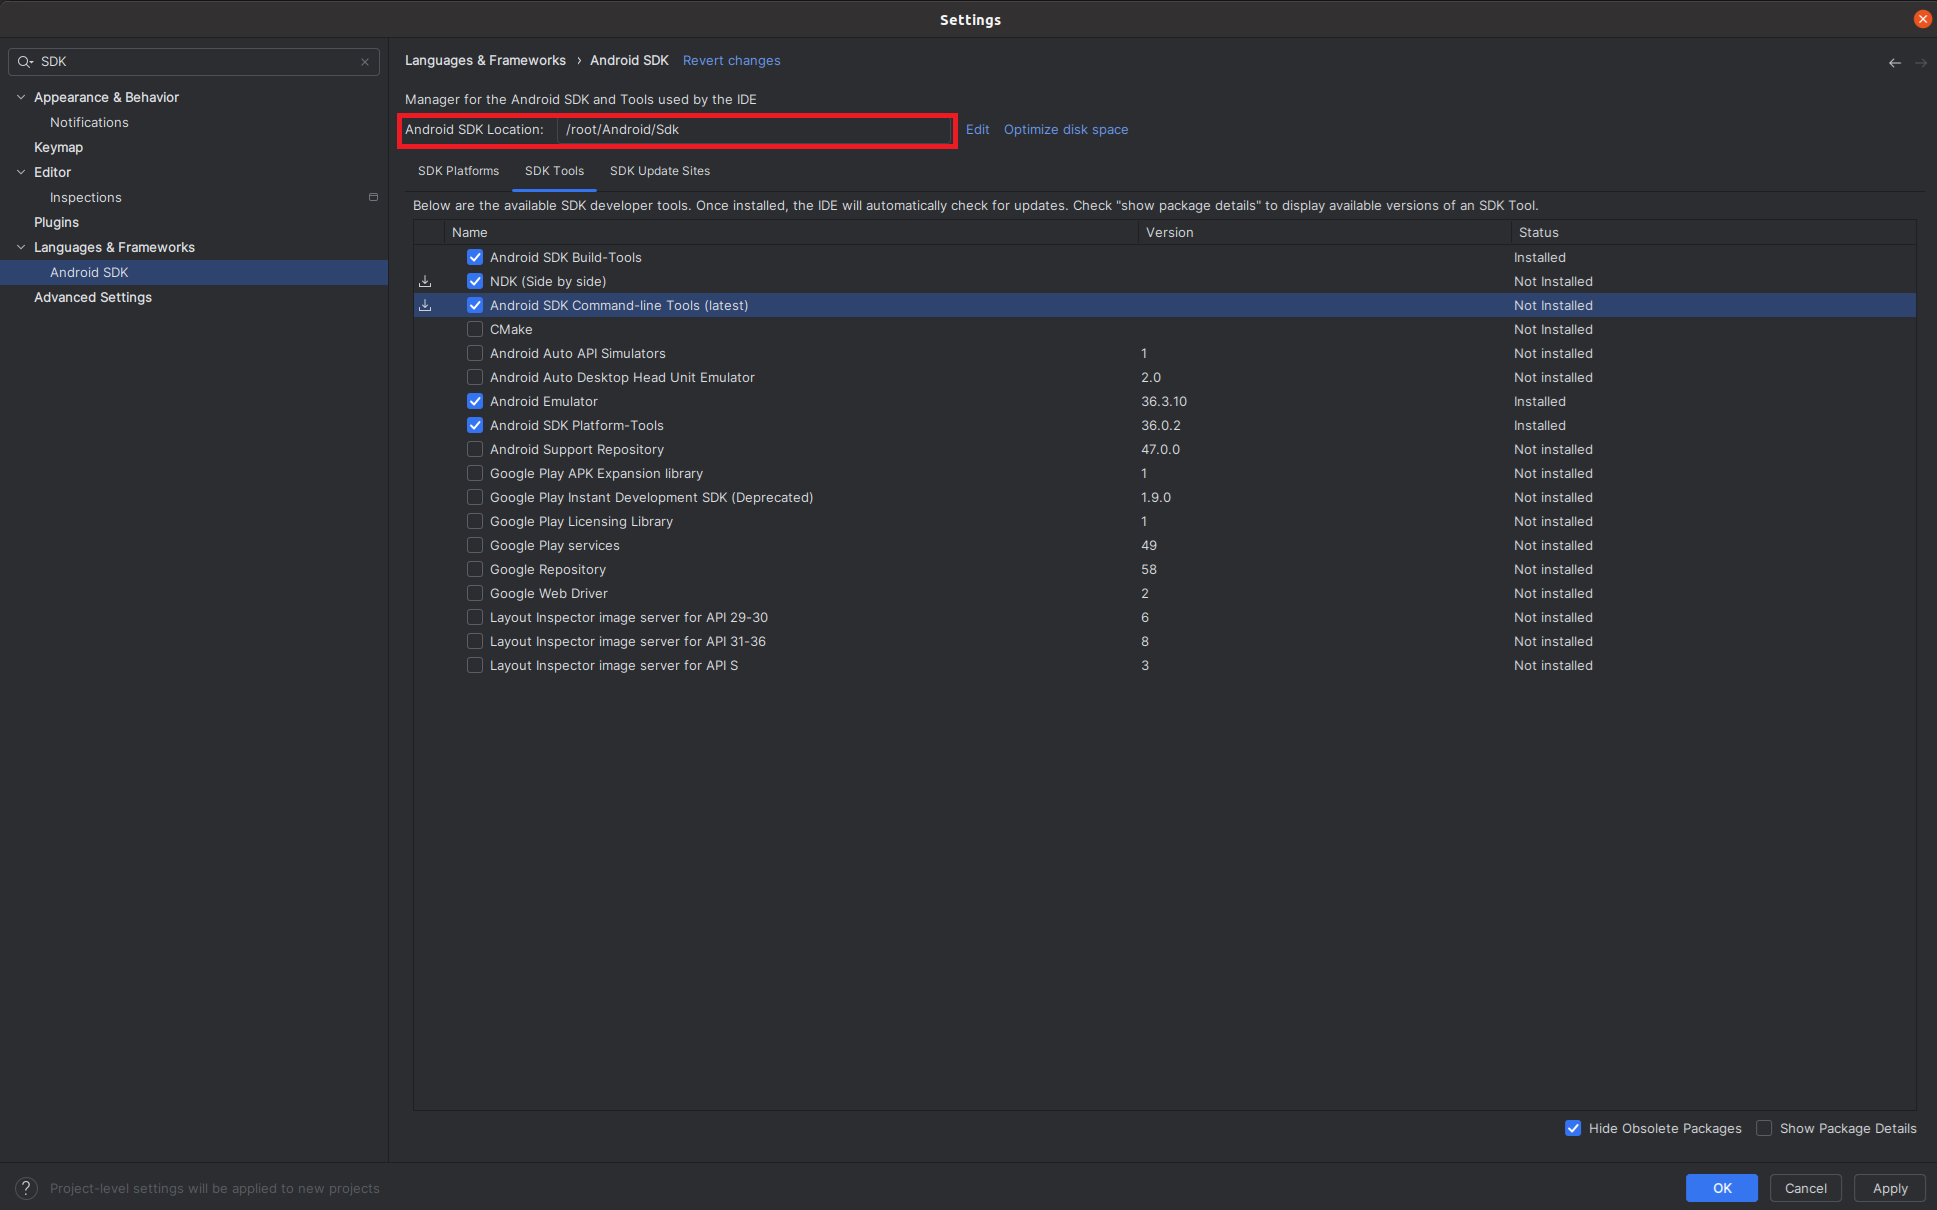 .
Then, ensure that the following environment variables are set:
.
Then, ensure that the following environment variables are set:
ANDROID_SDK_ROOT: The path found above.ANDROID_NDK_ROOT:$ANDROID_SDK_ROOT/ndk/28.2.13676358/
- Run
./mach build --android
Running in the emulator
- Create a new AVD image to run Servo:
$ANDROID_SDK_ROOT/cmdline-tools/latest/bin/avdmanager create avd \ --name "Servo" \ --device "pixel" \ --package "system-images;android-33;google_apis;arm64-v8a" \ --tag "google_apis" \ --abi "arm64-v8a" - Enable the hardware keyboard.
Open
~/.android/avd/Servo.avd/config.iniand changehw.keyboard = notohw.keyboard = yes. - Launch the emulator
$ANDROID_SDK_ROOT/emulator/emulator -avd Servo -netdelay none -no-snapshot - Install Servo on the emulator:
./mach install --android - Start Servo by tapping the Servo icon on your launcher screen.
Installing on a physical device
- Set up your device for development.
- Build Servo as described above, ensuring that you are building for the appropriate target for your device.
- Install Servo to your device by running:
./mach install --android - Start Servo by tapping the Servo icon on your launcher screen or run:
./mach run --android https://www.servo.org/
You can request a force-stop of Servo by running:
adb shell am force-stop org.servo.servoshell/org.servo.servoshell.MainActivity
If the above doesn’t work, try this:
adb shell am force-stop org.servo.servoshell
You can uninstall Servo by running:
adb uninstall org.servo.servoshell
Troubleshooting
Be sure to look at the General Troubleshooting section if you have trouble with your build.
Building for OpenHarmony
Get the OpenHarmony tools
Building for OpenHarmony requires the following:
- The OpenHarmony SDK. This is sufficient to compile servo as a shared library for OpenHarmony.
- The
hvigorbuild tool to compile an application into an app bundle and sign it.
Setting up the OpenHarmony SDK
The OpenHarmony SDK is required to compile applications for OpenHarmony. The minimum version of SDK that Servo currently supports is v6.0.0 (API-20).
Downloading via DevEco Studio
DevEco Studio is an IDE for developing applications for HarmonyOS NEXT and OpenHarmony. It supports Windows and macOS. You can manage installed OpenHarmony SDKs by clicking File->Settings and selecting “OpenHarmony SDK”. After setting a suitable installation path, you can select the components you want to install for each available API version. DevEco Studio will automatically download and install the components for you.
Manual installation of the OpenHarmony SDK (e.g. on Linux)
- Go to the OpenHarmony release notes and select the version you want to compile for.
- Scroll down to the section “Acquiring Source Code from Mirrors” and click the download link for the version of “Public SDK package for the standard system” matching your host system.
- Extract the archive to a suitable location.
- Switch into the SDK folder with
cd <sdk_folder>/<your_operating_system>. - Create a sub-folder with the same name as the API version (e.g 14 for SDK v5.0.2) and switch into it.
- Unzip the zip files of the individual components into the folder created in the previous step. Preferably use the
unzipcommand on the command-line, or manually ensure that the unzipped bundles are called e.g.nativeand notnative-linux-x64-5.x.y.z.
The following snippet can be used as a reference for steps 4-6:
cd ~/ohos-sdk/linux
for COMPONENT in "native toolchains ets js previewer" do
    echo "Extracting component ${COMPONENT}"
    unzip ${COMPONENT}-*.zip
    API_VERSION=$(cat ${COMPONENT}/oh-uni-package.json | jq -r '.apiVersion')
    mkdir -p ${API_VERSION}
    mv ${COMPONENT} "${API_VERSION}/"
done
On windows, it is recommended to use 7zip to unzip the archives, since the windows explorer unzip tool is extremely slow.
Manual installation of the HarmonyOS NEXT commandline tools
The HarmonyOS NEXT commandline tools contain the OpenHarmony SDK and the following additional tools:
codelinter(linter)hstack(crash dump stack analysis tool)hvigor/hvigorw(build tool)ohpm(package manager)
Currently, the commandline tools package is not publicly available and requires a chinese Huawei account to download.
Manual installation of hvigor without the commandline tools
hvigor (not the wrapper hvigorw) is also available via npm.
-
Install the same nodejs version as the commandline-tools ship. For HarmonyOS NEXT Node 18 is shipped. Ensure that the
nodebinary is in PATH. -
Install Java using the recommended installation method for your OS. The build steps are known to work with OpenJDK v17, v21 and v23. On macOS, if you install Homebrew’s OpenJDK formula, the following additional command may need to be run after the installation:
# For the system Java wrappers to find this JDK, symlink it with sudo ln -sfn $HOMEBREW_PREFIX/opt/openjdk/libexec/openjdk.jdk /Library/Java/JavaVirtualMachines/openjdk.jdk -
Edit your
.npmrcto contain the following line:@ohos:registry=https://repo.harmonyos.com/npm/ -
Install hvigor and the hvigor-ohos-plugin. This will create a
node_modulesdirectory in the current directory.npm install @ohos/hvigor npm install @ohos/hvigor-ohos-plugin -
Now you should be able to run
hvigor.jsin your OpenHarmony project to build a hap bundle:/path/to/node_modules/@ohos/hvigor/bin/hvigor.js assembleHap
Configuring hdc on Linux
hdc is the equivalent to adb for OpenHarmony devices.
You can find it in the toolchains directory of your SDK.
For convenience purposes, you might want to add toolchains to your PATH.
Among others, hdc can be used to open a shell or transfer files between a device and the host system.
hdc needs to connect to a physical device via usb, which requires the user has permissions to access the device.
It’s recommended to add a udev rule to allow hdc to access the corresponding device without needing to run hdc as root.
This stackoverflow answer also applies to hdc.
Run lsusb and check the vendor id of your device, and then create the corresponding udev rule.
Please note that your user should be a member of the group you specify with GROUP="xxx".
Depending on your Linux distributions you may want to use a different group.
To check if hdc is now working, you can run hdc list targets and it should show your device serial number.
If it doesn’t work, try rebooting.
Please note that your device needs to be in “Developer mode” with USB debugging enabled. The process here is exactly the same as one android:
- Tap the build number multiple times to enable developer mode.
- Then navigate to the developer options and enable USB debugging.
- When you connect your device for the first time, confirm the pop-up asking you if you want to trust the computer you are connecting to.
Signing configuration
Most devices require that the HAP is digitally signed by the developer to be able to install it.
When using the hvigor tool, this can be accomplished by setting a static signingConfigs object in the build-profile.json5 file or by dynamically creating the signingConfigs array on the application context object in the hvigorfile.ts script.
The signingConfigs property is an array of objects with the following structure:
[
    {
        "name": "default",
        "type": "<OpenHarmony or HarmonyOS>",
        "material": {
            "certpath": "/path/to/app-signing-certificate.cer",
            "storePassword": "<encrypted password>",
            "keyAlias": "debugKey",
            "keyPassword": "<encrypted password>",
            "profile": "/path/to/signed-profile-certificate.p7b",
            "signAlg": "SHA256withECDSA",
            "storeFile": "/path/to/java-keystore-file.p12"
        }
    }
]
Here <encrypted password> is a hexadecimal string representation of the plaintext password after being encrypted.
The key and salt used to encrypt the passwords are generated by DevEco Studio IDE and are stored on-disk alongside the certificate files and keystore, usually under <USER HOME>/.ohos.
To generate the information needed for password encryption, the required application and profile certificate files, and the keystore itself, you can clone a sample ArkTS app and open it on DevEco Studio IDE. Note that since signing information is tied to the bundle name, not all ArkTS app will work, and therefore it is highly recommended to use the sample ArkTS app mentioned above.
- Open Project Structure dialog from
File > Project Structuremenu. - Under the ‘Signing Config’ tab, enable the ‘Automatically generate signature’ checkbox.
NOTE: The signature autogenerated above is intended only for development and testing. For production builds and distribution via an App Store, the relevant configuration needs to be obtained from the App Store provider.
For Linux users, DevEco Studio is only available on Windows and MacOS. To proceed, you will need another Windows / MacOS machine with DevEco Studio IDE installed to create the signing keys. If you’re developing for OpenHarmony boards (such as HopeRun development board), then you can name the
SigningConfigsdefault. Otherwise, set it tohosif you’re developing Servo for HarmonyOS devices (such as Huawei Mate series phones).Once the keys have been generated, you will need to move the entire directory that stores the keys (usually under
<USER HOME>/.ohos/) generated by DevEco Studio from your Windows / MacOS machine.Additionally, you also need to copy
SigningConfigsfrombuild-profile.json5generated by DevEco Studio from your Windows / MacOS machine to a.jsonfile in your Linux machine. This will serve as a “signing material”machcan later refer.
Once generated, it is necessary to point mach to the above “signing material” configuration using the SERVO_OHOS_SIGNING_CONFIG environment variable.
The value of the variable must be a file path to a valid .json file with the same structure as the signingConfigs property given above, but with certPath, storeFile and profile given as paths relative to the json file, instead of absolute paths.
Building servoshell
Before building servo you will need to set some environment variables.
direnv is a convenient tool that can automatically set these variables based on an .envrc file, but you can also use any other method to set the required environment variables.
.envrc:
    export OHOS_SDK_NATIVE=/path/to/openharmony-sdk/platform/api-version/native

    # Required if the HAP must be signed. See the signing configuration section above.
    export SERVO_OHOS_SIGNING_CONFIG=/path/to/signing-configs.json

    # Required only when building for HarmonyOS:
    export DEVECO_SDK_HOME=/path/to/command-line-tools/sdk # OR /path/to/DevEcoStudio/sdk OR on MacOS /Applications/DevEco-Studio.app/Contents/sdk

    # Required only when building for OpenHarmony:
    # Note: The openharmony sdk is under ${DEVECO_SDK_HOME}/default/openharmony
    # Presumably you would need to replicate this directory structure
    export OHOS_BASE_SDK_HOME=/path/to/openharmony-sdk/platform

    # If you have the command-line tools installed:
    export PATH="${PATH}:/path/to/command-line-tools/bin/"
    export NODE_HOME=/path/to/command-line-tools/tool/node

    # Alternatively, if you do NOT have the command-line tools installed:
    export HVIGOR_PATH=/path/to/parent/directory/containing/node_modules  # Not required if `hvigorw` is in $PATH
If you use direnv and an .envrc file, please remember to run direnv allow . after modifying the .envrc file.
Otherwise, the environment variables will not be loaded.
The following command can then be used to compile the servoshell application for a 64-bit ARM device or emulator:
./mach build --ohos --release [--flavor=harmonyos]
In mach build, mach install and mach package commands, --ohos is an alias for --target aarch64-unknown-linux-ohos.
To build for an emulator running on an x86-64 host, use --target x86_64-unknown-linux-ohos.
The default ohos build / package / install targets OpenHarmony.
If you want to build for HarmonyOS you can add --flavor=harmonyos.
Please check the Signing configuration and add a configuration with "name": "hos" and "type": "HarmonyOS"" and the respective signing certificates.
Installing and running on-device
The following command can be used to install previously built servoshell application on a 64-bit ARM device or emulator:
./mach install --ohos --release [--flavor=harmonyos]
Further reading
Troubleshooting
Be sure to look at the General Troubleshooting section if you have trouble with your build.
Building Offline
Servo releases provide a servo-<release-tag>-src-vendored.tar.gz artifact which contains Servo’s source code and all Rust dependencies vendored.
The .cargo/config.toml file in the tarball contains the necessary configuration to build Servo offline using the vendored dependencies.
Linux
Please view the Linux build instructions for more on installing the required build dependencies.
We generally recommend using ./mach build to build Servo, however that does require uv to be installed and the Python dependencies to be synced via uv sync in advance (otherwise ./mach will try to access the network to setup the python environment).
# online pre-build environment (e.g. building a docker container)
uv sync
# offline build environment
./mach build --profile=production --frozen
In cases where this is difficult, you can also build Servo using cargo, in which case any recent Python version (>= 3.11) should be sufficient (but this is not tested in CI).
Note that ./mach build will enable the media-gstreamer feature by default - when using cargo you need to enable this feature manually, and set any gstreamer-related environment variables as well.
The required environment variables for the gstreamer feature are not documented here, but documentation improvements based on our ./mach build code are welcome.
# Build an offline release build with the production profile.
cargo build --profile=production --frozen
Windows and macOS
On Windows and macOS, ./mach bootstrap will download additional dependencies necessary to build Servo.
These are currently not provided in the tarball.
If there is interest in offline builds for these platforms, contributions are welcome (but reach out first on Zulip or via GitHub issues).
Prebuilt SpiderMonkey Artifacts
Online builds use prebuilt SpiderMonkey artifacts by default, hosted on servo/mozjs’s GitHub releases.
If you want to simplify or speed-up your build environment, you can pre-download these artifacts yourself and use MOZJS_ARCHIVE=path/to/libmozjs.tar.gz to use the prebuilt artifacts in offline builds.
You can verify the integrity of the downloaded artifacts by using GitHub attestations with the gh tool:
gh attestation verify path/to/libmozjs.tar.gz -R servo/mozjs
General Troubleshooting
See the style guide for how to format error messages.
If you run into trouble building Servo and you do not see your error listed on any other page, first try following the steps below:
- Ensure that you have all of the listed build requirements. In particular, if you are using an uncommon Linux distribution or some other kind of Unix, you may need to determine what the correct name of a particular dependency is on your system.
- Double-check that build requirements are installed and check dependency versions.
- Run
./mach boostrapor.\mach boostrapon Windows. Sometimes the tools or dependencies needed to build Servo will change. It is safe to run this command more than once. Ensure that no errors were reported during execution. If you have installed other dependencies manually you may need to run./mach bootstrap --skip-platform. - Refresh your environment. This may involve:
- Restarting your shell
- Logging out and logging back in
- Restarting your computer
Dependency versions
curl --versionshould print a version like 7.83.1 or 8.4.0- On Windows, type
curl.exe --versioninstead, to avoid getting the PowerShell alias forInvoke-WebRequest
- On Windows, type
uv --versionshould print 0.4.30 or newer- Servo’s
machbuild tool depends onuvto provision a pinned version of Python (set by the.python-versionfile in the repo) and create a local virtual environment (.venvdirectory) into which the python dependency modules are installed. - If the system already has an installation of the required Python version, then
uvwill just symlink to that installation to save disk space. - If the versions do not match or no Python installation is present on the host, then
uvwill download the required binaries. - Using an externally managed Python installation for executing
machas a Python script is currently not supported.
- Servo’s
rustup --versionshould print a version like 1.26.0- Windows:
choco --versionshould print a version like 2.2.2 - macOS:
brew --versionshould print a version like 4.2.17
You are not alone!
If you have problems building Servo that you can’t solve, you can always ask for help in the build issues chat on Zulip.
Overview: Embedding Servo
Servo is a web browser engine, which we intend to be easy to embed in other applications. Currently, the documentation on how to embed Servo is sparse, and this Chapter is an active work in progress. Please feel free to reach out to us on the Servo Zulip chat if you have any questions.
Building servo without mach
It is possible to build servo directly with cargo, albeit you will likely need to reimplement some of the mach functionality.
Below is a short overview of things to keep in mind.
Environment variables
./mach sets a number of environment variables to control the build, which is particularly required when cross-compiling to e.g., Android or OpenHarmony.
You can run ./mach print-env to see which variables are set, and use that to configure your build.
Media support
./mach build enables the media-gstreamer feature by default, which is not the case for regular builds.
media-gstreamer is required for media support on the common desktop platforms.
On Linux you will need to install the required gstreamer libraries via your package manager (e.g. by running ./mach bootstrap).
On macOS ./mach bootstrap will install the required gstreamer libraries by installing the latest packages from https://github.com/servo/servo-build-deps/releases/tag/macOS.
On Windows you can install the gstreamer libraries from https://github.com/servo/servo-build-deps/releases/tag/msvc-deps (version 1.22.8).
Resources
Servo requires some resources, and provides default versions via the servo-default-resources crate if the baked-in-resources feature is enabled.
This is achieved by baking the resources into the binary.
Embedders can opt-out, by disabling default-features, and providing their own resource reading mechanism via servo_embedder_traits::submit_resource_reader.
In such a case the ResourceReader implementation is responsible for providing all resources.
An example usage is the OpenHarmony port, which reads all resources from the filesystem: ohos/resources.rs.
Servo LTS releases
Besides our monthly releases, the Servo community provides best-effort long-term support (LTS) releases. Since Servo’s public API is still evolving, these LTS releases may be preferable for embedders that have limited resources to stay up to date with the latest Servo release. LTS releases allow embedders to have scheduled upgrade timeframes and benefit from security fixes, including security fixes for our JavaScript engine.
Scope of LTS releases
Servo is provided AS IS and no specific guarantees are given. LTS releases (and the details below) are provided on a best-effort basis. For now, this means:
- A new LTS release / branch is introduced every 6 months, based on the current regular release at the time.
- The expected support duration is 9 months, giving embedders time to migrate to the next LTS release.
- The LTS release will receive security fixes only.
- Patch releases will be released as needed; there is no fixed schedule.
- Only the
servolibrary and its dependencies are in scope. The browser demo, servoshell, is explicitly out of scope. - The minimum supported Rust version (MSRV) will not be increased on the LTS branch, but may increase when upgrading to the next LTS version
- Releases will be published to crates.io if possible, but embedders should expect that
gitdependencies might be required.
Patching CVEs in downstream crates
Many Rust libraries generally don’t backport CVE fixes to older releases / branches.
Since MSRV increases are treated as breaking changes, this can lead to us being unable to upgrade to a newer released version of a library (which patches the CVE).
These situations will be handled on a case-by-case basis, ideally in cooperation with the upstream maintainer, and will likely involve pulling a patched version of the library via git.
This means that LTS patch releases of Servo shouldn’t be expected to be avaiable on crates.io, since they could have git dependencies.
Limitations
- Servo is provided AS IS and no specific guarantees are given, including security guarantees. LTS releases are provided on a best-effort basis by interested community members.
- As mentioned above, Servo does not have a 1.0 release yet, which means that production usage of Servo should be carefully evaluated. The risk profile of using Servo in an app to render known, trusted content is very different from using Servo as a browser to render arbitrary content.
LTS release maintainers
- @jschwe (Jonathan Schwender)
- TBD
Getting Started
Servo welcomes contributions from everyone. Working on a web engine can be challenging and sometimes frustrating, but it can also be very rewarding and fun. If you spend the time and effort to get involved, you will constantly be learning and growing as a developer and open source contributor. To get started, please do the following:
- Read the rest of this page for basic information about contributing to Servo.
- Successfully fetch the Servo repository and build Servo.
- Set up your fork of Servo and learn the basics of using Git, following the contents of our Git Setup chapter.
- Learn a bit of Rust. There are many resources online for how to do this, but one of the best is the official Learning Rust documentation. If you are familiar with other imperative programming languages, you can learn Rust as you work more on Servo, but having a basic familiarity with the language is very useful to get started.
- Set up your editor so that it integrates with
rust-analyzer. - Read our Style Guide for expectations about the code you contribute.
- Read and follow the steps for making a pull request.
Working on an issue
Should you wish to work on an issue, please leave a comment on it in order to claim the issue. This is to prevent duplicated efforts from contributors on the same issue.
Sending the message “@servo-highfive assign me” will assign the issue to you.
Head over to Servo Starters to find good tasks to start with.
If you find any unfamiliar words or jargon, please check the glossary first.
If there’s no matching entry, please make a pull request to add one with the content TODO so we can correct that!
AI contributions
Contributions must not include content generated by large language models or other probabilistic tools, including but not limited to Copilot or ChatGPT. This policy covers code, documentation, pull requests, issues, comments, and any other contributions to the Servo project.
For now, we’re taking a cautious approach to these tools due to their effects — both unknown and observed — on project health and maintenance burden. This field is evolving quickly, so we are open to revising this policy at a later date, given proposals for particular tools that mitigate these effects. Our rationale is as follows:
Maintainer burden: Reviewers depend on contributors to write and test their code before submitting it. We have found that these tools make it easy to generate large amounts of plausible-looking code that the contributor does not understand, is often untested, and does not function properly. This is a drain on the (already limited) time and energy of our reviewers.
Correctness and security: Even when code generated by AI tools does seem to function, there is no guarantee that it is correct, and no indication of what security implications it may have. A web browser engine is built to run in hostile execution environments, so all code must take into account potential security issues. Contributors play a large role in considering these issues when creating contributions, something that we cannot trust an AI tool to do.
Copyright issues: Publicly available models are trained on copyrighted content, both accidentally and intentionally, and their output often includes that content verbatim. Since the legality of this is uncertain, these contributions may violate the licenses of copyrighted works.
Ethical issues: AI tools require an unreasonable amount of energy and water to build and operate, their models are built with heavily exploited workers in unacceptable working conditions, and they are being used to undermine labor and justify layoffs. These are harms that we do not want to perpetuate, even if only indirectly.
Note that aside from generating code or other contributions, AI tools can sometimes answer questions you may have about Servo, but we’ve found that these answers are often incorrect or very misleading.
In general, do not assume that AI tools are a source of truth regarding how Servo works. Consider asking your questions on Zulip instead.
AI Policy FAQ
Can I use AI tools to help translate from my native language to English?
Yes.
Can I use an AI tool to assist in finding bugs or security issues in Servo?
Yes, but you must verify the output of any AI tool before filing issues against the Servo project. Any issues filed against the project are expected to abide by the project’s AI policy—you must be able to reproduce and validate any findings, not simply trust the tool’s output.
Can I use an AI tool to help me understand Servo’s codebase better?
Yes, but see the earlier warning about these tools’ reliability.
Can I submit a PR that includes code generated by AI tools?
No. This includes (but is not limited to) all generative AI tools like Claude, Codex, ChatGPT, Cursor, Gemini, and Windsurf.
Can I use an AI tool to summarize a pull request?
No. This includes (but is not limited to) all generative AI tools like Claude, Codex, ChatGPT, Cursor, Gemini, and Windsurf. Please follow the project best practices when describing your pull request.
Can I use an AI review tool for my pull request?
Yes, but please don’t. The results are unreliable and noisy.
Can I use an AI tool to write a new issue description or comment?
No. This includes (but is not limited to) all generative AI tools like Claude, Codex, ChatGPT, Cursor, Gemini, and Windsurf.
What happens if I violate this AI policy?
The Servo maintainers reserve the right to close any pull request that does not meet the standards of this policy. Any comments, descriptions, and other non-code artifacts that are not allowed by the previous FAQ entries must be rewritten without the use of AI tooling.
Conduct
Servo Code of Conduct is published at https://servo.org/coc/.
Governance
Servo’s governance is defined by the Technical Steering Committee (TSC) and documented in the servo/project repository.
Finding Things to Do
Servo’s issue tracker contains a lot of issues, and it can feel overwhelming looking for something to work on. Here are some helpful tips for issue labels to look for:
Less complex issues
The E-less-complex label means that someone thinks the issue is appropriate for a new contributor. Issues with this label should contain a clear description of the problem, clear steps to follow to address it, and any expected verification steps.
More complex issues
The E-more-complex label means that someone thinks ths issue is appropriate for someone with a bit of experience.
Like E-less-complex, issues with this label should contain a clear description of the problem, clear steps to follow to address it, and any expected verification steps.
The difference between the two labels is the expected effort required to solve it, and they may require additional investigation to solve.
Fixing panics with minimized testcases
There are many ways to make Servo panic, and often these are found by fuzzing Servo. There are lots of examples of issues with minimized testcases (i.e. the smallest HTML/JS/CSS required to reproduce a problem) that are labelled with I-panic and C-has-manual-testcase.
These can be good issues to work on because the panic backtrace can provide pointers to relevant code, and you can focus on understanding the conditions that trigger the panic.
Minimizing testcases
It’s easy to file an issue about Servo rendering a web page incorrectly, but it’s often difficult to act on those issues.
It’s very helpful to look for issues with the C-needs minimized testcase label and work on isolating the HTML/CSS/JS required to reproduce the problem.
See the guide for tips about minimizing nontrivial pages.
Diagnosing failing Web Platform Tests
The Web Platform Tests (WPT) are Servo’s main source of automated conformance tests.
There are many tests that Servo does not yet pass, and these can be found by looking at the test metadata directory.
Every .ini. file under that directory corresponds to a test source file, and it can be helpful to choose a file in directory that interests you and diagnose what is causing the test not to pass.
You can also explore all the tests that Servo fails in the web-based wpt.fyi interface. See the guide for tips about identifying the cause of WPT test failures.
Git Setup
If you are new to Git or distrbuted version control, it’s highly recommended that you spend some time learning the basics before continuing here. There are many incredible resources online for learning Git. For instance, the Zulip project maintains a very thorough guide to using Git for contributing to an open source project. The information there is often very relevant to working on Servo as well. Becoming proficient with Git is a skill that will come in handy in many kinds of software development tasks and it’s worth the time.
When you cloned Servo originally, the upstream Servo repository at https://github.com/servo/servo was your upstream.
You can choose to keep that configuration, but the recommneded workflow is the following:
- Fork the upstream Servo repository.
- Check out a clone of your newly-forked copy of Servo.
Note that thegit clone --depth 10 https://github.com/<username>/servo.git--depth 10arguments here throw away most of Servo’s commit history for better performance. They can be omitted. - Add a new remote named
upstreamthat points atservo/servo.git remote add upstream https://github.com/servo/servo.git
Starting a new change
When you want to work on a new change, you shouldn’t do it on the main branch as that’s where you want to keep your copy of the upstream repository.
Instead you should do your work on a branch.
- Update your main branch to the latest upstream changes.
git checkout main git pull origin main - Create a new branch based on the main branch.
git checkout -b issue-12345 - Make your changes and commit them on that branch.
Don’t forget to sign off on each commit, too!
git commit --signoff -m "script: Add a stub interface for MessagePort"
Next, you probably want to make a pull request with your changes.
Editor Setup
It is highly recommended that you set up your editor to support rust-analyzer.
Although it requires a decent amount of RAM and CPU, this will make the experience of working on Servo much better as your editor will be able to provide you with code completion, live compilation errors and warnings, and readily-accessible rustdoc.
Unfortunately, rust-analyzer tries to run cargo without mach, which will cause issues due
to the special configuration that Servo currently needs to build.
Use the following instructions to configure your IDE.
Additions are welcome here!
Visual Studio Code
It’s recommend that you add the following to your project specific settings in .vscode/settings.json:
{
    "rust-analyzer.rustfmt.overrideCommand": [ "./mach", "fmt" ],
    "rust-analyzer.check.overrideCommand": [
        "./mach",
        "clippy",
        "--message-format=json",
        "--target-dir",
        "target/lsp",
        "--features",
        "tracing,tracing-perfetto"
    ],
    "rust-analyzer.cargo.buildScripts.overrideCommand": [
        "./mach",
        "clippy",
        "--message-format=json",
        "--target-dir",
        "target/lsp",
        "--features",
        "tracing,tracing-perfetto"    ],
}
Notes:
- In the above excerpt, the language server is building into its own target directory,
target/lsp, in order to avoid unwanted rebuilds. If you would like to save disk space you can remove the--target-dirandtarget/lsparguments and the default target directory will be used. - To enable optional build settings, simply add them to the build argument list in your configuration file.
- Windows: If you are on Windows, you will need to use
./mach.batinstead of just./mach. If you do not, you may receive an error saying that the command executed is not a valid Win32 application. - Cross-compilation: If you are cross-compiling, you can override the target used for cargo by adding
"rust-analyzer.cargo.target": "aarch64-linux-android". Note that some LSP features might not work in this configuration.
Zed
If you are using Zed, you must do something very similar to what is described for Visual Studio Code, but the Zed configuration file expects a slightly different syntax.
In your ./zed/settings.json file you need something like this:
{
  "lsp": {
    "rust-analyzer": {
      "initialization_options": {
        "checkOnSave": true,
        "check": {
          "overrideCommand": [
            "./mach",
            "clippy",
            "--message-format=json",
            "--target-dir",
            "target/lsp",
            "--feature",
            "tracing,tracing-perfetto"
          ]
        },
        "cargo": {
          "allTargets": false,
          "buildScripts": {
            "overrideCommand": [
              "./mach",
              "clippy",
              "--message-format=json",
              "--target-dir",
              "target/lsp",
              "--feature",
              "tracing,tracing-perfetto"
            ]
          }
        },
        "rustfmt": {
          "extraArgs": [
            "--config",
            "unstable_features=true",
            "--config",
            "binop_separator=Back",
            "--config",
            "imports_granularity=Module",
            "--config",
            "group_imports=StdExternalCrate"
          ]
        }
      }
    }
  }
}
Python
Servo contains Python scripts as part of build tooling and certain types of tests. Zed’s default Python configuration might not be able to provide proper static code analysis.
Servo is configured to work with the Pyrefly language server, which you can enable with something resembling the below config. You will also need to install the Pyrefly Zed extension.
{
  "lsp": {
    "pyrefly": {
      "binary": {
        "path": ".venv/bin/pyrefly",
        "arguments": ["lsp"],
      },
      "settings": {
        "python": {
          "pythonPath": ".venv/bin/python",
        },
        "pyrefly": {
          "python_interpreter": ".venv/bin/python",
        },
      },
    },
  },
  "languages": {
    "Python": {
      "language_servers": ["pyrefly", "!pyright", "!pylsp"],
    },
  },
}
NixOS
If you are on NixOS, you might get errors about pkg-config or crown:
thread ‘main’ panicked at ’called `Result::unwrap()` on an `Err` value: “Could not run `PKG_CONFIG_ALLOW_SYSTEM_CFLAGS=\“1\” PKG_CONFIG_ALLOW_SYSTEM_LIBS=\“1\” \“pkg-config\” \“–libs\” \“–cflags\” \“fontconfig\”`
[ERROR rust_analyzer::main_loop] FetchWorkspaceError: rust-analyzer failed to load workspace: Failed to load the project at /path/to/servo/Cargo.toml: Failed to read Cargo metadata from Cargo.toml file /path/to/servo/Cargo.toml, Some(Version { major: 1, minor: 74, patch: 1 }): Failed to run `cd “/path/to/servo” && “cargo” “metadata” “–format-version” “1” “–manifest-path” “/path/to/servo/Cargo.toml” “–filter-platform” “x86_64-unknown-linux-gnu”`: `cargo metadata` exited with an error: error: could not execute process `crown -vV` (never executed)
mach passes different RUSTFLAGS to the Rust compiler than plain cargo, so if you try to build Servo with cargo, it will undo all the work done by mach (and vice versa).
Because of this, and because Servo can currently only be built with mach, you need to configure the rust-analyzer extension to use mach in .vscode/settings.json:
Using crown
If you are using --use-crown, you should also set CARGO_BUILD_RUSTC in .vscode/settings.json as follows, where /nix/store/.../crown is the output of nix-shell --run 'command -v crown'.
{
    "rust-analyzer.server.extraEnv": {
        "CARGO_BUILD_RUSTC": "/nix/store/.../crown",
    },
}
These settings should be enough to not need to run code . from within a nix-shell, but it wouldn’t hurt to try that if you still have problems.
Problems with proc macros
When enabling rust-analyzer’s proc macro support, you may start to see errors like
proc macro `MallocSizeOf` not expanded: Cannot create expander for /path/to/servo/target/debug/deps/libfoo-0781e5a02b945749.so: unsupported ABI `rustc 1.69.0-nightly (dc1d9d50f 2023-01-31)` rust-analyzer(unresolved-proc-macro)
This means rust-analyzer is using the wrong proc macro server, and you will need to configure the correct one manually. Use mach to query the current sysroot path, and copy the last line of output:
$ ./mach rustc --print sysroot
NOTE: Entering nix-shell /path/to/servo/shell.nix
info: component 'llvm-tools' for target 'x86_64-unknown-linux-gnu' is up to date
/home/me/.rustup/toolchains/nightly-2023-02-01-x86_64-unknown-linux-gnu
Then configure either your sysroot path or proc macro server path in .vscode/settings.json:
{
    "rust-analyzer.procMacro.enable": true,
    "rust-analyzer.cargo.sysroot": "[paste what you copied]",
    "rust-analyzer.procMacro.server": "[paste what you copied]/libexec/rust-analyzer-proc-macro-srv",
}
Emacs
Emacs has two LSP client implementations: eglot, which is a built-in package Emacs, and emacs-lsp.
Eglot
To override the commands, we need to set eglot-workspace-configuration. To do so, create a .dir-locals.el file in the top level directory of your servo checkout with the following contents:
;;; Directory Local Variables         -*- no-byte-compile: t; -*-
;;; For more information see (info "(emacs) Directory Variables")

((nil . ((eglot-workspace-configuration
          . (:rust-analyzer
             (:rustfmt (:overrideCommand ["./mach" "fmt"])
                       :check (:overrideCommand
                               ["./mach" "clippy" "--message-format=json" "--target-dir" "target/lsp" "--features" "tracing,tracing-perfetto"])
                       :cargo (:buildScripts
                               (:overrideCommand
                                ["./mach" "clippy" "--message-format=json" "--target-dir" "target/lsp" "--features" "tracing,tracing-perfetto"]))))))))
After starting eglot (M-x eglot), you can check the workspace-configuration being used with M-x eglot-show-workspace-configuration.
Style Guide
The majority of our style recommendations are automatically enforced via our automated linters. This document has guidelines that are less easy to lint for.
Lots of code in Servo was written before these recommendations were agreed upon. We welcome pull requests to bring project code up to date with the modern guidelines.
Rust
In general, all Rust code in Servo is automatically formatted via rustfmt when you run ./mach fmt, which should align your code with the official Rust Style Guide.
In addition, Rust code should use Rust API naming conventions.
There are a few non-obvious points in the naming conventions guide such as:
- The
get_prefix is generally not used for getters in Rust code. An exception to this rule is when it is used for a variant of aget()method like instd::cell::Cell::get_mut(). - When camel-casing, acronyms and contractions of compound words count as one word.
For instance, a struct should be called
HtmlParserand notHTMLParser.
Indentation
In order to make the flow of complicated functions and methods easier to follow, we try to minimize indentation by using early returns.
This also matches the language used in specifications in many cases.
When the logic of a function reaches 2 or 3 levels of indentation or when a short conditional block is an exceptional case that drops to the bottom of a long function, you should consider using an early return.
Early returns work very well when combined with the necessity to unwrap Options or enum variants.
Prefer the following syntax when returning early when an Option value is None:
#![allow(unused)]
fn main() {
let Some(inner_value) = option_value else {
    return
};
}
This also works for enum variants as well:
#![allow(unused)]
fn main() {
enum Pet {
    Dog(usize),
    Cat(usize),
}

let pet = Pet::Dog(10);
let Pet::Dog(age) = pet else {
   return;
};
}
Abbreviation
Servo follows the Google C++ guide rules for naming. Avoid abbreviations that would not be known to someone outside of the project. Do not abbreviate by deleting letters in the middle of words.
Exception::
You may use some universally-known abbreviations, such as the use of i for a loop index.
You may also use single letters such as T for Rust type parameters.
Enum variants
In the interest of readability, avoid use-ing the variants of enums directly.
Instead, refer to enums by their qualified name (i.e. Enum::Variant).
In addition to avoiding naming collisions, this allows those unfamiliar with the code will more readily see the type used in the code.
Dead code
In almost all cases, do not commit dead code or commented out code to the repository. Commented out code can bit rot easily and dead code is not tested. When code becomes dead because it is completely unused, it should be removed.
Exception:
An exception for this case is when code is dead only one in some compilation configurations.
In that case, you use an expect(dead_code) compiler directive with a configuration qualifier.
For example:
#![allow(unused)]
fn main() {
#[cfg_attr(any(target_os = "android", target_env = "ohos"), expect(dead_code))]
pub(crate) const LINE_HEIGHT: f32 = 76.0;
}
In this case, the LINE_HEIGHT constant is compiled, but expected to be dead when compiling for Android or OpenHarmony.
unsafe code
Try to avoid unsafe code.
Unfortunately, a web engine is complicated so some amount of unsafe code is inevitable in Servo.
In the case that you have to make an unsafe function, use Safety comments, which explain why a block is safe and what the safety invariants are.
Use good judgement about when to add safety comments to unsafe blocks inside of functions.
Assertions
When Servo’s internal logic should make a certain condition impossible, use an assert! or debug_assert! statement to ensure that is the case.
You should think of assert! as both a kind of a test and a kind of documentation.
If the invariant expressed in the assertion ever becomes false, Servo might begin to crash when running tests, preventing the introduction or logic errors.
In addition, people reading the code can know what the author presumed to be true at a given point in the code in a stronger way than a comment allows.
If a particular part of a code is unreachable, for instance if an enum variant was handled before and shouldn’t be encountered later in the same function, use unreachable!(), but always filling the text with why the code is unreachable.
Option::map and Result::map/Result::map_err
The map APIs should only be used to transform one type to another, not as a form of control flow.
Prefer match, if let, or let/else when writing code that only affects a particular variant.
unwrap() and expect()
unwrap on Option or Result should almost never be used.
Instead, handle the None or Err case, doing any necessary error handling.
Servo should not crash, when possible.
If None or an Err is impossible due to the logic of Servo-internal code that does not involve external input or crates, then you can use expect() like you would use an assertion.
The text passed as an argument to expect() should express why the value cannot be None or Err.
Exception::
When dealing with Rust’s std::sync::Mutexor other concurrency primitives which use poisoning, it is appropriate to use unwrap.
todo!() and unimplemented!()
In code that is reachable via execution, do not use todo! or unimplemented!.
These macros will cause Servo to panic and normal web content shouldn’t cause Servo to panic.
Intead, try to make these kind of cases unreachable and return proper error values or simply have the code do nothing instead.
Macros
Macros obscure implementation details, and the callsites are often harder to read than inline Rust code.
When possible, prefer generic/parameterized functions over using macro_rules!.
Macros that are declared should attempt to look as much like inline valid Rust code as possible.
Exception:
When there are common control flow patterns (e.g. checking for an error/cached value and returning early) that can’t be replicated with Result/Option and the ? operator, macros are one way of reducing repetitive boilerplate.
Exception: When many unique types must be declared that follow an identical pattern, macros are one way of reducing the boilerplate.
Shell scripts
Shell scripts are suitable for small tasks or wrappers, but it’s preferable to use Python for anything with a hint of complexity or in general.
Shell scripts should be written using bash, starting with this shebang:
#!/usr/bin/env bash
Note that the version of bash available on macOS by default is quite old, so be careful when using new features.
Scripts should enable a few options at the top for robustness:
set -o errexit
set -o nounset
set -o pipefail
Remember to quote all variables, using the full form: "${SOME_VARIABLE}".
Use "$(some-command)" instead of backticks for command substitution.
Note that these should be quoted as well.
Servo Book
- Use permalinks when linking to source code repos — press
Yin GitHub to get a permanent URL
Markdown source
- Use one sentence per line with no column limit, to make diffs and history easier to understand
To help split sentences onto separate lines, you can replace ([.!?]) → $1\n, but watch out for cases like “e.g.”.
Then to fix indentation of simple lists, you can replace ^([*-] .*\n([* -].*\n)*)([^\n* -]) → $1 $3, but this won’t work for nested or more complex lists.
- For consistency, indent nested lists with two spaces, and use
-for unordered lists
Notation
- Use bold text when referring to UI elements like menu options, e.g. “click Inspect”
- Use
backtickswhen referring to single-letter keyboard keys, e.g. “pressAor Ctrl+A”
Error messages
- Where possible, always include a link to documentation, Zulip chat, or source code — this helps preserve the original context, and helps us check and update our advice over time
The remaining rules for error messages are designed to ensure that the text is as readable as possible, and that the reader can paste their error message into find-in-page with minimal false negatives, without the rules being too cumbersome to follow.
Wrap the error message in <pre><samp>, with <pre> at the start of the line (not indented).
If you want to style the error message as a quote, wrap it in <pre><blockquote><samp>.
<pre> treats newlines as line breaks, and at the start of the line, it prevents Markdown syntax from accidentally taking effect when there are blank lines in the error message.
<samp> marks the text as computer output, where we have CSS that makes it wrap like it would in a terminal.
Code blocks (<pre><code>) don’t wrap, so they can make long errors hard to read.
Replace every & with &, then replace every < with <.
Text inside <pre> will never be treated as Markdown, but it’s still HTML markup, so it needs to be escaped.
Always check the rendered output to ensure that all of the symbols were preserved.
You may find that you still need to escape some Markdown with \, to avoid rendering called `Result::unwrap()` on an `Err` value as called Result::unwrap() on an Err value.
| Error message | Markdown |
|---|---|
thread 'main' panicked at 'called `Result::unwrap()` on an `Err` value: "Could not run `PKG_CONFIG_ALLOW_SYSTEM_CFLAGS=\"1\" PKG_CONFIG_ALLOW_SYSTEM_LIBS=\"1\" \"pkg-config\" \"--libs\" \"--cflags\" \"fontconfig\"` |
|
error[E0765]: ...
 --> src/main.rs:2:14
  |
2 |       println!("```);
  |  ______________^
3 | | }
  | |__^
|
|
Making a Pull Request
Contributions to Servo or its dependencies should be made in the form of GitHub pull requests. Each pull request will be reviewed by a core contributor (someone with permission to land patches) and either landed in the main tree or given feedback for changes that would be required. All contributions should follow this format, even those from core contributors.
Pull request checklist
-
Branch from the main branch and, if necessary, rebase your branch to main before submitting your pull request. If it doesn’t merge cleanly with main you may be asked to rebase your changes.
-
Run
./mach fmtand./mach test-tidyon your change. -
Commits should be as small as possible, while ensuring that each commit is correct independently (i.e., each commit should compile and pass tests).
-
Commits should be accompanied by a Developer Certificate of Origin sign-off, which indicates that you (and your employer if applicable) agree to be bound by the terms of the project license. In git, this is the
-soption togit commit. -
If your patch is not getting reviewed, or you need a specific person to review it, you can @-reply a reviewer asking for a review in the pull request or a comment, or you can ask for a review in the Servo chat.
-
Add tests relevant to the fixed bug or new feature. For a DOM change this will usually be a web platform test; for layout, a reftest. See our testing guide for more information.
Opening a pull request
First, push your branch to your origin remote.
Next, either open the URL that is returned by a successful push to start the pull request,
or visit your Servo fork in your web browser and follow the UI prompts.
jdm@pathfinder servo % git push origin issue-12345
Enumerating objects: 43, done.
Counting objects: 100% (43/43), done.
Delta compression using up to 12 threads
Compressing objects: 100% (29/29), done.
Writing objects: 100% (29/29), 5.13 KiB | 5.13 MiB/s, done.
Total 29 (delta 25), reused 0 (delta 0), pack-reused 0
remote: Resolving deltas: 100% (25/25), completed with 14 local objects.
remote:
remote: Create a pull request for 'issue-12345' on GitHub by visiting:
remote:      https://github.com/jdm/servo/pull/new/issue-12345
remote:

Title and description
In Servo, commits in pull requests are squashed and the pull request title and description are used to create the final commit message (example). It’s important that the information in both the title and description fully describes the change, as it makes the commit useful for those looking at the repository history and makes Servo a healthier project as a whole.
The title should succinctly describe what a change does. Some tips:
- Prefix the title with the lower-case name of the crate you are working on. For example, if the change modifies code in the “script” crate, prefix the title with “script: “. If a change affects multiple crates, identify which crate is the primary “source” of the change or just omit the prefix.
- Titles should be written as an imperative (a request or command) sentence with a verb. For instance “layout: Skip box tree construction when possible.” Try to avoid generic verbs such as “fix”, “correct”, or “improve” and instead describe what the fix does. Code can be fixed multiple times, but the message should more uniquely identify the change.
- Prefixes should be lower-case and the rest of the title should only capitalize the first word and proper nouns (such as the name of data structures or specification concepts such as WebDriver). When in doubt follow what is written in the specification. Please do not use “Title Casing for Commit Messages.”
The commit description should:
- Describe the original problem or situation (perhaps linking to any open bugs).
- Describe how the change fixes the problem, improves the code, or prepares for some followup change.
- Explain any caveats with the change, such as newly failing tests, performance degradation, or uncovered edge cases. Discuss how these can be addressed in the future.
- Be written in multiple sentence paragraphs of text with either consistent wrapping (80 characters or less) or no wrapping at all (as GitHub will do this automatically).
The default pull request template includes several prompts; please fill them out by replacing the original instructions.
The “Testing” prompt is particularly important, since it helps streamline the review process. It asks:
- Are there already automated tests that cover the code that is being changed?
- If not, does this pull request include new automated tests?
- If not, what prevents adding at least one new test?
If you don’t know the answer, please write that down! It can always be rewritten later based on the reviewer feedback.
Addressing review comments
Prefer appending new commits to your branch over amending existing commits. This makes it easier for Servo reviewers to only look at the changes, which helps pull requests get reviewed more quickly.
git commit -s -m "script: Fix deadlock with cross-origin iframes."
git push origin issue-12345
Addressing merge conflicts
When a pull request has merge conflicts, the two most common ways to address them are merging and rebasing. Please do not press the “Update branch” button on the pull request; this performs a merge and will prevent some Servo CI functionality from working correctly.
Instead, first update your local main branch, then rebase your feature branch on top of the main branch, then force push the changes.
git checkout issue-12345
git pull --rebase upstream main
git push -f origin issue-12345
When a rebase encounters conflicts, you will need to address them:
jdm@pathfinder servo % git rebase main issue-12345
Auto-merging components/script/dom/bindings/root.rs
CONFLICT (content): Merge conflict in components/script/dom/bindings/root.rs
Auto-merging components/script/dom/node.rs
error: could not apply 932c8d3e97d... script: Remove unused field from nodes.
hint: Resolve all conflicts manually, mark them as resolved with
hint: "git add/rm <conflicted_files>", then run "git rebase --continue".
hint: You can instead skip this commit: run "git rebase --skip".
hint: To abort and get back to the state before "git rebase", run "git rebase --abort".
Please follow the GitHub documentation for resolving conflicts.
Running tests in pull requests
When you push to a pull request, GitHub automatically checks that your changes have no compilation, lint, or tidy errors.
To run unit tests or Web Platform Tests against a pull request, add one or more of the labels below to your pull request. If you do not have permission to add labels to your pull request, add a comment on your bug requesting that they be added.
| Label | Runs unit tests on | Runs web tests on |
|---|---|---|
T-full | All platforms | Linux |
T-linux-wpt | Linux | Linux |
T-macos | macOS | (none) |
T-windows | Windows | (none) |
The DevTools tests are experimental and not yet enabled by default.
It is highly recommended that pull requests that modify DevTools code run them.
To do so, add the T-linux-devtools label.
As with Web Platform Tests, if you do not have permission to add labels, comment to request that it is added.
Testing
This is boring. But your PR won’t get accepted without a test.
There are three types of tests in servo.
- Code formatting tests (
./mach test-tidy). - Unit tests (
./mach test-unit). - Integration tests (
./mach test-wpt).
The focus of this document will be on the Integration tests but we want to mention the other tests first.
Every submission has to confirm to the code formatting tests. Most of the formatting can be done
automatically with ./mach fmt.
The unit tests are in various files throughout the code base in typical rust #[cfg(test)] and
with #[test] annotations. You can run unit tests with ./mach test-unit. Example calls:
# Run all unit tests in the net crate
./mach test-unit -p servo-net
# Run a specific unit test in the net crate
./mach test-unit -p servo-net test_fetch_response_is_not_network_error
To be able to run unit tests for a new crate, you need to add the name of the crate to
self_contained_tests in python/servo/testing_commands.py.
Running the whole test-suite can be very memory intensive, you can dampen this behaviour somewhat with
with restricting the amount of compiled crates with ./mach test-unit -j 4.
Integration Tests
Tests are located in the tests directory.
You’ll see that there are a lot of files in there, so finding the proper location for your test is not always obvious.
First, look at the “Testing” section in ./mach --help to understand the different test categories.
You’ll also find some update-* commands.
It’s used to update the list of expected results.
To run a test:
./mach test-wpt tests/wpt/yourtest
Add a new test
If you need to create a new test file, it should be located in tests/wpt/mozilla/tests or in tests/wpt/tests if it’s something that doesn’t depend on servo-only features.
You’ll then need to update the list of tests and the list of expected results:
./mach test-wpt --manifest-update
Debugging a test
See the debugging guide to get started in how to debug Servo.
Web Platform Tests (tests/wpt)
This folder contains the Web Platform Tests and the code required to integrate them with Servo. In addition, there are WebGPU and WebGL tests which are imported and converted into Web Platform Test style tests.
Contents of tests/wpt
In particular, this folder contains:
config.ini: some configuration for the Web Platform Testsinclude.ini: the subset of Web Platform Tests we currently runtests: In-tree copy of the Web Platform Testsmeta: expected failures for the Web Platform tests we runmozilla: Web Platform Test-style tests that cannot be upstreamedwebgl: The imported WebGL testswebgpu: The imported WebGPU tests (See WebGPU chapter for more information)
Running the Web Platform Tests
The simplest way to run the Web Platform Tests in Servo is ./mach test-wpt in the root directory.
This will run the subset of JavaScript tests defined in include.ini and log the output to stdout.
A subset of tests may be run by providing positional arguments to the mach command, either as filesystem paths or as test urls e.g.
./mach test-wpt tests/wpt/tests/dom/historical.html
to run the dom/historical.html test, or
./mach test-wpt dom
to run all the DOM tests.
There are also a large number of command line options accepted by the test harness; these are documented by running with --help.
Running the WPT tests with a debug build often results in timeouts.
Instead, consider building with mach build -r and testing with mach test-wpt -r.
Running Web Platform Tests on your GitHub fork
Alternatively, you can execute the tests on GitHub-hosted runners using mach try.
Usually, mach try linux-wpt (all tests, linux) will be enough.
You can view the run results in your fork under the “Actions” tab. Any failed tasks will include a list of stable unexpected results at the bottom of the log. Unexpected results that are known-intermittent can likely be ignored.
When opening a PR, you can include a link to the run. Otherwise, reviewers will run the tests again.
Updating Web Platform Test expectations
When fixing a bug that causes the result of a test to change, the expected results for that test need to be changed.
This can be done manually, by editing the .ini file under the meta folder that corresponds to the test.
In this case, remove the references to tests whose expectation is now PASS, and remove .ini files that no longer contain any expectations.
When a larger number of changes is required, this process can be automated:
./mach test-wpt --update-expectations path/to/tests/
You can also update test expectations from Try runs performed on CI. Every CI run automatically saves a .log file that you can pass into update-wpt:
./mach update-wpt https://github.com/servo/servo/actions/runs/<ID-OF-CI-RUN>
Running all Web Platform Tests locally will take a long time and often cause unrelated failures (such as the runner exceeding the maximum number of open files on your system). The test expectations are also set based on the results of Servo’s CI machines, so differences in your setup might cause failures.
Usually you will have a rough idea where tests for your changes are.
For example, almost all tests for SubtleCrypto code are in the WebCryptoAPI directory.
In this case you can run only these tests with ./mach test-wpt WebCryptoAPI, followed by ./mach update-wpt as described above.
To ensure that other tests didn’t break, do a try run afterwards.
For updating WebGPU expectations, please see WebGPU chapter for more information.
Modifying Web Platform Tests
Please see the Web Platform Test Writing Tests guide for how to write tests. In general, a good way to start is to follow these steps:
- Find the directory that tests the feature you want to test.
- Find a test in that directory that tests a similar behavior, make a copy of the test with an appropriate name, and make your modifications.
- If the test is a reference test, you should also copy the reference if it needs to change, following the naming pattern of the directory you are modifying.
- Run
./mach update-manifestto update the WPT manifest with the new tests.
You must also run ./mach update-manifest whenever you modify a test, reference, or support file.
All changes to our in-tree Web Platform Tests will be upstreamed automatically when your PR is merged.
Servo-specific tests
The mozilla directory contains tests that cannot be upstreamed for some reason (e.g. because they depend on Servo-specific APIs), as well as some legacy tests that should be upstreamed at some point.
When run they are mounted on the server under /_mozilla/.
Analyzing reftest results
Reftest results can be analyzed from a raw log file.
To generate this run with the --log-raw option e.g.
./mach test-wpt --log-raw wpt.log
This file can then be fed into the reftest analyzer which will show all failing tests (not just those with unexpected results). Note that this ingests logs in a different format to original version of the tool written for gecko reftests.
The reftest analyzer allows pixel-level comparison of the test and reference screenshots.
Tests that both fail and have an unexpected result are marked with a !.
Updating the WPT manifest
MANIFEST.json can be regenerated automatically with the mach command update-manifest e.g.
./mach update-manifest
This is equivalent to running
./mach test-wpt --manifest-update SKIP_TESTS
Running DevTools Tests
The simplest way to run the DevTools tests in Servo is ./mach test-devtools from the root directory.
This will run all tests defined in devtools_tests/test_*.py. All DevTools-related test files exist in python/servo/devtools_tests.
Alternatives to running web platform tests
There are other ways to run web platform tests as well. These are not advised for the typical development workflows as they require custom setup. However, sometimes these runs are required to be able to debug complex interactions.
Running the Web Platform Tests with an external server
Normally wptrunner starts its own WPT server, but occasionally you might want to run multiple instances of mach test-wpt, such as when debugging one test while running the full suite in the background, or when running a single test many times in parallel (–processes only works across different tests).
This would lead to a “Failed to start HTTP server” errors, because you can only run one WPT server at a time. To fix this:
- Follow the steps in Running web tests manually
- Add a
breakto start_servers in serve.py as follows:
--- a/tests/wpt/tests/tools/serve/serve.py
+++ b/tests/wpt/tests/tools/serve/serve.py
@@ -746,6 +746,7 @@ def start_servers(logger, host, ports, paths, routes, bind_address, config,
                   mp_context, log_handlers, **kwargs):
     servers = defaultdict(list)
     for scheme, ports in ports.items():
+        break
         assert len(ports) == {"http": 2, "https": 2}.get(scheme, 1)

         # If trying to start HTTP/2.0 server, check compatibility
- Run
mach test-wptas many times as needed
If you get unexpected TIMEOUT in testharness tests, then the custom testharnessreport.js may have been installed incorrectly (see Running web tests manually for more details).
Running Web Platform Tests manually
(See also the relevant section of the upstream README.)
It can be useful to run a test without the interference of the test runner, for example when using a debugger such as gdb.
To do this, we need to start the WPT server manually, which requires some extra configuration.
To do this, first add the following to the system’s hosts file:
127.0.0.1   www.web-platform.test
127.0.0.1   www1.web-platform.test
127.0.0.1   www2.web-platform.test
127.0.0.1   web-platform.test
127.0.0.1   xn--n8j6ds53lwwkrqhv28a.web-platform.test
127.0.0.1   xn--lve-6lad.web-platform.test
Navigate to tests/wpt/web-platform-tests for the remainder of this section.
Normally wptrunner installs Servo’s version of testharnessreport.js, but when starting the WPT server manually, we get the default version, which won’t report test results correctly. To fix this:
- Create a directory
local-resources - Copy
tools/wptrunner/wptrunner/testharnessreport-servo.jstolocal-resources/testharnessreport.js - Edit
local-resources/testharnessreport.jsto substitute the variables as follows:
%(output)d- →
1if you want to play with the test interactively (≈ pause-after-test) - →
0if you don’t care about that (though it’s also ok to use1always)
- →
%(debug)s→true
- Create a
./config.jsonas follows (seetools/wave/config.default.jsonfor defaults):
{"aliases": [{
    "url-path": "/resources/testharnessreport.js",
    "local-dir": "local-resources"
}]}
Then start the server with ./wpt serve.
To check if testharnessreport.js was installed correctly:
- The standard output of
curl http://web-platform.test:8000/resources/testharnessreport.jsshould look like testharnessreport-servo.js, not like the default testharnessreport.js - The standard output of
target/release/servo http://web-platform.test:8000/css/css-pseudo/highlight-pseudos-computed.html(or any testharness test) should contain lines starting with:TEST STARTTEST STEPTEST DONEALERT: RESULT:
To prevent browser SSL warnings when running HTTPS tests locally, you will need to run Servo with --certificate-path resources/cert-wpt-only.
Running the Web Platform Tests in Firefox
When working with tests, you may want to compare Servo’s result with Firefox.
You can supply --product firefox along with the path to a Firefox binary (as well as few more odds and ends) to run tests in Firefox from your Servo checkout:
GECKO="$HOME/projects/mozilla/gecko"
GECKO_BINS="$GECKO/obj-firefox-release-artifact/dist/Nightly.app/Contents/MacOS"
./mach test-wpt dom --product firefox --binary $GECKO_BINS/firefox --certutil-binary $GECKO_BINS/certutil --prefs-root $GECKO/testing/profiles
Debugging
One of the simplest ways to debug Servo is to print interesting variables with the println!, eprintln!, or dbg! macros.
In general, these should only be used temporarily; you’ll need to remove them or convert them to proper debug logging before your pull request will be merged.
Debug logging with log and RUST_LOG
Servo uses the log crate for long-term debug logging and error messages:
#![allow(unused)]
fn main() {
log::error!("hello");
log::warn!("hello");
log::info!("hello");
log::debug!("hello");
log::trace!("hello");
}
Unlike macros like println!, log adds a timestamp and tells you where the message came from:
[2024-05-01T09:07:42Z ERROR servoshell::app] hello
[2024-05-01T09:07:42Z WARN  servoshell::app] hello
[2024-05-01T09:07:42Z INFO  servoshell::app] hello
[2024-05-01T09:07:42Z DEBUG servoshell::app] hello
[2024-05-01T09:07:42Z TRACE servoshell::app] hello
You can use RUST_LOG to filter the output of log by level (off, error, warn, info, debug, trace) and/or by where the message came from, also known as the “target”.
Usually the target is a Rust module path like servoshell::app, but there are some special targets too (see § Event tracing).
To set RUST_LOG, prepend it to your command or use export:
$ RUST_LOG=warn ./mach run -d test.html     # Uses the prepended RUST_LOG.
$ export RUST_LOG=warn
$ ./mach run -d test.html                   # Uses the exported RUST_LOG.
See the env_logger docs for more details, but here are some examples:
- to enable all messages up to and including
debuglevel, but nottrace:RUST_LOG=debug - to enable all messages from
servo::*,servoshell::*, or any target starting withservo:RUST_LOG=servo=trace(or justRUST_LOG=servo) - to enable all messages from any target starting with
style, but onlyerrorandwarnmessages fromstyle::rule_tree:RUST_LOG=style,style::rule_tree=warn
Note that even when a log message is filtered out, it can still impact runtime performance, albeit only slightly.
Some builds of Servo, including official nightly releases, remove DEBUG and TRACE messages at compile time, so enabling them with RUST_LOG will have no effect.
Event tracing
In the constellation, the compositor, and servoshell, we log messages sent to and received from other components, using targets of the form component>other@Event or component<other@Event.
This means you can select which event types to log at runtime with RUST_LOG!
For example, in the constellation (more details):
- to trace only events from script:
RUST_LOG='constellation<=off,constellation<script@' - to trace all events except for ReadyToPresent events:
RUST_LOG='constellation<,constellation<compositor@ReadyToPresent=off' - to trace only script InitiateNavigateRequest events:
RUST_LOG='constellation<=off,constellation<script@InitiateNavigateRequest'
In the compositor (more details):
- to trace only MoveResizeWebView events:
RUST_LOG='compositor<constellation@MoveResizeWebView' - to trace all events except for Forwarded events:
RUST_LOG=compositor<,compositor<constellation@Forwarded=off
In servoshell (more details):
- to trace only events from servo:
RUST_LOG='servoshell<=off,servoshell>=off,servoshell<servo@' - to trace all events except for AxisMotion events:
RUST_LOG='servoshell<,servoshell>,servoshell<winit@WindowEvent(AxisMotion)=off' - to trace only winit window moved events:
RUST_LOG='servoshell<=off,servoshell>=off,servoshell<winit@WindowEvent(Moved)'
Event tracing can generate an unwieldy amount of output. In general, we recommend the following config to keep things usable:
constellation<,constellation>,constellation<compositor@ForwardEvent(MouseMoveEvent)=off,constellation<compositor@LogEntry=off,constellation<compositor@ReadyToPresent=off,constellation<script@LogEntry=offcompositor<,compositor>servoshell<,servoshell>,servoshell<winit@DeviceEvent=off,servoshell<winit@MainEventsCleared=off,servoshell<winit@NewEvents(WaitCancelled)=off,servoshell<winit@RedrawEventsCleared=off,servoshell<winit@RedrawRequested=off,servoshell<winit@UserEvent(WakerEvent)=off,servoshell<winit@WindowEvent(CursorMoved)=off,servoshell<winit@WindowEvent(AxisMotion)=off
Other debug logging
mach run does this automatically, but to print a backtrace when Servo panics:
$ RUST_BACKTRACE=1 target/debug/servo test.html
Use -Z (-- --debug) to enable debug options.
For example, to print the stacking context tree after each layout, or get help about these options:
$ ./mach run -Z stacking-context-tree test.html
$ ./mach run -Z help            # Lists available debug options.
$ ./mach run -- --debug help    # Same as above: lists available debug options.
$ ./mach run --debug            # Not the same! This just chooses target/debug.
Alternatively, you can use the SERVO_DIAGNOSTICS environment variable to set diagnostic options.
$ SERVO_DIAGNOSTICS=style-tree ./mach run test.html
$ SERVO_DIAGNOSTICS=help ./mach run    # Lists available debug options.
$ export SERVO_DIAGNOSTICS=style-tree,display-list
$ ./mach run test.html            # Uses the exported SERVO_DIAGNOSTICS.
The SERVO_DIAGNOSTICS environment variable accepts comma-separated diagnostic options, identical to those available via -Z.
This feature is only available in debug and release builds, not in production builds.
On macOS, you can also add some Cocoa-specific debug options, after an extra --:
$ ./mach run -- test.html -- -NSShowAllViews YES
Running servoshell with a debugger
To run servoshell with a debugger, use --debugger-cmd.
Note that if you choose gdb or lldb, we automatically use rust-gdb and rust-lldb.
$ ./mach run --debugger-cmd=gdb test.html   # Same as `--debugger-cmd=rust-gdb`.
$ ./mach run --debugger-cmd=lldb test.html  # Same as `--debugger-cmd=rust-lldb`.
To pass extra options to the debugger, you’ll need to run the debugger yourself:
$ ./mach run --debugger-cmd=gdb -ex=r test.html         # Passes `-ex=r` to servoshell.
$ rust-gdb -ex=r --args target/debug/servo test.html    # Passes `-ex=r` to gdb.

$ ./mach run --debugger-cmd=lldb -o r test.html         # Passes `-o r` to servoshell.
$ rust-lldb -o r -- target/debug/servo test.html        # Passes `-o r` to lldb.

$ ./mach run --debugger-cmd=rr -M test.html             # Passes `-M` to servoshell.
$ rr record -M target/debug/servo test.html             # Passes `-M` to rr.
Many debuggers need extra options to separate servoshell’s arguments from their own options, and --debugger-cmd will pass those options automatically for a few debuggers, including gdb and lldb.
For other debuggers, --debugger-cmd will only work if the debugger needs no extra options:
$ ./mach run --debugger-cmd=rr test.html                    # Good, because it’s...
#  servoshell arguments        ^^^^^^^^^
$ rr target/debug/servo test.html                           # equivalent to this.
#  servoshell arguments ^^^^^^^^^

$ ./mach run --debugger-cmd=renderdoccmd capture test.html  # Bad, because it’s...
#                renderdoccmd arguments? ^^^^^^^
#                  servoshell arguments          ^^^^^^^^^
$ renderdoccmd target/debug/servo capture test.html         # equivalent to this.
# => target/debug/servo is not a valid command.

$ renderdoccmd capture target/debug/servo test.html         # Good.
#              ^^^^^^^ renderdoccmd arguments
#                    servoshell arguments ^^^^^^^^^
Debugging with gdb or lldb
To search for a function by name or regex:
(lldb) image lookup -r -n <name>
(gdb) info functions <name>
To list the running threads:
(lldb) thread list
(lldb) info threads
Other commands for gdb or lldb include:
(gdb) b a_servo_function    # Add a breakpoint.
(gdb) run                   # Run until breakpoint is reached.
(gdb) bt                    # Print backtrace.
(gdb) frame n               # Choose the stack frame by its number in `bt`.
(gdb) next                  # Run one line of code, stepping over function calls.
(gdb) step                  # Run one line of code, stepping into function calls.
(gdb) print varname         # Print a variable in the current scope.
See this gdb tutorial or this lldb tutorial more details.
To inspect variables in lldb, you can also type gui, then use the arrow keys to expand variables:
(lldb) gui
┌──<Variables>───────────────────────────────────────────────────────────────────────────┐
│ ◆─(&mut gfx::paint_task::PaintTask<Box<CompositorProxy>>) self = 0x000070000163a5b0    │
│ ├─◆─(msg::constellation_msg::PipelineId) id                                            │
│ ├─◆─(url::Url) _url                                                                    │
│ │ ├─◆─(collections::string::String) scheme                                             │
│ │ │ └─◆─(collections::vec::Vec<u8>) vec                                                │
│ │ ├─◆─(url::SchemeData) scheme_data                                                    │
│ │ ├─◆─(core::option::Option<collections::string::String>) query                        │
│ │ └─◆─(core::option::Option<collections::string::String>) fragment                     │
│ ├─◆─(std::sync::mpsc::Receiver<gfx::paint_task::LayoutToPaintMsg>) layout_to_paint_port│
│ ├─◆─(std::sync::mpsc::Receiver<gfx::paint_task::ChromeToPaintMsg>) chrome_to_paint_port│
└────────────────────────────────────────────────────────────────────────────────────────┘
If lldb crashes on certain lines involving the profile() function, it’s not just you.
Comment out the profiling code, and only keep the inner function, and that should do it.
Reversible debugging with rr (Linux only)
rr is like gdb, but lets you rewind. Start by running servoshell via rr:
$ ./mach run --debugger=rr test.html    # Either this...
$ rr target/debug/servo test.html       # ...or this.
Then replay the trace, using gdb commands or rr commands:
$ rr replay
(rr) continue
(rr) reverse-cont
To run one or more tests repeatedly until the result is unexpected:
$ ./mach test-wpt --chaos path/to/test [path/to/test ...]
Traces recorded by rr can take up a lot of space.
To delete them, go to ~/.local/share/rr.
OpenGL debugging with RenderDoc (Linux or Windows only)
RenderDoc lets you debug Servo’s OpenGL activity. Start by running servoshell via renderdoccmd:
$ renderdoccmd capture -d . target/debug/servo test.html
While servoshell is running, run qrenderdoc, then choose File > Attach to Running Instance.
Once attached, you can press F12 or Print Screen to capture a frame.
Debugging on OpenHarmony
It’s recommended to read the general advice from the Debugging section first. This section will only cover the differences that need to be considered on OpenHarmony.
Starting servoshell from the commandline
When debugging, it can often be useful to start servo from the commandline instead of clicking the app icon, since we can pass parameters from the commandline.
# Run this command to see which parameters can be passed to an ohos app
hdc shell aa start --help
# Start servo from the commandline
hdc shell aa start -a EntryAbility -b org.servo.servo
# --ps=<arg> <value> can be used to pass arguments with values to servoshell.
# The space between arg and value is mandatory when using `--ps`, meaning `--ps=--log-filter warn` is
# correct while `--ps=--log-filter=warn` is not.
# For pure flags without a value use `--psn <flag>`
hdc shell aa start -a EntryAbility -b org.servo.servo --ps=--log-filter "warn"
# Use `-U <url>` to let servo load a custom URL.
hdc shell aa start -a EntryAbility -b org.servo.servo -U https://servo.org
Logging
On OpenHarmony devices log messages can be saved and accessed via the hilog service:
# See the hilog help for a full list of arguments supported by hilog
hdc shell hilog --help
# View all logs (very verbose, includes all other apps)
hdc shell hilog
# All servo and Spidermonkey related logs
hdc shell hilog --domain=0xE0C3,0xE0C4
# Only Rust code from servo
hdc shell hilog --domain=0xE0C3
# Only spidermonkey C++ code
hdc shell hilog --domain=0xE0C4
# Filter by domain and log level
hdc shell hilog --domain=0xE0C3 --level=ERROR
Log level
Whether log statements are visible depends on multiple conditions:
- The compile-time max log level of the
logcrate. See log compile-time filters. Note: Therelease_max_level_<level>features of the log crate check ifdebug_assertions = falseis set to determine the release filters should apply or not. - The runtime
logglobal filter per module filters set in servoshell. Since environment variables aren’t an option to customize the log level,servoshellhas the--log-filteroption on ohos targets, which allows customizing the log filter of thelogcrate. By default, servoshell sets a log filter which hides log statements from many crates, so you likely will need to set a custom log-filter if you aren’t seeing the logs from the crate you are debugging. - The
hilogbase log filter.hdc shell hilog --base-level=<log_level>. Can be combined with--domainand--tagoptions to customize which logs are saved. - The
hiloglog filter when displaying logs:hdc shell hilog --level=<level>
Most of the time option 2 and/or 4 should be used, since they allow quick changes with recompiling.
Hilog domains
hilog allows setting a custom integer called “domain” (between 0 and 0xFFFF) when logging, which allows developers to easily filter logs using the domain.
For Rust code in servo logged via the log crate we set 0xE0C3 as the domain and for Spidermonkey C++ code we set 0xE0C4.
These values are somewhat arbitrarily chosen.
Hilog privacy feature
hilog has a privacy feature, which by default hides values in logs (e.g. from %d or %s substitutions).
Log statements from Rust are generally unaffected by this, since the string formatting is done on the Rust side.
If you encounter this issue when viewing C/C++ logs, you can temporarily turn off the privacy feature by running:
hdc shell hilog -p off
DevTools and port forwards
You can enable the DevTools server and connect to it remotely with Firefox. It is easiest to do this with the command line via
hdc shell aa start -a EntryAbility -b org.servo.servo --psn=--devtools=6080
To connect to an instance of Servo you have to forward the port with
hdc fport tcp:6080 tcp:6080. You should see a message that the forward succeeded. Now you can
connect to the DevTools server using localhost:6080.
Profiling
When profiling Servo or troubleshooting performance issues, make sure your build is optimised while still allowing for accurate profiling data.
./mach build --profile profiling --with-frame-pointer
- –profile profiling builds Servo with our profiling configuration
- –with-frame-pointer builds Servo with stack frame pointers on all platforms
The matching profile needs to be selected when running Servo:
./mach run --profile profiling http://example.org
Several ways to get profiling information about Servo’s runs:
Tracing with Perfetto
Tracing works by instrumenting specific functions (or portions of code) with explicit annotations such as time_profile! and servo_tracing::*.
It deterministically records every call through instrumented code, but does not provide any visibility into code that is not instrumented.
In contrast, sampling profilers can see everything but only probabilistically and thus get more accurate with long-running loops.
To use tracing, enable related compile-time features:
./mach build --profile profiling --features tracing tracing-perfetto
Then run Servo with the SERVO_TRACING environment variable set to EnvFilter directives to select which traces to enable:
SERVO_TRACING=… ./mach run --profile profiling http://example.org
For example:
SERVO_TRACING=offdisables all tracing (this is the default)SERVO_TRACING=traceenables all tracing (yields massive traces due tocompositing)SERVO_TRACING=[{servo_profiling}]does the same, since we implicitly filter onservo_profilingSERVO_TRACING=infowould enable only theinfolevel and above, but we don’t yet use levelsSERVO_TRACING=layoutenables tracing in thelayoutcrate onlySERVO_TRACING=trace,compositing=offenables all tracing except in thecompositingcrateSERVO_TRACING=[handle_reflow]enables tracing in spans named “handle_reflow” or their descendants
This creates a servo.pftrace file in the current directory, which can be visualized in ui.perfetto.dev.
Interval Profiling
Using the -p option followed by a number (time period in seconds), you can spit out profiling information to the terminal periodically. To do so, run Servo on the desired site (URLs and local file paths are both supported) with profiling enabled:
./mach run --profile profiling http://example.org -p 5
In the example above, while Servo is still running (AND is processing new passes), the profiling information is printed to the terminal every 5 seconds.
Once the page has loaded, hit ESC (or close the app) to exit. Profiling output will be provided, broken down by area of the browser and URL. For example, you might get output of the form below:
_category_                          _incremental?_ _iframe?_             _url_                  _mean (ms)_   _median (ms)_      _min (ms)_      _max (ms)_       _events_
Painting                                N/A          N/A                  N/A                        6.8177          0.9512          0.0035         30.7573               6
Layout                                  yes          yes     http://example.org/                     0.0016          0.0016          0.0016          0.0016               1
Layout                                  no           yes     http://example.org/                    14.4966         14.4966         14.4966         14.4966               1
ScriptParseHTML                         no           yes     http://example.org/                     0.8507          1.7009          0.0004          1.7009               2
TimeToFirstPaint                        no           yes     http://example.org/                     0.0000          0.0000          0.0000          0.0000               1
TimeToFirstContentfulPaint              no           yes     http://example.org/                     0.0000          0.0000          0.0000          0.0000               1

_url_   _blocked layout queries_
In this example, when loading the page we performed one full layout and one incremental layout passes.
TSV Profiling
Using the -p option followed by a file name, you can spit out profiling information of Servo’s execution to a TSV (tab-separated because certain url contained commas) file.
The information is written to the file only upon Servo’s termination.
This works well with the -x, -z, and -o options so that performance information can be collected during automated runs.
Example usage:
./mach run --profile profiling http://example.org -zxo out.png -p out.tsv
The formats of the profiling information in the Interval and TSV Profiling options are the essentially the same; the url names are not truncated in the TSV Profiling option.
Generating Timelines
Add the --profiler-trace-path /timeline/output/path.html flag to output the profiling data as a self contained HTML timeline.
Because it is a self contained file (all CSS and JS is inline), it is easy to share, upload, or link to from bug reports.
./mach run --profile profiling http://example.org -p 5 --profiler-trace-path trace.html
Usage:
-
Use the mouse wheel or trackpad scrolling, with the mouse focused along the top of the timeline, to zoom the viewport in or out.
-
Grab the selected area along the top and drag left or right to side scroll.
-
Hover over a trace to show more information.
Hacking
The JS, CSS, and HTML for the timeline comes from fitzgen/servo-trace-dump and there is a script in that repo for updating servo’s copy.
All other code is in the components/profile/ directory.
Sampling profiler
Servo includes a sampling profiler which generates profiles that can be opened in the Gecko profiling tools. To use them:
- Run Servo, loading the page you wish to profile
- Press Ctrl+P (or Cmd+P on macOS) to start the profiler (the console should show “Enabling profiler”)
- Press Ctrl+P (or Cmd+P on macOS) to stop the profiler (the console should show “Stopping profiler”)
- Keep Servo running until the symbol resolution is complete (the console should show a final “Resolving N/N”)
- Run
python etc/profilicate.py samples.json >gecko_samples.jsonto transform the profile into a format that the Gecko profiler understands - Load
gecko_samples.jsoninto https://profiler.firefox.com/
To control the output filename, set the PROFILE_OUTPUT environment variable.
To control the sampling rate (default 10ms), set the SAMPLING_RATE environment variable.
Memory Profiling
- Run Servoshell normally
- Open a new tab
- Navigate to
about:memory - Click
Measure - See a report similar to this:
  115.15 MiB -- explicit
     101.15 MiB -- jemalloc-heap-unclassified
      14.00 MiB -- url(http://example.org/)
         10.01 MiB -- layout-thread
            10.00 MiB -- font-context
             0.00 MiB -- stylist
             0.00 MiB -- display-list
          4.00 MiB -- js
             2.75 MiB -- malloc-heap
             1.00 MiB -- gc-heap
                0.56 MiB -- decommitted
                0.35 MiB -- used
                0.06 MiB -- unused
                0.02 MiB -- admin
             0.25 MiB -- non-heap
       0.00 MiB -- memory-cache
          0.00 MiB -- private
          0.00 MiB -- public

  121.89 MiB -- jemalloc-heap-active
  111.16 MiB -- jemalloc-heap-allocated
  203.02 MiB -- jemalloc-heap-mapped
  272.61 MiB -- resident
Using macOS Instruments
Xcode has a instruments tool to profile easily.
First, you need to install Xcode instruments:
xcode-select --install
Second, install cargo-instruments via Homebrew:
brew install cargo-instruments
Then, you can simply run it via CLI:
cargo instruments -t Allocations
Here are some links and resources for help with Instruments (Some will stream only on Safari):
- cargo-instruments on crates.io
- Using Time Profiler in Instruments
- Profiling in Depth
- System Trace in Depth
- Threads, virtual memory, and locking
- Core Data Performance Optimization and Debugging
- Learning Instruments
Profiling WebRender
When running Servoshell, press CTRL+F12 to show (or hide) the WebRender overlay.
Webpage snapshots
It is possible to use the mitmproxy tool to intercept servo traffic and create local snapshot (dump) of an arbitrary web-page, to then serve locally for profiling purposes.
mitmproxy support several ways to intersept the traffic including a proxy mode at port :8080, so you can set the browser to just:
./target/release/servo \
--pref=network_http_proxy_uri=http://127.0.0.1:8080 \
--ignore-certificate-errors
[!info] The default
mitmproxycerts are in the~/.mitmproxyor you can generate some usingmitmproxy, but I have just set my browser to ignore cert errors
[!warning] ignoring certs is easy, but be cautious of risks
Default mitmproxy
On a default network, the mitmproxy creates a local proxy server at :8080 and by setting it in browser or passing http_proxy=localhost:8080 and/or https_proxy=localhost:8080 (and by optionally unsetting the no_proxy) you can dump and serve the traffic.
Creating a dump
mitmproxy -w <dumpfile>
Serving a dump
mitmproxy --server-replay <dumpfile>
The resulted dump file is about ~5MB per page, so it can get large pretty fast, as the tool is very verbose and can store pictures.
Chain-proxy
In case of a another primary proxy connection, we need to pass the upstream to the main proxy from mitmproxy and if the main proxy also has custom certificates, it is crucial to pass them, or to ignore them
[!warning] ignoring certs is easy, but be cautious of risks
Creating a dump
mitmproxy  --mode upstream:${http_proxy} -w <dump-path>\
--set ssl_insecure=true
#### Serving the dump
```bash
mitmproxy -v  --server-replay ~/dev/recodings/servo_org_3.dump \
--set server_replay_extra=404 \
--set server_replay_ignore_host=true \
--set connection_strategy=lazy \
--set server_replay_reuse=true
[!info] the
replay_extraandreplay_reuseare optional, and may cause unexpected behaviour
OpenHarmony
It is possible to use the tool to intersept remote phone traffic including OpenHarmony targets. Open a reverse proxy port using hdc and then run the servo with proxy and certs set up.
reverse port
hdc rport tcp:8080 tcp:8080
run with args
hdc shell aa start -a EntryAbility \
-b org.servo.servo -U https://servo.org \
--psn=--pref=network_http_proxy_uri=http://127.0.0.1:8080 \
--psn=--ignore-certificate-errors
Crate Dependencies
A Rust library is called a crate.
Servo uses plenty of crates.
These crates are dependencies.
They are listed in files called Cargo.toml.
Servo is split into components and ports (see components and ports directories).
Each has its own dependencies, and each has its own Cargo.toml file.
Cargo.toml files list the dependencies.
You can edit this file.
For example, components/net_traits/Cargo.toml includes:
 [dependencies.stb_image]
 git = "https://github.com/servo/rust-stb-image"
But because rust-stb-image API might change over time, it’s not safe to compile against the HEAD of rust-stb-image.
A Cargo.lock file is a snapshot of a Cargo.toml file which includes a reference to an exact revision, ensuring everybody is always compiling with the same configuration:
[[package]]
name = "stb_image"
source = "git+https://github.com/servo/rust-stb-image#f4c5380cd586bfe16326e05e2518aa044397894b"
This file should not be edited by hand.
In a normal Rust project, to update the git revision, you would use cargo update -p stb_image, but in Servo, use ./mach cargo-update -p stb_image.
Other arguments to cargo are also understood, e.g. use –precise ‘0.2.3’ to update that crate to version 0.2.3.
See Cargo’s documentation about Cargo.toml and Cargo.lock files.
Working on a crate
As explained above, Servo depends on a lot of libraries, which makes it very modular. While working on a bug in Servo, you’ll often end up in one of its dependencies. You will then want to compile your own version of the dependency (and maybe compiling against the HEAD of the library will fix the issue!).
For example, I’m trying to bring some cocoa events to Servo. The Servo window on Desktop is constructed with a library named winit. winit itself depends on a cocoa library named cocoa-rs. When building Servo, magically, all these dependencies are downloaded and built for you. But because I want to work on this cocoa event feature, I want Servo to use my own version of winit and cocoa-rs.
This is how my projects are laid out:
~/my-projects/servo/
~/my-projects/cocoa-rs/
Both folders are git repositories.
To make it so that servo uses ~/my-projects/cocoa-rs/, first ascertain which version of the crate Servo is using and whether it is a git dependency or one from crates.io.
Both information can be found using, in this example, cargo pkgid cocoa(cocoa is the name of the package, which doesn’t necessarily match the repo folder name).
If the output is in the format https://github.com/servo/cocoa-rs#cocoa:0.0.0, you are dealing with a git dependency and you will have to edit the ~/my-projects/servo/Cargo.toml file and add at the bottom:
[patch]
"https://github.com/servo/cocoa-rs#cocoa:0.0.0" = { path = '../cocoa-rs' }
If the output is in the format https://github.com/rust-lang/crates.io-index#cocoa#0.0.0, you are dealing with a crates.io dependency and you will have to edit the ~/my-projects/servo/Cargo.toml in the following way:
[patch]
"cocoa:0.0.0" = { path = '../cocoa-rs' }
Both will tell any cargo project to not use the online version of the dependency, but your local clone.
For more details about overriding dependencies, see Cargo’s documentation.
Requesting crate releases
In addition to creating the Servo browser engine, the Servo project also publishes modular components when they can benefit the wider community of Rust developers.
An example of one of these crates is rust-url.
While we strive to be good maintainers, managing the process of building a browser engine and a collection of external libraries can be a lot of work, thus we make no guarantees about regular releases for these modular crates.
If you feel that a release for one of these crates is due, we will respond to requests for new releases. The process for requesting a new release is:
- Create one or more pull requests that prepare the crate for the new release.
- Create a pull request that increases the version number in the repository, being careful to keep track of what component of the version should increase since the last release. This means that you may need to note if there are any breaking changes.
- In the pull request ask that a new version be released. The person landing the change has the responsibility to publish the new version or explain why it cannot be published with the landing of the pull request.
DevTools
Firefox DevTools are a set of web developer tools that can be used to examine, edit, and debug a website’s HTML, CSS, and JavaScript. Servo has support for a subset of DevTools functionality, allowing for simple debugging.
Connecting to Servo
- Run servoshell with the DevTools server enabled.
The number after the
devtoolsparameter is the port used by the server.
./mach run --devtools=6080
-
Open Firefox and go to
about:debugging. If this is your first time using the DevTools integration, go to Setup and addlocalhost:6080as a network location. The port number must be the same as in the previous step. -
Click on Connect in the sidebar next to
localhost:6080.
- Back in Firefox, choose a webview and click Inspect. A new window should open with the page’s inspector.
Using the inspector
The inspector window is divided in various tabs with different workspaces. At the moment, Inspector and Console are working.
In the Inspector tab there are three columns. From left to right:
- The HTML tree shows the document nodes. This allows you to see, add, or modify attributes by double-clicking on the tag name or attribute.
- The style inspector displays the CSS styles associated with the selected element. The entries here come from the element’s style attribute, from matching stylesheet rules, or inherited from other elements. Styles can be added or modified by clicking on a selector or property, or clicking in the empty space below.
- The extra column contains more helpful tools:
- Layout contains information about the box model properties of the element. Note that flex and grid do not work yet.
- Computed, which contains all the CSS computed values after resolving things like relative units.
The Console tab contains a JavaScript console that interfaces with the website being displayed in Servo. Errors, warnings, and information that the website produces will be logged here. It can also be used to run JavaScript code directly on the website, for example, changing the document content or reloading the page:
document.write("Hello, Servo!")
location.reload()
Support for DevTools features is still a work in progress, and it can break in future versions of Firefox if there are changes to the messaging protocol.
Developing DevTools
Read the complete protocol description for an in-depth look at all of the important concepts.
- Client: Frontend that contains different tooling panels (Inspector, Debugger, Console, …) and sends requests to the server.
At the moment this is the
about:debuggingpage in Firefox. - Server: Browser that is being inspected by the client. Receives messages and delivers them to the appropiate actor so it can reply.
- Actor: Code on the server that can exchange messages with the client.
- Message: JSON packet that is exchanged between the server and the client.
- Messages from the client must include a
tofield with the name of the actor they are directed to, and atypefield specifying what sort of packet it is. - Messages from the server must include a
fromfield with the name of the actor that sends them.
- Messages from the client must include a
sequenceDiagram
    participant Client
    participant Server
    actor Actor1
    Client->>Server: {"to": "Actor1", "type": "SayHi"}
    Server-->>Actor1: {"to": "Actor1", "type": "SayHi"}
    Actor1-->>Server: {"from": "Actor1", "content": "hi!"}
    Server->>Client: {"from": "Actor1", "content": "hi!"}
Displaying protocol traffic
Jump to the Capturing and processing protocol traffic section for a more useful tool for log analysis.
Servo ↔ Firefox
Servo can show the messages sent and received from the DevTools server.
Enable the correct loging level for devtools and you are set:
RUST_LOG="error,devtools=debug" ./mach run --devtools=6080
The output has messages sent (prefixed by <-) and messages received (no prefix).
Here we can see how Servo sends the initial connection information and Firefox replies with a request to connect and its version number.
[2025-11-07T11:37:35Z INFO  devtools] Connection established to 127.0.0.1:47496
[2025-11-07T11:37:35Z DEBUG devtools::protocol] <- {"from":"root","applicationType":"browser","traits":{"sources":false,"highlightable":true,"customHighlighters":true,"networkMonitor":true}}
[2025-11-07T11:37:35Z DEBUG devtools::protocol] {"type":"connect","frontendVersion":"144.0.2","to":"root"}
[2025-11-07T11:37:35Z DEBUG devtools::protocol] <- {"from":"root"}
Firefox ↔ Firefox
A lot of work to improve developer tool support in Servo requires reverse-engineering the working implementation in Firefox. One of the most efficient ways to do this is to observe a successful session in Firefox and record the bidirectional protocol traffic between the server and the client.
On the first run
- Create a new Firefox profile using
firefox --createprofile devtools-testing. - Launch Firefox with
firefox --new-instance -P devtools-testing. - Open about:config and click on “Accept the Risk and Continue”.
- Change the following configuration:
# To see logs in the terminal window
browser.dom.window.dump.enabled = true
devtools.debugger.log = true
devtools.debugger.log.verbose = true
# To enable debugging
devtools.chrome.enabled = true
devtools.debugger.remote-enabled = true
# Optional, avoids having to confirm every time there is a connection
devtools.debugger.prompt-connection = false
After Firefox is configured, it can be launched from the terminal starting the DevTools server:
firefox --new-instance --start-debugger-server 6080 -P devtools-testing
# (on macOS you may need `/Applications/Firefox.app/Contents/MacOS/firefox`)
In this case it is possible to use the same Firefox instance as a client and a server. However, it is not recommended to use “This Firefox”, as that doesn’t give you access to tabs and messages could be different. Instead, whether you are using the same or a different instance, follow the steps outlined in the Connecting to Servo section, skipping the first one.
The terminal window now contains full debug server logs; copy them to somewhere for further analysis.
Capturing and processing protocol traffic
We have seen a simple way of obtaining message logs from Servo and Firefox.
However, this soon turns complex when wanting to compare logs between the two due to the different formats or performing queries on them.
There is a small script to make this process easier: etc/devtools_parser.py.
It is based on Wireshark, a powerful network packet analyzer; more specifically its cli, tshark.
It is configured to log packets sent on your local network on the port that the DevTools server is running.
It can read the payloads from these packets, which are small bits of the JSON DevTools protocol.
tshark needs to be installed for the script to work.
Install it with your package manager or get the full Wireshark release from the official website.
# Linux (Debian based)
sudo apt install tshark
# Linux (Arch based)
sudo pacman -S wireshark-cli
# Linux (Fedora)
sudo dnf install wireshark-cli
# MacOS (With homebrew):
brew install --cask wireshark
# Windows (With chocolatey):
choco install wireshark
You may need to add your user to the wireshark group to allow for rootless captures. Use usermod -a -G wireshark $USER.
Finally, make sure to set up a Firefox profile for debugging.
Capture a session
- Run either Servo or Firefox with the DevTools server enabled:
./mach run --devtools 6080
firefox --new-instance --start-debugger-server 6080 -P devtools-testing
- In another terminal, start the script in capture mode (
-w), specifying the same port as before:
./etc/devtools_parser.py -p 6080 -w capture.pcap
- Connect from
about:debuggingfollowing the same steps. - Perform any actions you want to record.
- Press
Ctrl-Cin the terminal running the parser to stop the recording. This will do two things:- Save the results to a
.pcapfile specified by the-wflag. This is a binary file format for Wireshark, but we can read it later with the same tool. - Print the message log.
There are two modes: the regular one, where it prints the messages in a friendly way, and
--json, which emits newline-separated JSON with each message.
- Save the results to a
- You can now close Servo or Firefox.
Read a capture
It is useful to save multiple captures and compare them later.
While tshark saves them by default in the .pcap format, we can use the same script to get better output from them.
Here the --json option is very useful, as it makes it possible to use tools like jq or nushell to query and manipulate data from them.
# Pretty print the messages
./etc/devtools_parser.py -r capture.pcap
# Save the capture in an NDJSON format
./etc/devtools_parser.py -r capture.pcap --json > capture.json
# Example of a query with jq to get unique message types
./etc/devtools_parser.py -r capture.pcap --json | jq -cs 'map({actor: (.from//.to) | gsub("[0-9]";""), type: .type} | select(.type != null)) | .[]' | sort -u
It is possible to save a JSON capture from the beginning using ./etc/devtools_parser.py -w capture.pcap --json > capture.json.
Here is an excerpt from the output of a capture:
{"to": "root", "type": "getRoot"}
{"from": "root", "deviceActor": "device1", "performanceActor": "performance0", "preferenceActor": "preference2", "selected": 0}
{"to": "device1", "type": "getDescription"}
{"from": "device1", "value": {"apptype": "servo", "version": "0.0.1", "appbuildid": "20251106175140", "platformversion": "133.0", "brandName": "Servo"}}
Guides
This sections contains a few guides for common tasks when working on Servo.
Fixing web content bugs
There are two main classes of web compatibility issues that can be observed in Servo. Visual bugs are often caused by missing features or bugs in Servo’s CSS and layout support, while interactivity problems and broken content is often caused by bugs or missing features in Servo’s DOM and JavaScript implementation.
- For help fixing a bug with our implementation of the DOM see Diangnosing DOM Errors.
- For help narrowing down issues, whether in layout or in the DOM, see Minimal Reproducible Test Cases.
Adding new features
Feature additions are not a great task for a new contributor, because there is often a long series of changes necessary to fully implement a feature in a web engine. To get started, see Implementing a DOM API.
Minimal Reproducible Test Cases
In order to identify exactly what is going wrong on a page, it’s very important to know how to create a minimal reproducible test case. Even if you don’t plan to fix the issue, providing the test case will make the issue much easier for others to fix and also preserve the failure even if the original site changes. The process of making a test case is fairly systematic and can be done by even very new web platform developers. A minimally reproducible test case is almost always the first step toward fixing an issue and they can often be easily converted into Web Platform Tests.
Basic approach
The basic approach to creating a minimal reproducible test case is to gradually remove unecessary content from a page until only the problematic part of the page remains. What this means is that the original layout issue, DOM error, or crash still happens even though the source code is much smaller. It may be that the error doesn’t look or function exactly the same when the test case is created, but it should still produce bad results when compared with other browsers, crash or produce an error. An important step is to compare the results with more than one other browser engine to see if the problem is actually a specification issue. It’s recommended that you also run the test case in Chrome, Firefox, and a WebKit-based browser like Safari.
Minimizing
In order to start creating a minimal reproducible test case, you first must have a copy of the page on your computer. In Chrome, save the page with the issue using “Webpage, Complete.” This ensure that all of the images, CSS, and JavaScript files are also saved to your computer. Next, load the saved HTML file in Chrome and Servo to ensure that the page still functions and that the bug still appears in Servo. Now it’s time to reduce! There are a few techniques you can use to do this:
- Look for a part of the page that is not relevant to the issue, such as a header, footer, etc. Remove those from the loaded HTML file in the Web Inspector, such as by highlighting the elements and pressing the Delete key on your keyboard. Save the page again and ensure that the bug is still there by loading the newly saved page. Keep going!
- If the issue is a layout issue, try removing all JavaScript loaded in the page. If by removing the JavaScript the issue goes away, undo your change and try removing other JavaScript.
- Try removing references to external stylesheets. If removing the stylesheet also removes the bug, then inline the stylesheet and gradually remove unrelated rules. If necessary you can use a type of binary elimination of style rules.
- Replace loaded images with a simple image tag with a
widthand aheight. Not loading an external resource makes the test case a lot easier to reason about. - When you only a few elements left on the page, try removing
class,id, or other unecessary attributes.
You should continue the reduction process until the test case is as small as possible. Often, as you do this, the nature of the bug becomes apparent and you are already half of the way toward fixing it.
Lithium
Lithium is a tool to automate the process above. It works particularly well with crashes and is resilient to non-deterministic bugs.
Implementing a DOM API
Part 1: Basic Setup of a Web API
- Read-up on the relevant spec.
- Add
.webidlfile(s) in this folder for each interface that you want to implement. If one already exists, you want to add the missing parts to it. - For each interface, this will generate a trait named
{interface_name}Methods, accessible viause crate::dom::bindings::codegen::Bindings::{interface_name}Binding. - Use this trait by:
- Adding a matching struct, using
#[dom_struct] - Adding methods with
todo!bodies.
- Adding a matching struct, using
- At this point, the struct can have only one member:
reflector_: Reflector,- The struct should be documented with a link to its interface in the spec,
- The trait methods should each be documented with a link to their definition in the interface.
- Example result.
- Back in the spec,
- Read-up on DOM interfaces.
- Using what you know, for each internal slot of the interface:
- Add an appropriate member to the struct(s) added at 4.
- If this requires defining other structs or enums, these should derive
JSTraceableandMallocSizeOf(example). - All
JSTraceablestructs added above that contain members that must be rooted because they are either JS values or DOM objects should be marked with#[cfg_attr(crown, crown::unrooted_must_root_lint::must_root)]. Example, where the lint is needed due to the presence of aJSVal. - If such a struct is assigned to a variable,
impl js::gc::Rootablefor the struct and userooted!to root the variable(example). - All of this can be changed later, so simply use your best judgement at this stage.
- Add methods for construction(not to be confused with a
Constructorthat is part of the Web API). - Example result.
Part 2: Writing a First Draft
- For each method of the bindings trait referred to at 3 in Part 1:
- In general, follow the structure of the spec: if a method calls into another named algorithm, implement that named algorithm as a separate private method of your struct, that the trait methods calls into. If you later realize this private method can be used from other structs, make it
pub(crate). - For each algorithm step in the spec:
- Copy the line from the spec.
- Implement the spec in code(which may take more than one line, and might require additional commenting).
- In general, follow the structure of the spec: if a method calls into another named algorithm, implement that named algorithm as a separate private method of your struct, that the trait methods calls into. If you later realize this private method can be used from other structs, make it
- Note: there are certain things that are often needed to perform operation as part of an algorithm:
JSContextorCurrentRealm, which are mutually exclusive, can be obtained as an argument to the generated trait method, using this configuration fileGlobalScope: can be obtained usingself.global()on adom_struct, orGlobalScope::from_current_realm- It is best to access them as early as possible, say at the top of the trait method implementation, and to pass them down as ref(in most cases
JSContext/CurrentRealmneed to be behind an&mutreference) - It is preferred to have
JSContext/CurrentRealmas the first argument, followed by&GlobalScopeif needed, and any other needed argument coming after
- This should give you a complete first draft.
Part 3: Running tests and fixing bugs
- Now comes the time to identify which WPT test to run against your first draft. You can find them here.
- This may require turning them on, using this config.
- Test may fail because:
- There is a bug in the code. These should be fixed.
- The test uses other APIs that aren’t supported yet(usually
ERROR).
- Bugs should be fixed. Copilot is of little help here.
- Expected failures can be marked as such, using the process described here.
- This part is done when there are no unexpected test results left.
- On occasion, on the advice of a reviewer, you may file an issue and describe a failure that you cannot fix, mark the test as a failure, and leave it to a follow-up.
Part 4: Refactoring and asking for a final review
- While you may ask for a review at any time if stuck, now is the time to take a last look at your code and decide if you want to refactor anything.
- If you are satisfied, now is the time to ask for a final review.
- Congratulations, the new Web API you implemented should soon merge.
Diagnosing Errors
Diagnosing DOM Errors
Error message like the following clearly show that a certain DOM interface has not been implemented in Servo yet:
[2024-08-16T01:56:15Z ERROR script::dom::bindings::error] Error at https://github.githubassets.com/assets/vendors-node_modules_github_mini-throttle_dist_index_js-node_modules_smoothscroll-polyfill_di-75db2e-686488490524.js:1:9976 AbortSignal is not defined
However, error messages like the following do not provide much guidance:
[2024-08-16T01:58:25Z ERROR script::dom::bindings::error] Error at https://github.githubassets.com/assets/react-lib-7b7b5264f6c1.js:25:12596 e is undefined
Opening the JS file linked from the error message often shows a minified, obfuscated JS script that is almost impossible to read.
Let’s start by unminifying it. Ensure that the js-beautify binary is in your path, or install it with:
npm install -g js-beautify
Now, run the problem page in Servo again with the built-in unminifying enabled:
./mach run https://github.com/servo/servo/activity --unminify-js
This creates an unminified-js directory in the root Servo repository and automatically persists unminified copies of each external JS script
that is fetched over the page’s lifetime. Servo also evaluates the unminified versions of the scripts, so the line and column numbers in the
error messages also change:
[2024-08-16T02:05:34Z ERROR script::dom::bindings::error] Error at https://github.githubassets.com/assets/react-lib-7b7b5264f6c1.js:3377:66 e is undefined
You’ll find react-lib-7b7b5264f6c1.js inside of ./unminified-js/github.githubassets.com/assets/, and if you look at line 3377 you will
be able to start reading the surrounding code to (hopefully) determine what’s going wrong in the page. If code inspection is not enough, however,
Servo also supports modifying the locally-cached unminified JS!
./mach run https://github.com/servo/servo/activity --local-script-source unminified-js
When the --local-script-source argument is used, Servo will look for JS files in the provided directory first before attempting to fetch
them from the internet. This allows Servo developers to add console.log(..) statements and other useful debugging techniques to assist
in understanding what real webpages are observing. If you need to revert to a pristine version of the page source, just run with the
--unminify-js argument again to replace them with new unminified source files.
Diagnosing Stable WPT Errors
Diagnosing a FAIL result
Start by opening the test file’s .ini that contains the expected failures.
It is found under tests/wpt/meta/ in a parallel directory tree to tests/wpt/tests/.
The WPT test harness suppresses most output related to failures that are marked expected in the .ini file.
To learn more about all failures for a test file, change the top-level [filename.html] so it doesn’t match the actual filename; this will cause the harness to ignore the .ini file entirely.
To learn more about one subtest in particular, delete it from the .ini file then run the test again.
The harness will show the specific test assertions that fail, along with the JS stack trace when the failures occur.
Diagnosing an ERROR result
Error results occur when an exception is thrown without being caught. The stack trace from the test harness should show the subtest in which the uncaught exception was observed, as well as the kind of error.
If the exception comes from calling an API method that is implemented in Rust, you will need to find that method implementation and look for code that returns a matching Error variant.
Diagnosing a TIMEOUT result
Test timeouts occur when an async/promise subtest is declared but never completes. You will need to identify two things:
- the last test code that successfully runs
- why the subsequent code that should run is never executed
The quickest way to track down the first data point is inserting console.log statements to prove that code paths are executed.
The code that doesn’t run is usually:
- an event handler (either the event is never fired, or the handler has filtering logic that is tripped)
- a promise handler (the promise is never resolved/rejected)
- an await statement (the promise is never resolved/rejected)
In each case, it’s helpful to start from the code that is intended to trigger the missing step (e.g. the relevant event.fire(..) in Rust code) and working backwards to determine why it’s never executed.
Diagnosing a NOTRUN result
These failures occur when an async subtest is declared (e.g. let some_test = async_test("frobbing the whatsit");) but never executed (e.g. some_test.step(() => ...)).
This usually occurs when a test file sets up many subtests and tries to run them sequentially, but encounters an exception or timeout that prevents further execution.
These results are usually a symptom of some other problem exposed by the test file, and those other problems should be investigated first.
Diagnosing a reftest failure
To see a visual representation of the differences between a test file and its reference file, you can use the reftest analyzer.
To quickly inspect the appearance of a reftest, you can try running the file directly (./mach run tests/wpt/tests/css/CSS2/some-file.html).
If the file relies on other resources from the testsuite, you may need to start the WPT web server first:
cd tests/wpt/tests; ./wpt serve./mach run http://localhost:8000/css/CSS2/some-file.html
Using a debugger with Web Platform Tests
To attach a debugger to Servo while running a Web Platform Test, add the --debugger flag to your ./mach test-wpt command.
There are two modes of operation:
- When using the
servodrivertest harness (the default), you must run a command to attach your debugger in another terminal. A sample command is provided in the output of the./mach test-wptcommand; the test harness will then wait for 30 seconds before continuing execution. - When using the
servotest harness (--product=servo), the debugger will automatically attach for you. To continue the test harness execution, userunfrom the debugger prompt.
Diagnosing Intermittent WPT Errors
The most common sources of intermittent failures in Web Platform Tests include:
- Scheduling (e.g. multiple threads running concurrently or in parallel)
- OS interactions (e.g. socket read/write for network requests)
- Nondeterministic task selection
Each of these can perturb the ordering of events within Servo in nondeterministic ways, exposing unexpected or unplanned behaviour in the engine.
In Servo, this nondeterminism often manifests in code that:
- uses mutexes or shared memory instead of channels.
- enqueues multiple tasks that run on one thread but via different task sources.
- uses timeouts to detect if an event occurred.
Reproducing the failure
While it’s possible to come up with a theory for a particular intermittent failure, it is helpful to show a before/after failure rate for an attempted fix.
Some strategies for reproducing intermittent failures:
- Run with
--repeat-until-unexpectedto repeat the test until an unexpected result is reported - Run the test under heavy load (e.g. run a clean release build in another terminal while running the test on repeat)
- Try different build or runtime configurations:
./mach build --dev./mach build --release./mach build --debug-mozjs./mach test-wpt ... --binary-args=--force-ipc./mach test-wpt ... --binary-args=--multiprocess
Make sure your test-wpt command is using the same runtime binary as the build you have made!
Diagnosing the problem
Once you have reproduced the failure, you need to figure out what’s different about the runs that report different results. When testing out changes, you should keep in mind the frequency of the intermittent results. Don’t jump to conclusions without waiting long enough!
Start by commenting out as much of the test as you can while still reproducing the failure.
Try adding console.log calls to show the ordering of different events, then compare the output between the common case and the intermittent case.
You may need to use set the RUST_LOG environment variable to see internal Servo tracing logs for relevant crates and modules.
Add explicit delays to parts of the test to observe if the failures are more or less likely to occur:
- move part of the test into a closure that executes after a fixed delay, like
test_object.step_timeout(() => ..., 1000) - add a delay to the response for a network request
Diagnosing problems with layout tests
If the test verifies properties of layout (either a reftest or a test that uses layout APIs like getBoundingClientRect(), scrollTop, offsetParent, etc.), some common sources of intermittent results include:
- incremental layout behaves incorrectly for a particular change, but this is covered up by another async operation that triggers additional layout
- a screenshot is taken too early/too late relative to some other change (e.g. a web font loading)
To make incremental layout issues more visible, try:
- delaying the page modification until all other page updates are complete (try a very delayed
setTimeout). - running the test with a real window (
--no-headless). - not touching the mouse until the page modification occurs, then resize the window.
To identify if screenshot timing is an issue, use the reftest analyzer to see the screenshot received by the test harness. If it does not match the output you see when running the test file, the timing of the screenshot may be at fault.
Making a Release
Releasing a new servo version
Bumping the servo version on main
Currently we release a new servo version every month.
At the end of the month, prepare a branch based on latest main.
Run ./mach release X.Y.Z to bump the version numbers and commit the changes.
Open a pull request on servo, to merge the branch into main.
Ideally, the pull request is merged timely on the last or the first day of the month, so that the version number bump correlates closely with the blog-post range.
The blog-post range is up to (including) the head of the last nightly release of the month.
The version bump should be merged after this commit, so that all changes mentioned in the blog post are included in the release.
Creating a release branch
Create a branch with the name release/vX.Y.Z, based on the commit that bumped the version number (in main).
If the date of merge was (significantly) later, and significant changes were made, then the release branch can also be based on an earlier commit and the version number bump backported / re-applied.
The branch should be pushed to the upstream servo repository.
Creating a draft release for testing
Go to the actions tab of the servo repository, and select the Release workflow.
Select the Run workflow button on the top right corner.
Choose the branch release/vX.Y.Z (that you just pushed) as the branch to run the workflow on.
Leave the tickbox unchecked to create a release on the nightly-releases repository, since that allows non-maintainers to help test the release.
Enter the tag vX.Y.Z-beta1, to creating pre-release for testing.
Click Run workflow.
The created workflow will run and create a (public) release on the nightly-releases repository.
Once the release has been created, you can open a thread on zulip and perform a call for testing of the various artifacts.
Backporting changes to the release branch
If any critical fixes need to be applied to the release branch (e.g. fixing crashes detected during manual testing), a PR should be opened against the branch following the regular review process. After that another round of testing should be performed, so try to only backport if absolutely necessary.
Preparing the release
Once the test release on the nightly repository has been manually tested, you can prepare the release by running the release workflow again, but this time checking the box to create a release on upstream servo.
This will create only a draft release on the upstream servo repository.
After the artifacts have been uploaded to the release, click on the edit button to edit the draft release.
The tag should already correctly be vX.Y.Z.
Change the target from main to release/vX.Y.Z.
Click on Generate release notes and then wrap the generated release notes with the following block:
<details>
  <summary>Generated Release notes</summary>
  Release notes here.
</details>
Contact the dedicated signer of the macOS artifact and ask them to sign the release. This might take a while, so this should be done a couple of days before the planned release date.
Finally, add our usual release notes summary, linking to the blog post and to the common issues section (check the previous release notes for examples). Once the blog post is published, we publish the release.
Architecture
Servo is a project to develop a new web browser engine. Our goal is to create an architecture that takes advantage of parallelism at many levels while eliminating common sources of bugs and security vulnerabilities associated with incorrect memory management and data races.
Because C++ is poorly suited to preventing these problems, Servo is written in Rust, a modern language designed specifically with Servo’s requirements in mind. Rust provides a task-parallel infrastructure and a strong type system that enforces memory safety and data race freedom.
flowchart TB
    subgraph Web Content Process
    ScriptA[Script Thread]-->PipelineA[Pipeline A]
    PipelineA
    PipelineA-->ImageA[Image Cache]
    PipelineA-->FontA[Font Cache]
    PipelineA-->LayoutA[Layout]
    LayoutA-->ImageA
    LayoutA-->FontA

    ScriptA[Script Thread]-->PipelineB[Pipeline B]
    PipelineB
    PipelineB-->ImageB[Image Cache]
    PipelineB-->FontB[Font Cache]
    PipelineB-->LayoutB[Layout]
    LayoutB-->ImageB
    LayoutB-->FontB
    end

    subgraph Embedder Process
    direction TB
    Embedder-->Constellation[Constellation Thread]
    Embedder<-->Renderer[Renderer]
    Constellation<-->Renderer
    Renderer-->WebRender
    Constellation-->SystemFont[System Font Cache]
    Constellation-->Resource[Resource Manager]
    end

    Constellation<-->ScriptA
    FontA-->SystemFont
    PipelineA-->Renderer
    FontB-->SystemFont
    PipelineB-->Renderer
This diagram shows the architecture of multiprocess Servo running with a single web content process. When multiprocess mode is enabled, each script thread runs in its own web content process. When multiprocess mode is disabled, all script threads run in the embedder process. Each script thread has a set of communication channels with the constellation and embedding API parts of the embedder process. Solid lines indicate communication channels or API calls.
Constellation, script threads, and pipelines
Each Servo instance has a single constellation, which manages the web content processes for all frames in all WebViews.
The script thread in the web content process can manages multiple pipelines, one for each <iframe> or main frame in the WebView.
The pipeline in the script thread is responsible for accepting input, running JavaScript against the DOM, performing layout, building display lists, and sending display lists to the renderer.
There is a single renderer for the entire Servo instance, which manages multiple WebRender instances which render to a variety of RenderingContexts (essentially OpenGL contexts on platform surfaces).
The pipeline consists of three main parts:
- Script: Script’s primary mission is to create and own the DOM and execute the JavaScript engine. It receives events from multiple sources, including navigation events, and routes them as necessary.
- Layout: Layout initially starts in the same thread as Script, but may use worker threads to lay out a page in parallel. It calculates styles, and constructs the two main layout data structures, the box tree and the fragment tree. The fragment tree is used to determine untransformed positions of nodes and from there to build a display list, which is sent to the renderer.
- Renderer: The renderer (also known as the compositor) forwards display lists to WebRender, which is the content rasterization and display engine used by both Servo and Firefox. It uses the GPU to render the final image of the page. Running on the embedder’s user interface thread, the renderer is also the first to receive input events, which are generally immediately sent to the constellation and then the script thread for processing. Some events, such as scroll and touch events, can be handled initially by the renderer for responsiveness.
Concurrency and parallelism
Concurrency is the separation of tasks to provide interleaved execution. Parallelism is the simultaneous execution of multiple pieces of work in order to increase speed. Here are some ways that we take advantage of both:
- Task-based architecture: Major components in the system should be factored into actors with isolated heaps, with clear boundaries for failure and recovery. This will also encourage loose coupling throughout the system, enabling us to replace components for the purposes of experimentation and research.
- Concurrent rendering: Rendering is a separate thread, decoupled from layout in order to maintain responsiveness. The renderer thread manages its memory manually to avoid garbage collection pauses.
- Selector matching: This is an embarrassingly parallel problem. Like Gecko, Servo does selector matching in a separate pass from flow tree construction so that it is more easily parallelized.
- Parallel layout: We build the flow tree using a parallel traversal of the DOM that respects the sequential dependencies generated by elements such as floats.
- Parsing: We have written a new HTML parser in Rust, focused on both safety and compliance with the specification. We have not yet added speculation or parallelism to the parsing.
- Image decoding: Decoding multiple images in parallel is straightforward.
- Decoding of other resources: This is probably less important than image decoding, but anything that needs to be loaded by a page can be done in parallel, e.g. parsing entire style sheets or decoding videos. Style sheets are parsed in parallel when possible.
Challenges
- Parallel-hostile libraries: Some third-party libraries we need don’t play well in multithreaded environments. Fonts in particular have been difficult. Even if libraries are technically thread-safe, often thread safety is achieved through a library-wide mutex lock, harming our opportunities for parallelism.
- Too many threads: If we throw maximum parallelism and concurrency at everything, we will end up overwhelming the system with too many threads.
- Too many open file handles: IPC communication usually requires opening a file handle on the system. We have run into issues (#23910, #33672, #23905 with file handle exhaustion due to overuse of IPC mechanisms.
JavaScript and DOM bindings
We are currently using SpiderMonkey, although pluggable engines is a long-term, low-priority goal. Each web content process gets its own JavaScript runtime. DOM bindings use the native JavaScript engine API instead of XPCOM, automatically generated via WebIDL.
Multi-process architecture
Similar to Chromium and WebKit2, we intend to have a trusted embedder process and multiple, less trusted web content processes. The high-level API is IPC-based, with non-IPC implementations for testing and single-process use-cases, though it is expected most serious uses would use multiple processes. The engine processes will use the operating system sandboxing facilities to restrict access to system resources.
Rust’s type system also adds a significant layer of defense against memory safety vulnerabilities. This alone does not make a sandbox any less important to defend against unsafe code, bugs in the type system, and third-party/host libraries, but it does reduce the attack surface of Servo significantly relative to other browser engines. Additionally, we have performance-related concerns regarding some sandboxing techniques (for example, proxying all OpenGL calls to a separate process).
I/O and resource management
Web pages depend on a wide variety of external resources, with many mechanisms of retrieval and decoding. These resources are cached at multiple levels—on disk, in memory, and/or in decoded form. In a parallel browser setting, these resources must be distributed among concurrent workers.
Traditionally, browsers have been single-threaded, performing I/O on the “main thread”, where most computation also happens. This leads to latency problems. In Servo there is no “main thread” and the loading of all external resources is handled by a single resource manager task.
Browsers have many caches, and Servo’s task-based architecture means that it will probably have more than extant browser engines (e.g. we might have both a global task-based cache and a task-local cache that stores results from the global cache to save the round trip through the scheduler). Servo should have a unified caching story, with tunable caches that work well in low-memory environments.
References
Important research and accumulated knowledge about browser implementation, parallel layout, etc.:
- How Browsers Work - basic explanation of the common design of modern web browsers by long-time Gecko engineer Ehsan Akhgari
- More how browsers work article that is dated, but has many more details
- Webkit overview
- Fast and parallel web page layout (2010) - Leo Meyerovich’s influential parallel selectors, layout, and fonts. It advocates separating parallel selectors from parallel cascade to improve memory usage. See also the 2013 paper for automating layout and the 2009 paper that touches on speculative lexing/parsing.
- Servo layout on mozilla wiki
- Robert O’Callahan’s mega-presentation - Lots of information about browsers
- ZOOMM paper - Qualcomm’s network prefetching and combined selectors/cascade
- Strings in Blink
- Incoherencies in Web Access Control Policies - Analysis of the prevelance of document.domain, cross-origin iframes and other weirdness
- A Case for Parallelizing Web Pages – Sam King’s server proxy for partitioning webpages. See also his process-isolation work that reports parallelism benefits.
- High-Performance and Energy-Efficient Mobile Web Browsing on Big/Little Systems Save power by dynamically switching which core to use based on automatic workload heuristic
- C3: An Experimental, Extensible, Reconfigurable Platform for HTML-based Applications Browser prototype written in C# at Microsoft Research that provided a concurrent (though not successfully parallelized) architecture
- CSS Inline vertical alignment and line wrapping around floats - dbaron imparts wisdom about floats
- Quark - Formally verified browser kernel
- HPar: A Practical Parallel Parser for HTML
- Gecko HTML parser threading
Project Structure
- components
- bluetooth — Implementation of the bluetooth thread.
- canvas — Implementation of painting threads for 2D and WebGL canvases.
- compositing — Integration with OS windowing/rendering and event loop.
- constellation — Management of resources for a top-level browsing context (ie. tab).
- devtools — In-process server to allow manipulating browser instances via a remote Firefox developer tools client.
- fonts — Code for dealing with fonts and text shaping.
- layout — Converts page content into positioned, styled boxes and passes the result to the renderer.
- layout_thread — Runs the threads for layout, communicates with the script thread, and calls into the layout crate to do the layout.
- msg — Shared APIs for communicating between specific threads and crates.
- net — Network protocol implementations, and state and resource management (caching, cookies, etc.).
- plugins — Syntax extensions, custom attributes, and lints.
- profile — Memory and time profilers.
- script — Implementation of the DOM (native Rust code and bindings to SpiderMonkey).
- script_bindings - Support code and bindings generated from WebIDL files.
The bindings consist of traits representing WebIDL interfaces and glue code for the
SpiderMonkey JavaScript engine.
The actual trait implementations are located in the
scriptcrate. These are split into two crates in order to improve the speed of incremental builds. - script_layout_interface — The API the script crate provides for the layout crate.
- selectors — CSS selector matching.
- servo — Entry points for the servo application and libservo embedding library.
- shared — Shared traits/code used by multiple components that don’t want to depend on the main crate for build speed reasons.
- style — APIs for parsing CSS and interacting with stylesheets and styled elements.
- util — Assorted utility methods and types that are commonly used throughout the project.
- webdriver_server — In-process server to allow manipulating browser instances via a WebDriver client.
- webgpu — Implementation of threads for the WebGPU API.
- etc — Useful tools and scripts for developers.
- ports
- servoshell — The example browser that uses servo.
- python
- mach — A command-line tool to help with developer tasks.
- servo — Implementations of servo-specific mach commands.
- tidy — Python package of code lints that are automatically run before merging changes.
- resources — Files used at run time. Need to be included somehow when distributing binary builds.
- support
- android — Libraries that require special handling for building for Android platforms
- target
- debug — Build artifacts generated by
./mach build --debug. - doc — Documentation is generated here by the
rustdoctool when running./mach doc - release — Build artifacts generated by
./mach build --release.
- debug — Build artifacts generated by
- tests
- dromaeo — Harness for automatically running the Dromaeo testsuite.
- html — Manual tests and experiments.
- jquery — Harness for automatically running the jQuery testsuite.
- power — Tools for measurement of power consumption.
- unit — Unit tests using rustc’s built-in test harness.
- wpt — W3C web-platform-tests and csswg-tests along with tools to run them and expected failures.
Repositories
The Servo project maintains a number of repositories that are either released independently of Servo or are forked from an upstream project.
Widely-used in Rust ecosystem
- euclid: Geometric types
- ipc-channel: Interprocess communication channels
- html5ever: an HTML5 parser written in Rust
- rust-cssparser: A CSS parser written in Rust
- rust-url: URL library for Rust, based on the URL Standard. Also known as
url. - string-cache: String interning library
Forks
- mozjs: Servo’s fork of SpiderMonkey and Rust bindings
- stylo: Servo’s CSS implementation with regular synchronization with the upstream version in the Gecko repository
- webrender: A fork of Firefox’s WebRender with a few small changes for Servo
Servo-internal
- book: This book!
- ci-runners: Scripts and tools used for Servo’s CI (continuous integration)
- malloc_size_of: Measure the runtime size of values
- media: The media backend that Servo uses, currently GStreamer-only
- servo: The main repository for the Servo web platform engine
- surfman: Low-level cross-platform Rust library for managing graphic surfaces
- wpt: Servo’s fork of the Web Platform Tests
Experimental Web Platform Features
This is a list of web platform features that have a partial implementation in Servo and are gated behind an optional preference.
The following features are enabled by the experimental rendering mode or --enable-experimental-web-platform-features flag.
| Feature | Tracking issue | Preference |
|---|---|---|
| CSS Font Loading API | #29376 | dom_fontface_enabled |
| CSS Grid | #34479 | layout_grid_enabled |
| CSS Multicol | #22397 | layout_columns_enabled |
| Clipboard API | #36084 | dom_async_clipboard_enabled |
| Document.execCommand | #25005 | dom_exec_command_enabled |
| IndexedDB | #6963 | dom_indexeddb_enabled |
| IntersectionObserver | #35767 | dom_intersection_observer_enabled |
| Navigator.registerProtocolHandler() | #40615 | dom_navigator_protocol_handlers_enabled |
| Notification API | #34841 | dom_notification_enabled |
| OffscreenCanvas | #34111 | dom_offscreen_canvas_enabled |
| Permissions API | #31235 | dom_permissions_enabled |
| Sanitizer API | #43948 | dom_sanitizer_enabled |
| Storage API | #43976 | dom_storage_manager_api_enabled |
| Variable fonts | #38800 | layout_variable_fonts_enabled |
| WebGL2 | #41394 | dom_webgl2_enabled |
| WebGPU | #24706 | dom_webgpu_enabled |
The following features are disabled by default but can be toggled with a command line flag (e.g. --pref dom_webgpu_enabled).
| Feature | Tracking issue | Preference |
|---|---|---|
| Adopted Stylesheet | #38132 | dom_adoptedstylesheet_enabled |
| CSS writing modes | #2560 | layout_writing_mode_enabled |
| CookieStore | #37674 | dom_cookiestore_enabled |
| Credential Management API | #38788 | dom_credential_management_enabled |
| File and Directory Entries API | #45653 | dom_entries_api_enabled |
| Geolocation API | #38903 | dom_geolocation_enabled |
| Largest Contentful Paint | #42000 | largest_contentful_paint_enabled |
| Media Capture and Streams API | #26861 | dom_canvas_capture_enabled |
| Screen Wake Lock API | #43615 | dom_wakelock_enabled |
| ServiceWorker | #36538 | dom_serviceworker_enabled |
| VisualViewport | #41341 | dom_visual_viewport_enabled |
| Web Animations | #36950 | dom_web_animations_enabled |
| WebRTC | #41396 | dom_webrtc_enabled |
| WebRTC Transceiver | #41396 | dom_webrtc_transceiver_enabled |
| WebVTT | #22312 | dom_webvtt_enabled |
| WebXR Layers | #27468 | dom_webxr_layers_enabled |
Enabled web platform features
This is a list of web platform features with an implementation that is complete enough to enable by default.
However, they can still be disabled with an optional preference (e.g. --pref dom_webgpu_enabled=false).
| Feature | Tracking issue | Preference |
|---|---|---|
| AbortController | #34866 | dom_abort_controller_enabled |
| Gamepad API | #10977 | dom_gamepad_enabled |
| MutationObserver | #6633 | dom_mutation_observer_enabled |
| ResizeObserver | #39790 | dom_resize_observer_enabled |
| SharedWorker | #7458 | dom_sharedworker_enabled |
| WebCrypto API | #40687 | dom_crypto_subtle_enabled |
Script
This document should get you up to speed on Script Thread, rooting and Gc. It is by no means complete.
Servo is unique in that it uses garbage collection for some things that are non-obvious.
For example, every DOM object (a struct with #[dom_struct]) is owned by SpiderMonkey’s garbage collector.
This necessitates that the engine APIs that interact with these objects must be sound when garbage collection can occur at many points in the program.
While the garbage collector (GC) is complex and has multiple modes, we can assume that whenever the GC runs then the Rust program does not run.
Rooting and rooted types
An important part of garbage collection is establishing the roots of the object graph. A root tells the garbage collector two things:
- Do not delete any value that is transitively reachable from this root.
- If garbage collection causes this rooted value to be moved in memory, all pointers to this value should be updated.
In Servo’s code, roots are created automatically by using the DomRoot<T>, Root<T>, and Rooted<T> types.
See the module documentation for more details about the difference. These types implement Deref, so we can treat them as
normal references.
The following examples contain simplifications of real Servo code patterns to make them easier to understand.
Assume the following code, declaring a Kittens type that contains pointers to Cat types, all of which are owned by the garbage collector:
#![allow(unused)]
fn main() {
#[dom_struct]
struct Kittens {
    children: Vec<Dom<Cat>>
}

fn play_with_kittens(kittens: &Kittens) {
    let children = & cats.children;
    play_with(children)
}
}
Without rooting the GC could pause our program after we got the reference to children, move the Kittens struct around
and we would have invalid access when playing with them!
This holds even if Kittens was rooted by some other mechanism earlier in the call chain.
Remember that the Garbage Collector cannot change pointers of our local variable ‘children’ if it doesn’t know about it.
Hence, we need to transform the code into
#![allow(unused)]
fn main() {
#[dom_struct]
struct Kittens {
    children: Vec<Dom<Cat>>
}

fn play_with_kittens(cats: &Kittens) {
    let children: Vec<DomRoot<Cat>> = cats.children.iter().map(|cat| cat.as_rooted()).collect();
    play_with(children)
}
}
We will assume that getting the cat reference and rooting it is one atomic action.
Unrooting (the reverse) will automatically be done via a Drop impl on DomRoot<T>.
To ensure web API implementations in Servo are sound, the engine code is conservative and usually returns rooted types (such as DomRoot<Node>).
This is an acceptable tradeoff between safety and performance because rooting and unrooting operations are efficient; they essentially just push and pop vector elements.
Crown and CanGc
It’s easy to overlook rooting concerns when implementing new APIs.
Crown is the answer (if you are working on Script things you should run ./mach build --use-crown to be sure it is checking things).
In essence, Crown just checks that you do not forgotten to root things and you will sometimes see certain lints in the code talking to crown such as #[cfg_attr(crown, allow(crown::unrooted_must_root))]. These essentially disable crown and should only be used in very specific circumstances.
But there is another piece of the puzzle tangentially related. While rooting gives us the way to enforce the GC to play nice with our rust pointers, we also have rust RefCells. While the pointers for these are now properly handled by the GC, the GC needs to borrow the RefCell to test reachability and redirect the pointer.
But we can only borrow a RefCell not simulataneously. What happens if we have a Gc pause while having a cell borrowd?
#![allow(unused)]
fn main() {
struct CatCarrier {
    cat: RefCell<Dom<Cat>>,
}

fn some_function(carrier: &CatCarrier) {
    let mutable_cat = carrier.inner_cat.borrow_mut().as_rooted();
    play_with_cat_mutably(mutable_cat);
    cleanup_playspace();
}
}
Now assume that cleanup_playspace can call the GC. It could then happen that we
- Hold the mutable borrow to the cat inside the carrier.
- Cleanup after the cat.
- The GC pauses and tries to trace the rooted
mutable_catvia borrowing the RefCell. - Panics because the RefCell can only be borrowed mutably once!
We call this a borrow hazard. To prevent this we have the following solution.
#![allow(unused)]
fn main() {
fn some_function(carrier: &CatCarrier, can_gc: CanGc) {
    {
        let mutable_cat = carrier.inner_cat.borrow_mut().as_rooted();
        play_with_cat_mutably(mutable_cat);
    }
    cleanup_playspace(can_gc);
}
}
Now this example is not complete and only here to illustrate the following point.
CanGC (which is a trivial type and easily copyable) was introduced, not as a
formal prevention of the borrow hazard but as a note to the programmer. It says:
Be careful if you want to have a mutable borrow that it does not cross the boundaries
of a function taking CanGc.
There are more details here on how to recognize and handle borrow hazards.
We only want to use this as a motivating example for the following section on &JSContext
and &mut JSContext.
Our running example would then look something like this:
#![allow(unused)]
fn main() {
fn some_function(cats: &Kittens, can_gc: CanGc) {
    let children: Vec<DomRoot<Cat>> = cats.children.iter().map(|cat| cat.as_rooted()).collect();
    play_with_cats(children);
    cleanup_after_cats(children, can_gc);
}
}
The pecise notion of this is that we can be sure that no GC will happen when we call play_with_cats but there
might be a GC happening while we call cleanup_after_cats. The reason why some methods can incur GC and some methods do not are deep in the SpiderMonkey connections to servo and you will generally not be obvious.
What does it mean for you?
In essence, if a method you are calling needs CanGc you should have your method use CanGc
so that everybody can remember to be careful about borrow hazards around the code.
JSContext, &mut JSContext
But as you can see this can be hazardous. What if somebody forgot to use the CanGc attribute
in their function call but actually does call the GC somewhere deep in the call stack?
Then we created a borrow hazard that will lead to crashes we might not understand.
To solve this we introduce JSContext and &mut JSContext.
Unlike CanGc, these types use the Rust compiler’s borrowing rules and SpiderMonkey API wrappers to ensure that any API that can trigger garbage collection requires a &mut JSContext argument.
Since these values are unique, they must be passed by callers.
Similarly, any API function that cannot GC but still requires access to a JS context only takes a &JSContext argument.
There is also a NoGc type that can be constructed from a JSContext.
Since this type borrows the &mut JSContext, it makes it impossible to invoke any code that requires a &mut JSContext argument (i.e. can trigger a GC operation) while the NoGc value exists.
Note: Currently the Servo codebase is transforming from the previous
CanGcapproach to theJSContextapproach. You might see both in the codebase and also several escape hatches.
The performance of rooting
#![allow(unused)]
fn main() {
#[dom_struct]
struct Kittens {
    children: Vec<Cat>
}

impl Kittens {
    fn children(&self) -> Vec<DomRoot<Cat>> {
        self.children.iter().map(|cat| cat.as_rooted()).collect()
    }
}

fn some_function(cats: &Kittens) {
    let happy = cats.children().iter().any(|cat| cat.is_purring());
    if happy {
        println!("Happy cat found!");
    }
}
}
This API for interacting with kittens is safely rooted, but when there are many children the rooting and unrooting work can add up.
We can use the JSContext types to ensure code that violates rooting rules won’t trigger any GC operations that could observe those violations.
Since &mut is a unique borrow, we can introduce a new type:
#![allow(unused)]
fn main() {
struct UnrootedDom<'a, T> {
    inner_cat: Dom<T>,
    js_context: &mut 'a JSContext,
}
}
Then whenever we have a handle on UnrootedDom we know that as long as this lives we can not call any methods that has a GC.
The following is invalid code.
#![allow(unused)]
fn main() {
#[dom_struct]
struct Kittens {
    children: Vec<UnrootedDom<'_, Cat>>,
}

fn make_cats(cx: &mut JSContext) -> Kittens {}

fn play_with_cat(cx: &JSContext, cat: &Cat) {}

fn cleanup_after_cats(cx: &mut JSContext, cat: &Cat) {}

fn some_function(cx: &mut JSContext) {
    let cats = make_cats(cx);
    for cat in cats.children {
        play_with_cat(cx, cat.inner_cat)
    }
    for cat in cats.children {
        cleanup_after_cats(cx, cat)
    }
}
}
We will get a compile error that cx is borrowed mutably once by ‘make_cats’ and once by ‘cleanup_after_cats’. But notice that the call to ‘play_with_cat’ is perfectly fine.
This is the essence of ‘UnrootedDomNode’ and similar ‘Unrooted’ methods. Some of these might also take the ‘NoGC’ argument
#![allow(unused)]
fn main() {
fn play_with_cats<'a>(no_gc: &'a NoGC, cat: Cat) {}

fn some_function(cx: &mut JSContext, cat: &Cat) {
    play_with_cats(cx.no_gc(), cat);
}
}
More Information
TODO:
- https://github.com/servo/servo/blob/main/components/script/script_thread.rs
- JavaScript: Servo’s only garbage collector
SpiderMonkey
Current state of, and outlook on, Servo’s integration of SpiderMonkey: https://github.com/gterzian/spidermonkey_servo
Script Thread
DOM Bindings
The DOM bindings are implementations of WebIDL interfaces in native Rust code.
A code generator is responsible for producing glue code that exposes these native Rust implementations to JavaScript via the SpiderMonkey API.
The WebIDL files themselves are located in components/script_bindings/webidls/.
These files contain the definition of each interface including their names, attributes, and methods.
The Rust implementations of these interfaces are contained in components/script/dom.
Each Rust implementation is a special Rust struct which holds the state of each DOM object.
Layout Wrappers
JavaScript runs in a single thread and the DOM interfaces are not thread-safe.
Layout needs to access the DOM, but is expected to run across different threads.
In theory, this can work as long as a thread does not try to read from or mutate a DOM object while another thread is mutating the same object.
We try to make this bit of unsafety easier to manage by limiting how layout can use DOM objects via a wrapper struct that exposes a limited, yet compatible, set of functionality.
There are two usage patterns:
- Layout itself assumes that only a single thread “owns” the DOM wrapper for each node and thus writing to the DOM should be safe. Children of the node may be processed in other threads concurrently. On the other hand, accessing the parent is highly unsafe, as another thread may be writing to and reading from the parent node.
styloandselectorsassume that nodes can be accessed from any thread, but only a single thread will write to a node at once. This means that accessing parents and children is safe, but writing to the node is highly unsafe.
In addition, layout depends on the script, so it is not possible to pass DOM instances directly from script to layout otherwise we would have a dependency cycle.
Instead layout-api exposes a trait-based interface and script implements it.
This allows the Layout interface to deal with nodes directly.
The four traits that we expose are:
LayoutNode: This is the basic interface for a DOM node that is used for layout.DangerousStyleNode: This is the interface which implementsstyloandselectorstraits for interacting with nodes. This can be created from aLayoutNodeby calling the unsafe methodLayoutNode::dangerous_style_node(). In general, these nodes should not be used by layout code, unless passing them directly to astyloorselectorscall.LayoutElement: This is the basic interface for a DOM element that is used for layout.DangerousStyleElement: This is the interface which implementsstyloandselectorstraits for interacting with elements. This can be created from aLayoutElementby calling the unsafe methodLayoutElement::dangerous_style_element(). In general, these elements should not be used by layout code, unless passing them directly to astyloorselectorscall.
script implements these traits with ServoLayoutNode, ServoDangerousStyleNode, ServoLayoutElement, and ServoDangerousLayoutElement.
In addition, script exposes two other structs which implement stylo traits: ServoDangerousStyleDocument and ServoDangerousStyleShadowRoot.
Rules for Layout Wrappers
- In order to keep things simple and build times faster, the trait definitions (
LayoutNodeandLayoutElement) should not contain any default methods. All implementation code should be inscript. - Layout should not use
DangerousStyleNodeandDangerousStyleElementunless calling intostyloorselectors. There are currently a few exceptions, but they will be eliminated gradually. - Layout should not rely on methods defined only on
ServoLayoutNodeandServoLayoutElement. Instead, new functionality should be added to theLayoutNodeorLayoutElementtraits and then implemented inServoLayoutNodeorServoLayoutElement. This will allow eliminatingTrustedNodeAddressin the future and passingLayoutNodes directly to layout, removing a source of unsafe code.
Microtasks
According the HTML spec, a microtask is: “a colloquial way of referring to a task that was created via the queue a microtask algorithm”(source). Each event-loop–meaning window, worker, or worklet–has its own microtask queue. The tasks queued on it are run as part of the perform a microtask checkpoint algorithm, which is called into from various places, the main one being after running a task from a task queue that isn’t the microtask queue, and each call to this algorithm drains the microtask queue–running all tasks that have been enqueued up to that point(without re-entrancy).
The microtask queue in Servo
The MicroTaskQueue is a straightforward implementation based on the spec: a list of tasks and a boolean to prevent re-entrancy at the checkpoint.
One is created for each runtime, matching the spec since a runtime is created per event-loop.
For a window event-loop, which can contain multiple window objects, the queue is shared among all GlobalScope it contains.
Dedicated workers use a child runtime, but that one still comes with its own microtask queue.
Microtask queueing
A task can be enqueued on the microtask queue from both Rust, and from the JS engine.
- From JS: the JS engine will call into
enqueue_promise_jobwhenever it needs to queue a microtask to call into promise handlers. This callback mechanism is set up once per runtime. This means that resolving a promise, either from Rust or from JS, will result in this callback being called into, and a microtask being enqueued. Strictly speaking, the microtask is still enqueued from Rust. - From Rust, there are various places from which microtask are explicitly enqueued by “native” Rust:
- To implement the await a stable state algorithm, via the script-thread, apparently only via the script-thread, meaning worker event-loop never use this algorithm.
- To implement the dom-queuemicrotask algorithm, both on window and worker event-loops.
- And various other places in the DOM, which can all be traced back to the variants of
Microtask - A microtask can only ever be enqueued from steps running on a task itself, never from steps running “in-parallel” to an event-loop.
Running Microtask Checkpoints
The perform-a-microtask-checkpoint corresponds to MicrotaskQueue::checkpoint, and is called into at multiple points:
- In the parser, when encountering a
scripttag as part of tokenizing. This corresponds to #parsing-main-incdata:perform-a-microtask-checkpoint. - Again in the parser, ss part of creating an element. This corresponds to #creating-and-inserting-nodes:perform-a-microtask-checkpoint.
- As part of cleaning-up after running a script. This corresponds to #calling-scripts:perform-a-microtask-checkpoint.
- At two points(one, two) in the
CustomElementRegistry, the spec origin of these calls is unclear: it appears to be “clean-up after script”, but there are no reference to this in the parts of the spec that the methods are documented with. - In a worker event-loop, as part of step 2.8 of the event-loop-processing-model
- In two places(one, two) in a window event-loop(the
ScriptThread), again as part of step 2.8 of the event-loop-processing-model. This needs to consolidated into one call, and what is a “task” needs to be clarified(TODO(#32003)). - Our paint worklet implementation does not seem to run this algorithm yet.
Garbage collection and RefCell
There is a subtle interaction between Servo’s integration with SpiderMonkey’s garbage collector and Rust’s model for shared ownership.
Since DOM objects in Servo are not uniquely owned, we must use RefCell/DomRefCell for members that can be mutated.
When a garbage collection (GC) operation is triggered from SpiderMonkey, every DOM object is traced to find any reachable JS value.
This tracing is implemented by the JSTraceable derive, which calls JSTraceable::trace on each member of the DOM object (unless it is annotated with #[no_trace]).
Since the JSTraceable implementation for RefCell borrows the cell, this means that any mutable borrow of a DOM object’s member will trigger a panic if a GC occurs while the borrow is still active.
We often refer to this in Servo as a borrow hazard.
Recognizing borrow hazards: CanGc
Servo has a type named CanGc which is used to indicate when a GC could occur before the callee returns.
There is one rule: when calling a function that accepts a CanGc argument, the caller must also accept a CanGc argument.
There are exceptions to this rule:
- trait methods that are defined outside of the
script/script_bindingscrates cannot propagateCanGc, so implementations must useCanGc::note()if aCanGcargument is required by a callee - async tasks must use
CanGc::note(), since they execute independently of the caller’s stack frame extern "C"functions must useCanGc::note(), since they require a matching signature for some external library
When CanGc is propagated correctly through a piece of code, borrow hazards can be identified by looking for uses of borrow_mut() nearby uses of can_gc.
In particular, when the return value of borrow_mut() is stored in a variable, and that variable is still alive when a function call includes a can_gc argument, there’s a very good chance that it’s a panic waiting to be triggered!
See an example issue highlighting a borrow hazard. To learn more, see the original issue proposing a static analysis.
Verifying borrow hazards
To verify that a particular mutable borrow can trigger be triggered when a GC occurs, we need 1) deterministic garbage collection, 2) a way to run the suspicious code.
To make garbage collection deterministic, you first need to build Servo with --debug-mozjs, then run it with --pref js_mem_gc_zeal_level=2 --pref js_mem_gc_zeal_frequency=1.
This enables a mode where the garbage collector runs any time a JS allocation occurs, and is guaranteed to trigger any latent borrow hazards.
It is also very slow, so minimizing your testcase will save you time.
If you are unsure of exactly how to trigger the suspicious code, add a panic to it and run WPT tests from the appropriate directory until you find a test file that panics.
Patterns for fixing borrow hazards
- Force the borrow to be dropped earlier by scoping it (
{ ... }) - Clone a temporary value out of the borrowed value so the borrow can be dropped earlier
- Instead of
RefCell<SomeStruct>, make members inside ofSomeStructuseRefCell/Cell - Split a mixed immutable/mutable borrow into multiple scoped immutable borrows and only use mutable borrows when the mutation occurs
Examples of fixing borrow hazards
- https://github.com/servo/servo/pull/40139
- https://github.com/servo/servo/pull/40138
Examples of propagating CanGc arguments
- https://github.com/servo/servo/pull/40033
- https://github.com/servo/servo/pull/36180
- https://github.com/servo/servo/pull/40325
Adding CanGc arguments to generated DOM method traits
The extra arguments to WebIDL methods are controlled by the Bindings.conf file.
CanGc arguments in particular are controlled by the canGc key for a particular interface.
If an interface is not yet listed in the file, feel free to add it.
Servo’s style system overview
This document provides an overview of Servo’s style system. For more extensive details, refer to the style doc comments, or the Styling Overview in the wiki, which includes a conversation between Boris Zbarsky and Patrick Walton about how style sharing works.
Selector Implementation
To ensure compatibility with Stylo (a project integrating Servo’s style system into Gecko), selectors must be consistent.
The consistency is implemented in selectors’ SelectorImpl, containing the logic related to parsing pseudo-elements and other pseudo-classes apart from tree-structural ones.
Servo extends the selector implementation trait in order to allow a few more things to be shared between Stylo and Servo.
The main Servo implementation (the one that is used in regular builds) is SelectorImpl.
DOM glue
In order to keep DOM, layout and style in different modules, there are a few traits involved.
Style’s dom traits (TDocument, TElement, TNode, TRestyleDamage) are the main “wall” between layout and style.
Layout’s wrapper module makes sure that layout traits have the required traits implemented.
The Stylist
The stylist structure holds all the selectors and device characteristics for a given document.
The stylesheets’ CSS rules are converted into Rules.
They are then introduced in a SelectorMap depending on the pseudo-element (see PerPseudoElementSelectorMap), stylesheet origin (see PerOriginSelectorMap), and priority (see the normal and important fields in PerOriginSelectorMap).
This structure is effectively created once per pipeline, in the corresponding LayoutThread.
The properties module
The properties module is a mako template.
Its complexity is derived from the code that stores properties, cascade function and computation logic of the returned value which is exposed in the main function.
Layout
Servo’s current layout system is also known as Layout 2020. It replaced the original layout system which was also known as Layout 2013.
Layout happens in three phases: box tree construction, fragment tree construction, and display list construction. Once a display list is generated, it is sent to WebRender for rendering. When possible during tree construction, layout will try to use parallelism with Rayon. Certain CSS feature prevent parallelism such as floats or counters. The same code is used for both parallel and serial layout.
Box Tree
The box tree is tree that represents the nested formatting contexts as described in the CSS specification. There are various kinds of formatting contexts, such as block formatting contexts (for block flow), inline formatting contexts (for inline flow), table formatting contexts, and flex formatting contexts. Each formatting context has different rules for how boxes inside that context are laid out. Servo represents this tree of contexts using nested enums, which ensure that the content inside each context can only be the sort of content described in the specification.
The box tree is just the initial representation of the layout state and generally speaking the next phase is to run the layout algorithm on the box tree and produce a fragment tree.
Fragments in CSS are the results of splitting elements in the box tree into multiple fragments due to things like line breaking, columns, and pagination.
Additionally during this layout phase, Servo will position and size the resulting fragments relative to their containing blocks.
The transformation generally takes place in a function called layout(...) on the different box tree data structures.
Layout of the box tree into the fragment tree is done in parallel, until a section of the tree with floats is encountered. In those sections, a sequential pass is done and parallel layout can commence again once the layout algorithm moves across the boundaries of the block formatting context that contains the floats, whether by descending into an independent formatting context or finishing the layout of the float container.
Fragment Tree
The product of the layout step is a fragment tree.
In this tree, elements that were split into different pieces due to line breaking, columns, or pagination have a fragment for every piece.
In addition, each fragment is positioned relatively to a fragment corresponding to its containing block.
For positioned fragments, an extra placeholder fragment, AbsoluteOrFixedPositioned, is left in the original tree position.
This placeholder is used to build the display list in the proper order according the CSS painting order.
Display List Construction
Once layout has created a fragment tree, it can move on to the next phase of rendering which is to produce a display list for the tree. During this phase, the fragment tree is transformed into a WebRender display list which consists of display list items (rectangles, lines, images, text runs, shadows, etc). WebRender does not need a large variety of display list items to represent web content.
In addition to normal display list items, WebRender also uses a tree of spatial nodes to represent transformations, scrollable areas, and sticky content. This tree is essentially a description of how to apply post-layout transformations to display list items. When the page is scrolled, the offset on the root scrolling node can be adjusted without immediately doing a layout. Likewise, WebRender has the capability to apply transformations, including 3D transformations to web content with a type of spatial node called a reference frame.
Clipping whether from CSS clipping or from the clipping introduced by the CSS overflow property is handled by another tree of clip nodes.
These nodes also have spatial nodes assigned to them so that clips stay in sync with the rest of web content.
WebRender decides how best to apply a series of clips to each item.
Once the display list is constructed it is sent to the compositor which forwards it to WebRender.
Accessibility
This section contains information on the design of Servo’s accessibility system.
Background provides information on the goals of the accessibility system, and on AccessKit, the library we use to provide cross-platform accessibility support.
Servo accessibility for embedders explains the embedder APIs for activating accessibility and consuming accessibility information produced by Servo.
(TODO) servoshell accessibility will describe how we use the embedder API to embed Servo’s accessibility trees in the servoshell application.
WebView accessibility internals explains how accessibility activation for a particular webview is implemented.
Generating accessibility trees for web content explains how the tree for a particular web page is created and updated.
(TODO) Servo accessibility tree testing will describe how we test the correctness of our accessibility tree implementation.
accessibility_enabled pref
While the system is being developed, the accessibility_enabled pref must be set in order to enable the accessibility code to run.
Note
As well as enabling the pref, it may be necessary to have an assistive technology running in order for the accessibility tree to be built and exposed to accessibility inspectors. On Linux, running Orca is sufficient. Accerciser or Elevado can be used to inspect the accessibility tree as it is exposed to assistive technologies.
Accessibility Background
Accessibility tree
Accessibility information is provided to platform accessibility APIs as a tree of nodes, representing the different parts of the UI - for example, a node representing a toolbar may contain nodes representing buttons.
Platform APIs allow assistive technologies like screen readers to present an alternative user interface (for example, a speech- or braille-based interface) to users, and allow those interfaces to be interacted with via the assistive technology by allowing the assistive technology to relay user interactions back to the application.
A browser’s accessibility tree combines the accessibility tree for its own UI (the address bar, and so on) with the accessibility trees for any active documents, so that users can use assistive technology to interact with web pages being shown in the browser.
AccessKit concepts
AccessKit provides a platform-independent schema for exposing information about the application’s UI to assistive technology APIs.
Central cache
Since assistive technologies need to query the tree frequently and synchronously, multi-process browsers typically cache the tree centrally to allow them to do so without incurring IPC latency or interrupting web content processes.
This principle is behind the accessibility architecture of Chromium (docs) and Firefox (Cache the World). In these architectures, the main browser process retains an in-memory accessibility tree composed of the tree representing the browser UI plus the sub-trees for any web contents being shown in the browser (including tabs which are currently not showing). Each renderer process is responsible for communicating updates to its accessibility tree to the main process for incorporation into the aggregated tree. The accessibility trees are all represented internally in a platform-independent manner, and mapped to the respective platform APIs for the platform the browser is running on.
The basic design of AccessKit is based on Chromium’s original multi-process accessibility architecture, which also influenced Firefox’s “Cache the World” design. It provides a platform-independent, serializable schema centered on the concept of tree updates, as well as an API to allow consuming those updates to create an in-memory tree which can be mapped to platform APIs. Typically, application developers only need to be concerned with producing the tree updates; AccessKit provides “adapters” which consume the updates, retain the cached full tree, and communicate with platform APIs.
AccessKit data types
Node
AccessKit provides a Node type to represent a node in the accessibility tree.
A Node must have a Role value, and may have many other properties, including children.
Node is designed to be serializable, so it can be easily passed between processes.
NodeId
Each Node is associated with a NodeId, which must be unique within the node’s tree.
Properties which refer to other nodes in the tree, including children, refer to nodes by their NodeIds.
Node doesn’t have an ID property; rather, the mechanism for associating a Node with a NodeId is via TreeUpdate.
TreeUpdate
TreeUpdate represents a change to an accessibility tree.
The initial full tree for an application or subtree is sent as a TreeUpdate with all known nodes, and the necessary metadata for the tree; subsequent TreeUpdates need only include nodes which have changed and the tree’s TreeId.
Any node which is added or changed in any way, including adding or removing child nodes, must be included in the TreeUpdate in full (i.e. not only changed properties for the node).
Somewhat counter-intuitively, AccessKit doesn’t provide a schema for an accessibility tree data structure to be used as a “source” for TreeUpdates - it’s up to the application to produce TreeUpdates based on any UI changes in any way it sees fit.
The bulk of each TreeUpdate is a vector of (NodeId, Node) pairs; each NodeId must be unique to the TreeId that the TreeUpdate refers to.
The rest of the TreeUpdate consists of the TreeId for the tree, the NodeId of the currently focused node, and optionally some metadata about the tree (required if this is the first TreeUpdate for this TreeId).
Each TreeUpdate can only have one TreeId; this determines the ID space for the NodeIds in the update.
Subtrees
AccessKit allows applications to nest separate trees to avoid needing to maintain global uniqueness of NodeIds.
Nesting a tree as a subtree of another tree is a two-step process, where the order is critical:
- Send a
TreeUpdatefor the parent tree which includes aNodewith atree_idvalue equal to theTreeIdof the child tree. ThisNodebecomes a graft node for the subtree. - Send a
TreeUpdatefor the child tree with the matchingtree_idvalue.
Any TreeUpdate with a tree_id value other than TreeId::ROOT MUST be preceded by a TreeUpdate containing a Node with the same tree_id value; otherwise, the AccessKit adapter consuming the TreeUpdate will panic.

Adapters
Nodes and TreeUpdates allow an application to describe a platform-independent accessibility tree.
Adapters map between this platform-independent representation and the various platform-specific accessibility APIs.
Typically, an adapter will provide a method which takes a TreeUpdate, and uses the accesskit_consumer API to update an in-memory tree which can be queried via platform APIs, triggering the appropriate notifications to the API as it does so.
AccessKit provides platform-specific adapters for Linux, macOS and Windows, as well as a cross-platform accesskit_winit adapter which can be used by projects using the winit cross-platform windowing library.
accesskit_winit pulls in the respective platform-specific adapters under the hood.
Actions
Finally, AccessKit provides an ActionRequest type for relaying user actions from assistive technology back to the application in a platform-independent way.
Adapters provide hooks for the application to be notified of action requests, so that they can handle user actions.
Servo accessibility for embedders
Activating accessibility for a WebView
The entry point for activating accessibility is WebView::set_accessibility_active().
This will return a randomly-generated TreeId, which will remain stable for the lifetime of the WebView.
The WebView’s TreeId can also be accessed via the accesskit_tree_id() method.
Important
The
WebView’sTreeIdmust be used to create a graft node in the embedder’s application tree by sending aTreeUpdateto the AccessKit Adapter including a node with atree_idvalue corresponding to the WebView’sTreeId, before anyTreeUpdates are forwarded to AccessKit from the WebView.
Once accessibility is active for the WebView, it will begin to emit TreeUpdates via the WebViewDelegate::notify_accessibility_tree_update() method.
Once the graft node has been created, these TreeUpdates can be forwarded directly to the AccessKit adapter.
The WebView will continue to emit TreeUpdates for any change to its accessibility tree until either its set_accessibility_active() method is used to deactivate the accessibility tree, or its lifetime ends.
Accessibility tree changes will be triggered by navigations within the webview, as well as any changes to the contents of the currently active document.
Servo manages subtrees within the WebView’s accessibility tree; the embedder only needs to ensure that there is a graft node for the WebView in its top-level tree, and that Servo’s TreeUpdates are sent to the adapter in the order in which they are emitted from Servo.

Note
The updates from the
WebVieware currently one-way: we don’t yet supportActionRequests.
Per-WebView accessibility activation was added in #42309.
WebView accessibility internals
As described in the Servo accessibility for embedders section, the Servo accessibility system is exposed to embedders on a per-WebView basis.
The WebView has a minimal tree of its own, which essentially exists to provide a graft node for its top-level Pipeline’s accessibility tree.
The tree for the pipeline is generated based on its document’s structure by layout::AccessibilityTree.
This tree is created when accessibility is activated for the pipeline, and updated each time the document is reflowed.
Any changes to the tree are captured in a TreeUpdate, which is sent to the embedder.
Note
We currently don’t support accessibility trees in IFrames.
WebView subtree
Each WebView has a minimal tree consisting of a ScrollView and a graft node for the top-level pipeline (i.e. the top-level document).
#43029 first introduced the minimal tree for WebViews.
A TreeUpdate with an updated graft node is emitted when accessibility is activated for the WebView, and when the WebView navigates to another top-level Document, causing its top-level Pipeline to change.

#43556 first introduced the graft node between the WebView and the document.
Accessibility activation
When an embedder calls set_accessibility_active(true) on a WebView, the WebView assumes responsibility for ensuring that until accessibility is deactivated or the WebView is destroyed, the embedder will receive TreeUpdates representing the WebView and its current contents at any given time.
In order to do this, it needs to activate accessibility in its top-level Pipeline both immediately, and whenever the top-level Pipeline changes.
It also de-activates accessibility in any inactive pipelines (i.e. any pipelines which don’t correspond to a Document currently being shown, but which are retained by the back/forward cache).
The basic initial flow is:
- The embedder application calls
set_accessibility_active(true)on theWebView.- This causes the
WebViewto randomly generate and store aTreeIdfor itself, which will remain consistent for the life of theWebViewor untilset_accessibility_active(false)is called.
- This causes the
- The
WebViewsends aEmbedderToConstellationMessage::SetAccessibilityActive()message to notify the constellation that accessibility should be activated for its top-level pipeline. - The constellation sends a
ScriptThreadMessage::SetAccessibilityActive()message to notify the script thread that accessibility should be activated for the specified pipeline. - The script thread calls
set_accessibility_active()on the pipeline’sLayoutThread. - On the next reflow, the
LayoutThreadgenerates an initialTreeUpdatefor its accessibility tree, and sends anEmbedderMsg::AccessibilityTreeUpdate()message with the tree update. - The
WebViewretrieves theTreeUpdate’stree_idand stores it in itsgrafted_accesskit_tree_idfield. It then generates aTreeUpdaterepresenting its own minimal tree with the graft node’stree_idset to thegrafted_accesskit_tree_id, and passes thisTreeUpdateto itsWebViewDelegate’snotify_accessibility_tree_update()method. - Once the graft node has been updated, the
WebViewcan then callnotify_accessibility_tree_update()again to forward the web contents’TreeUpdatebuilt in step 5.
Important
The
WebViewmust send theTreeUpdateupdating its graft node before it forwards the firstTreeUpdatefrom the pipeline in order to avoid a panic, due to the ordering requirements for subtree grafting.
After accessibility has been activated on the pipeline, it will continue to send TreeUpdates to the WebView.
After the first, there’s no need to send a separate TreeUpdate for the WebView’s tree; the TreeUpdates from the pipeline can be passed directly to notify_accessibility_tree_update().
Handling navigations: grafted tree epoch
When there is a navigation, such as when a user enters a new URL in the address bar, clicks a link, or uses the Back or Forward buttons, the WebView’s top-level pipeline changes.
This means that it needs to:
- de-activate accessibility in the old top-level pipeline,
- activate accessibility in the new top-level pipeline,
- graft the tree for the new pipeline in place of the tree for the old pipeline,
- begin forwarding the tree updates from the new pipeline, and
- ignore any further tree updates from the old pipeline.
We manage this by tracking an Epoch which is incremented every time the top-level pipeline changes.
This epoch is passed from the Constellation, where the top-level pipeline is set, to ScriptThreadMessage::SetAccessibilityActive() along with the PipelineId.
It’s then sent back to the WebView in EmbedderMsg::AccessibilityTreeUpdate(), so that the WebView can check this against its existing grafted_accesskit_tree_epoch.
- If the epoch hasn’t changed, the
TreeUpdatecan simply be forwarded to the embedder. - If the epoch is greater than the existing
grafted_accesskit_tree_epoch, that indicates that a new tree needs to be grafted, and the epoch value needs to be updated. - If the epoch is less than the existing
grafted_accesskit_tree_epoch, theTreeUpdateshould be ignored.
Important
If the
TreeUpdatewith a stale epoch was forwarded to the embedder, it could cause a panic, as it would contain aTreeIdwhich is no longer grafted in theWebView’s tree.

Note
Only the current document needs to be in the platform’s accessibility tree. Updating the
WebView’s graft node to graft in the tree for the current document will (correctly) cause the previously active document to be removed from the platform’s accessibility tree. If and when the user navigates back to a previously-viewed document, the graft node will be updated again to graft in the accessibility tree for that document.However, deactivating accessibility in inactive pipelines means we destroy all of the accessibility tree information cached in layout for that pipeline. This means that even if the user navigates in the session history, we will always need to re-compute all accessibility data whenever a navigation occurs. Issue #46471 proposes retaining accessibility data instead.
The pipeline epoch was introduced in #42388.
Deterministic TreeId generation for Pipelines
We have a deterministic mapping from a PipelineId to accesskit::TreeId, implemented using the Uuid::new_v5() method, using a static namespace value combined with the pipeline ID.
This was implemented to allow immediately sending a TreeUpdate updating the WebView’s graft node without needing to wait for a message to return from the pipeline.
However, now we update the graft node immediately after receiving the first TreeUpdate from the new pipeline, which also includes the tree id.
We expect it will be still useful when implementing IFrame support: we would only need to have the pipeline ID for the embedded frame to turn the <iframe> element into a graft node.
See #43012 for more discussion of the design.
Generating accessibility trees for web content: layout::accessibility_tree
We generate and update the accessibility tree for a single pipeline (i.e. a single web page being rendered) as part of the reflow routine. This allows us to ensure that all layout information is up to date before updating the accessibility tree, that the tree is updated whenever any DOM mutations and/or style recalculations have occurred, and that DOM mutations are prevented from occurring while the tree is being updated.
The logic for generating and updating the accessibility tree lives in layout::accessibility_tree.
This module includes:
AccessibilityTree, representing the current state of the accessibility tree and the logic to update the tree based on the current document stateAccessibilityNode, representing a single node in the accessibility tree and the logic to update it based on its corresponding DOM nodeAccessibilityUpdate, representing the in-progress update pass, and yielding theTreeUpdatewhen the update is complete.
Our aspirational goal is to make updating the accessibility tree fast enough that users won’t notice any performance degradation when accessibility is active.
The accessibility tree lives in the layout crate because accessibility tree building depends on data from both the DOM tree and the outputs of layout.
Activating accessibility for a pipeline
When the ScriptThread receives the ScriptThreadMessage::SetAccessibilityActive message for a pipeline, it locates the Document for that pipeline, and calls the set_accessibility_active() method on its LayoutThread.
This causes the LayoutThread to:
- toggle its
accessibility_activeflag, - create an instance of
AccessibilityTreewhich is stored in itsaccessibility_treefield, and - set its
needs_accessibility_updateflag, which marks it as needing the accessibility tree to be updated in the next reflow.
Even if no reflow is otherwise required, setting the needs_accessibility_update flag will ensure a rendering update occurs, as it is checked in Document’s needs_rendering_update() method, and LayoutThread’s can_skip_reflow_request_entirely() method.
For example, if you loaded a static web page in servoshell, waited until the load and rendering the page were complete, and then started an assistive technology to activate accessibility, this would ensure that layout would run even though there would otherwise be no reason to run layout.
That ensures the accessibility tree will be populated regardless of whether a layout is required otherwise.
When the next reflow occurs, if the LayoutThread’s accessibility_tree exists, the accessibility tree update occurs as a phase after all the other phases in handle_reflow().
This primarily consists of calling the update_tree() method on AccessibilityTree, which returns an accesskit::TreeUpdate.
The TreeUpdate is emitted back to the embedder via EmbedderMessage::AccessibilityTreeUpdate, where the WebView can forward it to the embedding application via WebViewDelegate::notify_accessibility_tree_update(). (See WebView accessibility internals for more information on how TreeUpdates are processed in WebView.)
AccessibilityTree
AccessibilityTree represents the state of the accessibility tree as of the last reflow for a particular Document, and encapsulates the logic to update the tree based on the current document state and produce an accesskit::TreeUpdate which can be forwarded to embedders.
Updating the tree: AccessibilityTree::update_tree()
Each time a reflow occurs, LayoutThread will check its needs_accessibility_update flag, and if it is set will call the update_tree() method on its accessibility_tree.
update_tree() creates a new AccessibilityUpdate to track data relating to the update pass, updates its root_node_id if necessary, and then updates itself based on data from the DOM.
AccessibilityUpdate
Methods in AccessibilityTree which can mutate the tree, such as get_or_create_node() and drop_removed_nodes(), take an AccessibilityUpdate in order to track what changes were made.
If an AccessibilityNode is changed in any way, it is added to the AccessibilityUpdate’s changed_nodes set.
This set is used to produce the accesskit::TreeUpdate when the AccessibilityUpdate is finalized.
Initial tree construction
The first time update_tree is called on the accessibility tree, its nodes map is empty and needs to be populated from the DOM tree.
This will produce an initial accesskit::TreeUpdate to populate the tree on the AccessKit side.
ensure_root_node() will create the root node for the accessibility tree based on the root DOM node.
Since the root node is newly created, its corresponding DOM node gets pushed into the damage_from_dom structure with AccessibilityDamage::Rebuild, ensuring it will be completely populated from the DOM tree, including populating its children.
apply_changes_from_dom_tree() takes the damage_from_dom structure with the root DOM node marked as Rebuild (and potentially other DOM nodes marked with various damage, although since all nodes will be newly created any damage from the DOM tree is irrelevant).
This method will then call into update_node_and_descendants_from_dom_node() for the root node.
update_node_and_descendants_from_dom_node() populates the root node in two steps:
- First
AccessibilityNode::update_node_from_dom_node()populates the node’s local properties, such as its role. - Second,
AccessibilityNode::update_descendants_from_dom_node()populates the node’s children - recursively calling intoAccessibilityTree::update_node_and_descendants_from_dom_node()for each new child.
Some properties of accessibility nodes, such as some nodes’ computed names, are dependent on other information in the accessibility tree and can only be computed after that information is populated from the DOM tree.
We track changes to nodes which may cause these properties to need recomputation by tracking propagating LocalAccessibilityDamage within the tree.
“Local” in this context differentiates this type of damage from AccessibilityDamage which comes from the DOM tree.
As the tree is populated from the DOM tree via update_node_and_descendants_from_dom_node(), the AccessibilityUpdate keeps track of any LocalAccessibilityDamage for each node.
After the updates from the DOM tree have finished, LocalAccessibilityDamage is propoagated within the tree.
Finally, LocalAccessibilityDamage tracked in the AccessibiltyUpdate is consumed in AccessibilityTree::resolve_local_damage_for_node_and_subtree(), starting from the root node.
This method first calls into AccessibilityNode::update_node_local() to resolve the local damage on the node, and then recurses into the node’s children if necessary.
Finally, after these three update phases (creating the root node, populating it recursively from the DOM tree, and computing properties which are based on the populated accessibility tree) are complete, the AccessibilityUpdate is finalize()d, producing the initial accesskit::TreeUpdate for the tree.
Incremental updates
Calls to update_tree() after the tree has been populated for the first time follow the same basic flow, but with differences resulting from the tree already being populated.
Typically, calls to ensure_root_node() after the tree has been populated will essentially be a no-op, since there will already be a node associated with the root DOM node.
The damage_from_dom argument to update_tree() should now contain pairs of corresponding ServoLayoutNodes and AccessibilityDamage values.
These are collected in between reflows on the Document’s AccessibilityData, and passed in to the reflow method via ReflowRequest.
The damage_from_dom structure is passed (as previously) to apply_changes_from_dom_tree(), where it now allows us to update only nodes whose corresponding DOM nodes have changed since the last tree update.
Any nodes which have been added to the DOM tree since the last accessibility update will be picked up due to a parent node having a Children damage value; from there, any new nodes will be populated recursively the same way the root node is in the initial update.
Dropping nodes from the AccessibilityTree: TreeChange
Once the tree update is complete, any AccessibilityNode which is no longer in the tree is dropped.
This happens in the AccessibilityTree::drop_removed_nodes() method, which consumes parts of the AccessibilityUpdate during finalize().
drop_removed_nodes() is called at the end of the update so that we can distinguish between a node which has been removed from its parent node because it was moved elsewhere in the tree, and a node which has been removed from the tree altogether.
We determine which nodes to drop using the AccessibilityUpdate’s tree_changes map, which tracks what nodes have been added to, removed from and moved within the tree during the current update pass.
Tree changes are determined based on updates to parent nodes:
- If a DOM node has a child which hasn’t yet been added to the tree, that node will be created when
get_or_create_node()is called, and it will be tracked asTreeChange::New- A node which is
Newin a particular update can never beMovedorRemovedin the same update.
- A node which is
- If a DOM node has a child which was previously the child of a different node, the child node will be tracked as
TreeChange::PendingMove, orMovedif it was previously tracked asRemoved. - If a DOM node no longer has a child which it had previously, that child node will be tracked as
TreeChange::Removed, orMovedif it was previously tracked asPendingMove.
For a node to be tracked as Moved, it must be both removed from its old parent and added to its new parent in the same update pass, in either order.
When tree_changes is processed by AccessibilityTree::drop_removed_nodes() during finalization, any nodes in the subtree of a node with Removed status will be dropped from the tree’s nodes.
Any nodes which still have a PendingMove status at this point will cause a panic, as this would mean that they have been added to their new parent without being removed from their old parent.
(TODO) Ensuring AccessibilityNodes don’t outlive their corresponding DOM nodes
// TODO: write
Compositor
TODO: See https://github.com/servo/servo/blob/main/components/compositing/compositor.rs
Canvas
Servo supports four types of canvas context:
CanvasRenderingContext2D(2dcontext)WebGLRenderingContext(webglcontext)WebGL2RenderingContext(webgl2context)GPUCanvasContext(webgpucontext)
Each canvas context implements the CanvasContext trait, which requires contexts to implement some common features in a unified way:
context_idresize: this method clears the painter’s image by setting it to transparent alpha (all bytes are zero)get_image_data: used when obtaining the canvas image, usually by callingtoDataUrl,toBlob,createImageBitmapon the canvas or indirectly by drawing one canvas in anotherupdate_the_rendering: for triggering update of image (usually by swapping screen-buffer and back-buffer)canvas: obtain connected canvas element (this can beHTMLCanvasElementorOffscreenCanvas, which can also be connected toHTMLCanvasElementwith context set toplaceholder) while also providing some good default implementations (onscreen,origin_is_clean,size,mark_as_dirty).mark_as_dirtyis called from functions that affect the painter’s image and tells layout to rerender the canvas element (by markingHTMLCanvasElementas dirty node).
HTML event loop and rendering
flowchart TB
    subgraph Content Process
        subgraph Script flow
            JS-->utr[Update the rendering]-->Layout
        end
    end

    subgraph Main Process
        subgraph Painters
            WGPU[WGPU thread]
            WEBGL[WebGL thread]
            CPT[Canvas Paint Thread]
        end

        %% actual update in painters
        Painters--CreateImage-->Compositor
        Painters--UpdateImage-->Compositor

        Compositor-->WR

        WR[WebRender]--lock,unlock-->Painters
    end

    %% init canvas
    JS--create context-->Painters--ImageKey, CanvasId-->JS

    %% update canvas rendering
    utr<--Update rendering-->Painters

    %% rendering
    Layout--DisplayList (contains ImageKey)-->Compositor
As part of the HTML event loop, the script thread runs a task (parsing, script evaluating, callbacks, events, …) and after that it performs a microtask checkpoint that drains the microtasks queue.
In the window event loop we queue a global task to update the rendering if there is a rendering opportunity (usually driven by compositor based on hardware refresh rate).
In Servo, we do not actually queue a task, but instead we run update the rendering after any IPC messages in the ScriptThread and then perform a microtask checkpoint too as the event loop would have done after a task is completed.
Update the rendering does various resize, scroll and animations steps (which also includes performing a microtask checkpoint to resolve outstanding promises) and then run the animation frame callbacks (callbacks added with requestAnimationFrame).
At this point draw commands are issued to painters to create a new frame of animation.
Finally, we trigger reflow (layout), which first updates the rendering of canvases (by flushing dirty canvases) and animated images, then traverses the DOM and its styles, builds a DisplayList, and sends that to WebRender for rendering.
When canvas context creation is requested (canvas.getContext('2d')), the script thread blocks on the painter thread as it initializes and creates a new WebRender image (CreateImage), finally sending the associated ImageKey back to script.
sequenceDiagram
    Script->>Constellation: Create Context
    Constellation->>Painter: Create Context

    Painter->>Compositor: GenerateImageKey
    Compositor->>WebRender: GenerateImageKey

    opt
        Painter<<->>Compositor: ExternalImageId
    end

    WebRender->>Compositor: ImageKey
    Compositor->>Painter: ImageKey

    Painter->>Compositor: CreateImage
    Compositor->>WebRender: CreateImage

    Painter->>Script: PainterIPCSender, ImageKey, CanvasId
Each canvas context implements LayoutCanvasRenderingContextHelpers, which returns the ImageKey that layout will use in its DisplayList, or None if the canvas is cleared or otherwise not paintable due to its size.
WebRender will read the resultant image data when rendering, based on the provided ImageKey.
In WebGL and WebGPU painters this is done by implementing a custom WebrenderExternalImageApi; this provides lock and unlock methods for WebRender to obtain the actual image data.
For 2D canvases, image data is directly provided via CreateImage and UpdateImage IPC messages.
sequenceDiagram
    Script->>Painter:Update rendering (flush)
    Painter->>Compositor:UpdateImage
    Compositor->>WebRender: UpdateImage
    opt
        Painter->>Script: Done
    end

    Note over Script: Layout
    Script->>Compositor: DisplayList
    Compositor->>WebRender: DisplayList
    opt
        Compositor<<->>WebRender: Query ExternalImage Registery
        WebRender->>+Painter: lock ExternalImage
        WebRender->>Painter: unlock ExternalImage
        deactivate Painter
    end
2D canvas context
flowchart LR
    CanvasRenderingContext2d --- HTMLCanvasContext
    subgraph OffscreenCanvasRenderingContext2D
        subgraph CanvasRenderingContext2d
            CS'[CanvasState]
        end
    end
    OffscreenCanvasRenderingContext2D --- OffscreenCanvas
    PaintRenderingContext2D --- PaintWorklet
    subgraph PaintRenderingContext2D
        CS''[CanvasState]
    end
While most canvases use the same DOM type for their onscreen and offscreen contexts, this is not the case for 2D canvases due to their long history. Web standards define three types of 2D canvas context:
CanvasRenderingContext2D(connected toHTMLCanvasContext)OffscreenCanvasRenderingContext2D(connected toOffscreenCanvas)PaintRenderingContext2D(only available inPaintWorklet)
CanvasRenderingContext2D and PaintRenderingContext2D are implemented as wrappers around CanvasState, while OffscreenCanvasRenderingContext2D is implemented as a wrapper around CanvasRenderingContext2D because of similar logic to avoid duplication.
flowchart LR
    HTMLCanvasElement --getContext('2d')--> CanvasRenderingContext2d
    CanvasRenderingContext2d --strokeRect--> CanvasState
    CanvasState --IPC
    strokeRect--> CanvasPaintThread
    CanvasPaintThread --Done--> CanvasState
CanvasState implements the actual logic of 2D drawing, by setting appropriate state and sending IPC messages to the Canvas Paint Thread.
Some commands only change internal state, but don’t need to send any messages until there is an actual draw command.
All “dirty” 2d canvases are stored in Document and are flushed during reflow, by sending IPC messages that trigger the update_the_rendering method on each canvas.
When drawing one 2D canvas into another 2D canvas, we send DrawImageInOther, a special IPC message that avoids copying the bitmap out of the canvas paint thread.
WebGL canvas context
flowchart LR
    WebGLRenderingContext --- c["HTMLCanvasElement
    OffscreenCanvas"]
    subgraph WebGL2RenderingContext
        WebGLRenderingContext
    end
WebGL(2) canvas contexts are WebGLRenderingContext or WebGL2RenderingContext, and in Servo WebGL2RenderingContext wraps and extends WebGLRenderingContext.
These contexts store state and send IPC messages to the WebGL thread, which executes actual OpenGL (or OpenGL ES) commands and returns results via IPC.
The script thread blocks on the WebGL thread, waiting for each operation to complete.
All “dirty” WebGL canvases are stored in Document and are flushed as part of reflow, by sending one IPC message containing all dirty context ids, then blocking on the WebGL thread until all canvases are flushed.
Flushing swaps the framebuffer, where one is for presentation (that is read by WebRender) while the other is used for drawing as the target of GL commands.
WebGPU canvas context
WebGPU presentation is the most special as it is fully async (non-blocking). More info about how async is done in WebGPU can be read in the WebGPU chapter.
sequenceDiagram
    loop Context Creation
        Script->>WGPU: CreteContext
        WGPU->>WebRender: CreateImage
        WebRender->>WGPU: ImageKey
        WGPU->>Script: ImageKey
    end

    alt animation Callback
        Note over Script: getCurrentTexture
        Script-)WGPU:CreateTexture
        activate Script
        Note over Script: draw operations into current texture
    else update the rendering
    Note over Script: expire current texture
        Script-)WGPU:SwapchainPresent
        WGPU-)WGPU: Copy texture to one of staging buffer
        WGPU-)+WGPU poller: Map stagging buffer to CPU as GPUPresentationBuffer
        opt presentationId is newer than existing
            WGPU poller -)-WebRender: UpdateImage
        end
        WGPU poller -)WGPU poller: Unmap GPUPresentationBuffer

        Script-)WGPU:DestroyTexture
        deactivate Script

    end
    loop rendering
        WebRender<<->>+WGPU: lock ExternalImage and read GPUPresentationBuffer
        WebRender->>WGPU: unlock ExternalImage
        deactivate WGPU
    end
All onscreen WebGPU contexts have their update_the_rendering executed as part of updating the rendering in the HTML event loop.
This expires (destroys) the current texture, but before that we send a SwapChainPresent request, which copies texture data into one of 10 presentation buffers on the GPU.
After copying is done, we async map the new buffer to CPU.
Because this process is async, we mark each presentation buffer with an incrementing u64 id, and only replace the active presentation buffer if our buffer’s id is newer.
The inactive presentation buffer gets unmapped.
flowchart TD
    S[Staging Presentation Buffer] --copy_texture_to_buffer, mapAsync-->
    Mapping --mapAsync done-->
    UpdateWR --yes-->
    Mapped[Mapped, Unmapped old]

    UpdateWR--else unmap-->S
This is also modeled in TLA+: https://gist.github.com/gterzian/aa5d96a89db280017b04917eee67f6ac
Both WebRender’s lock and get_image_data will use content of the active presentation buffer.
Resources
- https://medium.com/@polyglot_factotum/fixing-servos-event-loop-490c0fd74f8d
- Update the rendering of canvas (#35733)
- webgpu: renovate gpucanvascontext and webgpu presentation to match the spec (#33521)
- webgpu: Fix HTML event loop integration (#34631)
- webgpu: Introduce PresentationId to ensure updates with newer presentation (#33613)
- webgpu: Make uploading data to wr with less copies (#33368)
How WebXR works in Servo
Terminology
Servo’s WebXR implementation involves three main components:
- The script thread (runs all JS for a page)
- The WebGL thread (maintains WebGL canvas data and invokes GL operations corresponding to WebGL APIs)
- The compositor (AKA the main thread)
Additionally, there are a number of WebXR-specific concepts:
- The discovery object (i.e. how Servo discovers if a device can provide a WebXR session)
- The WebXR registry (the compositor’s interface to WebXR)
- The layer manager (manages WebXR layers for a given session and frame operations on those layers)
- The layer grand manager (manages all layer managers for WebXR sessions)
Finally, there are graphics-specific concepts that are important for the low-level details of rendering with WebXR:
- Surfman is a crate that abstracts away platform-specific details of OpenGL hardware-accelerated rendering.
- A surface is a hardware buffer that is tied to a specific OpenGL context.
- A surface texture is an OpenGL texture that wraps a surface. Surface textures can be shared between OpenGL contexts.
- A surfman context represents a particular OpenGL context, and is backed by platform-specific implementations (such as EGL on Unix-based platforms).
- ANGLE is an OpenGL implementation on top of Direct3D which is used in Servo to provide a consistent OpenGL backend on Windows-based platforms.
How Servo’s compositor starts
The embedder is responsible for creating a window and triggering the rendering context creation appropriately. Servo creates the rendering context by creating a surfman context which will be used by the compositor for all web content rendering operations.
How a session starts
When a webpage invokes navigator.xr.requestSession(..) through JS, this corresponds to the XrSystem::RequestSession method in Servo.
This method sends a message to the WebXR message handler that lives on the main thread, under the control of the compositor.
The WebXR message handler iterates over all known discovery objects and attempts to request a session from each of them. The discovery objects encapsulate creating a session for each supported backend.
As of July 19, 2024, there are three WebXR backends:
- headless - supports a window-less, device-less device for automated tests
- glwindow - supports a GL-based window for manual testing in desktop environments without real devices
- openxr - supports devices that implement the OpenXR standard
WebXR sessions need to create a layer manager at some point in order to be able to create and render to WebXR layers. This happens in several steps:
- Some initialization happens on the main thread
- The main thread sends a synchronous message to the WebGL thread
- The WebGL thread receives the message
- Some backend-specific, graphics-specific initialization happens on the WebGL thread, hidden behind the layer manager factory abstraction
- The new layer manager is stored in the WebGL thread
- The main thread receives a unique identifier representing the new layer manager
This cross-thread dance is important because the device performing the rendering often has strict requirements for the compatibility of any WebGL context that is used for rendering, and most GL state is only observable on the thread that created it.
How an OpenXR session is created
The OpenXR discovery process starts at OpenXrDiscovery::request_session. The discovery object only has access to whatever state was passed in its constructor, as well as a SessionBuilder object that contains values required to create a new session.
Creating an OpenXR session first creates an OpenXR instance, which allows configuring which extensions are in use. There are different extensions used to initialize OpenXR on different platforms; for Windows the XR_KHR_D3D11_enable extension is used since Servo relies on ANGLE for its OpenGL implementation.
Once an OpenXR instance exists, the session builder is used to create a new WebXR session that runs in its own thread. All WebXR sessions can either run in a thread or have Servo run them on the main thread. This choice has implications for how the graphics for the WebXR session can be set up, based on what GL state must be available for sharing.
OpenXR’s new session thread initializes an OpenXR device, which is responsible for creating the actual OpenXR session. This session object is created on the WebGL thread as part of creating the OpenXR layer manager, since it relies on sharing the underlying GPU device that the WebGL thread uses.
Once the session object has been created, the main thread can obtain a copy and resume initializing the remaining properties of the new device.
WebGPU
Servo’s WebGPU implementation is powered by wgpu(-core), and is composed of two parts:
- DOM implementation
- WGPU implementation
flowchart LR
    subgraph Content Process
        Script[Script Thread]
    end

    subgraph Main Process
        WGPU[WGPU thread]
        poller[WGPU poller]
        WebRender
        Constellation
    end

    %% init
    Script--RequestAdapter-->Constellation
    Constellation--RequestAdapter/WebRender-->WGPU
    Script--WebGPURequest-->WGPU
    WGPU--Adapter/WebGPU chan-->Script

    %% normal operation
    WGPU--token(), wake()-->poller
    WGPU--Create/Update Image-->WebRender
    WGPU--WebGPUResponse/WebGPUMsg-->Script
DOM implementation
DOM implementation lives in components/script/dom/webgpu, implementing JS interfaces defined in WebGPU IDL that are exposed to the web platform.
Here we only implement logic that is described in the WebGPU spec under the content timeline. This mostly involves converting JS types to wgpu-types descriptors that are sent to WGPU thread via IPC messages that are defined in https://github.com/servo/servo/blob/main/components/shared/webgpu/messages/recv.rs. WebGPU is async by design, so there is no need to wait for WGPU thread operations to finish. This is done by storing ids in DOM WebGPU objects that link to WGPU objects that live in the WGPU thread (are provided by wgpu-core). More information about this design is available in the wgpu repo.
WGPU implementation
Actual processing is done in two dedicated threads of the main browser process: one for WGPU, and one for the WGPU poller.
These threads are started lazily on the first request for an adapter.
The WGPU thread implements steps defined in the device timeline, by dispatching wgpu-core functions in response to incoming IPC messages from script.
Some calls also wake the WGPU poller thread, which effectively runs the queue timeline by calling poll_all_devices from wgpu-core.
Updating WebGPU CTS expectations
WebGPU CTS expectations are enormous, so instead of mach update-wpt we use a fork of moz-webgpu-cts to update expectations.
To update expectations, you need to obtain the wptreport log for the run, either by triggering a full CTS run in CI (mach try webgpu) or by running specific tests locally:
$ mach test-wpt -r --log-wptreport report.json [tests ...]
Note that expectations are set for release and production builds, as debug builds are too slow. Then update expectations as follows:
$ moz-webgpu-cts --servo process-reports --preset set report.json
You can also test Servo against the live CTS:
$ mach run -r --pref dom.webgpu.enabled 'https://gpuweb.github.io/cts/standalone/?runnow=1&q=<test>'
Currently, we have several flaky tasks with webgpu:shader,execution,expression which is tracked in #31397.
They can be ignored if they appear in unexpected result of your try runs.
Working on upstream gfx-rs/wgpu
Servo can be used to test wgpu changes against the WebGPU CTS as follows:
- Update wgpu in Servo’s Cargo.toml to the latest commit (optional, but recommended if Servo is out of date)
- Base your wgpu changes on the same wgpu commit used by Servo
- Update wgpu in Servo’s Cargo.toml to the branch with your changes
- Test your changes by triggering a full CTS run:
mach try webgpu - Include a link to the test results in your wgpu pull request
More resources
The Servodriver test harness
Servodriver is a test harness built on top of the wptrunner framework and a WebDriver server.
It is not yet enabled by default, but can be run with the --product servodriver argument appended to any test-wpt command.
Servodriver is made of three main components: the Python test harness that orchestrates the browser, the web server inside Servo that implements the WebDriver specification, and the scripts that are loaded inside the test pages.
The wptrunner harness
Wptrunner is the harness that uses an executor and browser combination to launch a supported product.
The browser defines Python classes to instantiate and methods to invoke for supported configurations, as well as arguments to pass to the Servo binary when launching it.
It delegates all WebDriver-specific logic to the base WebDriverBrowser class, which is common to all browsers that rely on WebDriver.
The Servodriver executor defines Servo-specific test initialization, result processing, and inter-test state management. For example, Servo defines WebDriver extension methods for managing preferences, and these are invoked between tests to ensure that each test runs with our intended configuration.
Our Servodriver executor delegates a lot of logic to the common WebDriverTestharnessExecutor. This executor is responsible for executing the testdriver.js harness and enables the Python harness to retrieve test results from the browser.
Servo’s WebDriver implementation
There are three main components to this implementation: the server handler, the script handler, and the input handler.
Server handler
When wptrunner connects to the WebDriver server in the new Servo instance, it creates a new session.
This session persists state between WebDriver API calls.
API calls that interact with the browser are routed through the constellation as ConstellationMsg::WebDriverCommand, and those that need to interact directly with content inside a document are part of the WebDriverScriptCommand enum.
Many of these APIs require a synchronous response, via an IpcSender channel that Servo’s WebDriver server uses to wait for a response.
However, cases like navigation and executing async scripts involve additional synchronization.
Navigation
When a navigation is requested, the constellation receives an IpcSender that it stores. When a navigation completes, the constellation checks if the pipeline matches the navigation from WebDriver, and notifies the WebDriver server using the original channel.
Async scripts
When an async script execution is initiated, the WebDriver specification provides a way for scripts to communicate a result to the server. The script is invoked as an anonymous function with an additional function argument that sends the response to the server.
Script handler
When a WebDriver message is received that targets a specific browsing context, it is handled by the ScriptThread that contains the active document. The logic for processing each command lives in webdriver_handlers.rs. Any command that returns a value derived from web content must serialize JS values as values that the WebDriver server can convert into API value types.
We expose two web-accessible methods for communicating async results to the WebDriver server: Window.webdriverCallback and Window.webdriverTimeout.
Input handler
When the WebDriver server receives input action commands (e.g. pointer or mouse inputs), it creates an action sequence and progressively dispatches them to the compositor via the constellation. The compositor then handles these events the same way as any input events received from the embedder (modulo known bugs).
The test page scripts
The testdriver harness works by incorporating all of these elements together.
The executor opens a new window and invokes an async script that sets the testdriver callback to Window.webdriverCallback (arguments[arguments.length - 1]).
This window creates a message queue, which is read by the executor harness.
Subsequently, each test that runs is opened as a new window; these windows can then use opener.postMessage to communicate with the original window, which allows the testdriver APIs to send messages that represent WebDriver API calls.
Debugging hints
Always start with the following RUST_LOG:
RUST_LOG=webdriver_server,webdriver,script::webdriver_handlers,constellation
This usually makes it clear if the expected API calls are being processed.
When debugging input-related problems, add JS debugging lines that log the getBoundingClientRect() of whatever element is being clicked, then compare the coordinates received by the compositor when clicking manually vs the coordinates received from the WebDriver server.
Android app architecture
The implementation of the Android app is divided into a number of components:
- the shared Android/OpenHarmony implementation of
servoshell(ports/servoshell/egl) - the Android-specific
servoshellintegration (ports/servoshell/egl/android.rs) - the main Android activity (
support/android/apk/servoapp/src/main/java/org/servoshell) - the ServoView component (
support/android/apk/servoview/src/main/java/org/servo/servoview)- the Android SurfaceView (
ServoView.java) - the Servo engine wrapper (
Servo.java) - the JNI servoshell integration (
JNIServo.java)
- the Android SurfaceView (
Control flow
Embedder -> Servo
Events that start inside the app are either initiated by the native app UI (eg. loading a URL) or as part of the Servo view (eg. a touch input). All native app UI is defined in the main activity and uses the public API of the ServoView component to interact with the underlying Servo instance.
The ServoView is responsible for coordinating between two threads-the GL thread that’s running the actual Servo instance, and the UI thread. It is also responsible for forwarding input events to the engine and reacting to platform events like surface resizing.
Servo -> Embedder
Events that start inside the engine need to reach various layers of the embedding app.
The lowest level is the Servo engine wrapper, which implements a JNIServo.Callbacks interface.
These callbacks allow the engine wrapper to trigger callbacks in the UI and GL threads according to the action that needs to occur.
Actions that take place in the UI thread include showing a prompt and triggering the onscreen keyboard, while GL thread actions include spinning the Servo event loop and performing GL rendering operations.
The Servo component exposes a Client interface for the UI thread actions, enabling communication with the highest layers of the embedding application.
JNI integration
Every native member of the JNIServo class is implemented in the android.rs file as a #[unsafe(no_mangle)] function with a matching name.
The jni-rs crate documentation has more information on this integration.
Docs for older versions
Some parts of this book may not apply to older versions of Servo.
If you need to work with a very old version of Servo, you may find these docs helpful:
- README.md
- CONTRIBUTING.md
- docs/COMMAND_LINE_ARGS.md
- docs/HACKING_QUICKSTART.md
- docs/ORGANIZATION.md
- docs/STYLE_GUIDE.md
- docs/debugging.md
- docs/glossary.md
- docs/components/style.md
- docs/components/webxr.md
- tests/wpt/README.md
- Building Servo (on the wiki)
- Building for Android (on the wiki)
- Design (on the wiki)
- Profiling (on the wiki)
TODO: docs/glossary.md
How to use this glossary
This is a collection of common terms that have a specific meaning in the context of the Servo project. The goal is to provide high-level definitions and useful links for further reading, rather than complete documentation about particular parts of the code.
If there is a word or phrase used in Servo’s code, issue tracker, mailing list, etc. that is confusing, please make a pull request that adds it to this file with a body of TODO.
This will signal more knowledgeable people to add a more meaningful definition.
Glossary
Compositor
The thread that receives input events from the operating system and forwards them to the constellation. It is also in charge of compositing complete renders of web content and displaying them on the screen as fast as possible.
Constellation
The thread that controls a collection of related web content. This could be thought of as an owner of a single tab in a tabbed web browser; it encapsulates session history, knows about all frames in a frame tree, and is the owner of the pipeline for each contained frame.
Display list
A list of concrete rendering instructions. The display list is post-layout, so all items have stacking-context-relative pixel positions, and z-index has already been applied, so items later in the display list will always be on top of items earlier in it.
Layout thread
A thread that is responsible for laying out a DOM tree into layers of boxes for a particular document. Receives commands from the script thread to lay out a page and either generate a new display list for use by the renderer thread, or return the results of querying the layout of the page for use by script.
Pipeline
A unit encapsulating a means of communication with the script, layout, and renderer threads for a particular document. Each pipeline has a globally-unique id which can be used to access it from the constellation.
Renderer thread (alt. paint thread)
A thread which translates a display list into a series of drawing commands that render the contents of the associated document into a buffer, which is then sent to the compositor.
Script thread (alt. script task)
A thread that executes JavaScript and stores the DOM representation of all documents that share a common origin.
This thread translates input events received from the constellation into DOM events per the specification, invokes the HTML parser when new page content is received, and evaluates JS for events like timers and <script> elements.